Samsung UN65H6300AF User Manual Ver.1.0 (English) - Page 54
Connecting to a Wireless Internet Network with WPS
 |
View all Samsung UN65H6300AF manuals
Add to My Manuals
Save this manual to your list of manuals |
Page 54 highlights
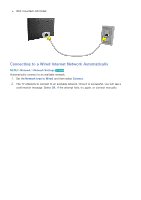
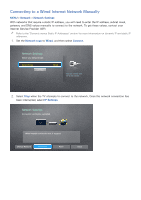
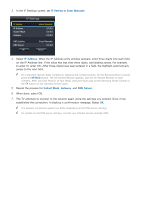
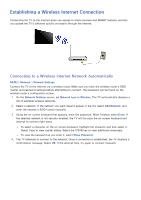
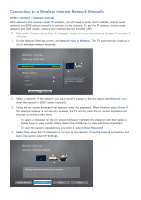
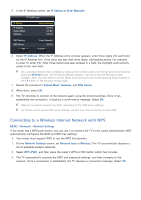
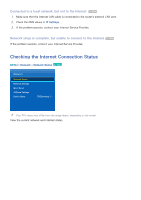
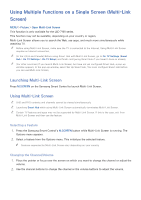
555 In the IP Settings screen, set IP Setting to Enter Manually. IP Settings IP Setting IP Address Subnet Mask Gateway Enter Manually 0.0.0.0 0.0.0.0 0.0.0.0 DNS Setting DNS Server OK Enter Manually 0.0.0.0 Cancel 666 Select IP Address. When the IP Address entry window appears, enter three digits into each field on the IP Address line. If the value has less than three digits, add leading zeroes. For example, to enter 10, enter 010. After three digits have been entered in a field, the highlight automatically jumps to the next field. "" On a standard remote, enter numbers by pressing the number buttons. On the Samsung Smart Control, press the KEYPAD button. The On-Screen Remote appears. Use the On-Screen Remote to enter numbers. After you have filled in all four fields, press the touch pad on the Samsung Smart Control or the E button on the standard remote again. 777 Repeat the process for Subnet Mask, Gateway, and DNS Server. 888 When done, select OK. 999 The TV attempts to connect to the network again using the entered settings. Once it has established the connection, it displays a confirmation message. Select OK. "" Network connection speeds may differ depending on the DNS server settings. "" For details on the correct DNS server settings, contact your Internet service provider (ISP). Connecting to a Wireless Internet Network with WPS MENU > Network > Network Settings If the router has a WPS push button, you can use it to connect the TV to the router automatically. WPS automatically configures the SSID and WPA key settings. ●● Your router must support WPS to use the WPS functionality. 111 On the Network Settings screen, set Network type to Wireless. The TV automatically displays a list of available wireless networks. 222 Select WPS (PBC), and then press the router's WPS or PBC button within two minutes. 333 The TV automatically acquires the SSID and password settings, and then connects to the network. Once a connection is established, the TV displays a connection message. Select OK.
-
 1
1 -
2
-
3
-
4
-
5
-
6
-
7
-
8
-
9
-
10
-
11
-
12
-
13
-
14
-
15
-
16
-
17
-
18
-
19
-
20
-
21
-
22
-
23
-
24
-
25
-
26
-
27
-
28
-
29
-
30
-
31
-
32
-
33
-
34
-
35
-
36
-
37
-
38
-
39
-
40
-
41
-
42
-
43
-
44
-
45
-
46
-
47
-
48
-
 49
49 -
 50
50 -
 51
51 -
 52
52 -
 53
53 -
 54
54 -
 55
55 -
 56
56 -
 57
57 -
 58
58 -
 59
59 -
60
-
61
-
62
-
63
-
64
-
65
-
66
-
67
-
68
-
69
-
70
-
71
-
72
-
73
-
74
-
75
-
76
-
77
-
78
-
79
-
80
-
81
-
82
-
83
-
84
-
85
-
86
-
87
-
88
-
89
-
90
-
91
-
92
-
93
-
94
-
95
-
96
-
97
-
98
-
99
-
100
-
101
-
102
-
103
-
104
-
105
-
106
-
107
-
108
-
109
-
110
-
111
-
112
-
113
-
114
-
115
-
116
-
117
-
118
-
119
-
120
-
121
-
122
-
123
-
124
-
125
-
126
-
127
-
128
-
129
-
130
-
131
-
132
-
133
-
134
-
135
-
136
-
137
-
138
-
139
-
140
-
141
-
142
-
143
-
144
-
145
-
146
-
147
-
148
-
149
-
150
-
151
-
152
-
153
-
154
-
155
-
156
-
157
-
158
-
159
-
160
-
161
-
162
-
163
-
164
-
165
-
166
-
167
-
168
-
169
-
170
-
171
-
172
-
173
-
174
-
175
-
176
-
177
-
178
-
179
-
180
-
181
-
182
-
183
-
184
-
185
-
186
-
187
-
188
-
189
-
190
-
191
-
192
-
193
-
194
-
195
-
196
-
197
-
198
-
199
-
200
-
201
-
202
-
203
-
204
-
205
-
206
-
207
-
208
-
209
-
210
-
211
-
212
-
213
-
214
-
215
-
216
-
217
-
218
 |
 |