HP 2840 HP Color LaserJet 2820/2830/2840 All-In-One - User Guide - Page 93
Sending faxes, To adjust the resolution for the current fax job, To send a fax to one recipient
 |
UPC - 829160742731
View all HP 2840 manuals
Add to My Manuals
Save this manual to your list of manuals |
Page 93 highlights
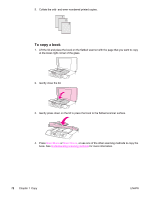
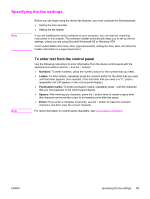
Sending faxes This section describes how to fax a document. Note Note To adjust the resolution for the current fax job 1. On the device control panel, press RESOLUTION to show the current resolution setting. 2. Use the < or the > button to select the appropriate resolution setting. 3. Press ENTER to save the selection. This procedure changes the fax resolution for the current fax job. For instructions about changing the default fax resolution, see Changing the default resolution setting. To change the fax contrast or glass-scan size, you must change the default settings. See Changing the default light/dark (contrast) setting or Changing the default glass-size setting. Note To send a fax to one recipient 1. Dial the fax number by using one of the following methods: Use the alphanumeric buttons on the device control panel to dial the number. If the fax number you are calling has been assigned to a one-touch key, press that key. If the fax number you are calling has a speed-dial entry, press PHONE BOOK, use the alphanumeric buttons to enter the speed-dial entry, and then press ENTER. When dialing by using the alphanumeric buttons, include any pauses or additional numbers that are necessary for the call, such as an area code, an access code for numbers that are outside of a PBX system (usually a 9), or a long-distance prefix. See Using dialing characters for more information. 2. Load the document into the automatic document feeder (ADF) input tray or onto the flatbed scanner. 3. Press START FAX. 4. If you are scanning from the flatbed scanner, press 1 to select YES when Send from glass? 1=Yes 2=No appears, and then press ENTER. 5. Complete one of the following steps: ● If you have more pages to scan, press 1 to select YES, and then repeat step 4 for each page of the fax job. ● If you are finished, press 2 to select NO. When you press NO, the device automatically sends all pages. When the last page of the fax has exited the device, you can start sending another fax, copying, or scanning. To fax to numbers that you use regularly, you can assign a one-touch key or speed-dial entry. See To program speed-dial entries and one-touch keys and To program group-dial entries. If you have electronic phone books available, you might be able to use them to select recipients. Electronic phone books are generated by using third-party software programs. ENWW Sending faxes 77
-
 1
1 -
2
-
3
-
4
-
5
-
6
-
7
-
8
-
9
-
10
-
11
-
12
-
13
-
14
-
15
-
16
-
17
-
18
-
19
-
20
-
21
-
22
-
23
-
24
-
25
-
26
-
27
-
28
-
29
-
30
-
31
-
32
-
33
-
34
-
35
-
36
-
37
-
38
-
39
-
40
-
41
-
42
-
43
-
44
-
45
-
46
-
47
-
48
-
49
-
50
-
51
-
52
-
53
-
54
-
55
-
56
-
57
-
58
-
59
-
60
-
61
-
62
-
63
-
64
-
65
-
66
-
67
-
68
-
69
-
70
-
71
-
72
-
73
-
74
-
75
-
76
-
77
-
78
-
79
-
80
-
81
-
82
-
83
-
84
-
85
-
86
-
87
-
 88
88 -
 89
89 -
 90
90 -
 91
91 -
 92
92 -
 93
93 -
 94
94 -
 95
95 -
 96
96 -
 97
97 -
 98
98 -
99
-
100
-
101
-
102
-
103
-
104
-
105
-
106
-
107
-
108
-
109
-
110
-
111
-
112
-
113
-
114
-
115
-
116
-
117
-
118
-
119
-
120
-
121
-
122
-
123
-
124
-
125
-
126
-
127
-
128
-
129
-
130
-
131
-
132
-
133
-
134
-
135
-
136
-
137
-
138
-
139
-
140
-
141
-
142
-
143
-
144
-
145
-
146
-
147
-
148
-
149
-
150
-
151
-
152
-
153
-
154
-
155
-
156
-
157
-
158
-
159
-
160
-
161
-
162
-
163
-
164
-
165
-
166
-
167
-
168
-
169
-
170
-
171
-
172
-
173
-
174
-
175
-
176
-
177
-
178
-
179
-
180
-
181
-
182
-
183
-
184
-
185
-
186
-
187
-
188
-
189
-
190
-
191
-
192
-
193
-
194
-
195
-
196
-
197
-
198
-
199
-
200
-
201
-
202
-
203
-
204
-
205
-
206
-
207
-
208
-
209
-
210
-
211
-
212
-
213
-
214
-
215
-
216
-
217
-
218
-
219
-
220
-
221
-
222
-
223
-
224
-
225
-
226
-
227
-
228
-
229
-
230
-
231
-
232
-
233
-
234
-
235
-
236
-
237
-
238
-
239
-
240
-
241
-
242
-
243
-
244
-
245
-
246
-
247
-
248
-
249
-
250
-
251
-
252
-
253
-
254
-
255
-
256
-
257
-
258
-
259
-
260
-
261
-
262
-
263
-
264
-
265
-
266
-
267
-
268
-
269
-
270
-
271
-
272
-
273
-
274
-
275
-
276
-
277
-
278
-
279
-
280
-
281
-
282
-
283
-
284
-
285
-
286
-
287
-
288
-
289
-
290
-
291
-
292
-
293
-
294
-
295
-
296
-
297
-
298
-
299
-
300
-
301
-
302
-
303
-
304
-
305
-
306
-
307
-
308
-
309
-
310
-
311
-
312
-
313
-
314
-
315
-
316
-
317
-
318
-
319
-
320
-
321
-
322
-
323
-
324
-
325
-
326
-
327
-
328
-
329
-
330
-
331
-
332
-
333
-
334
 |
 |