| Section |
Page |
| Product information |
17 |
| Model configurations |
18 |
| HP Color LaserJet 4600 Series printer |
18 |
| Printer features |
21 |
| Printer features |
21 |
| Printer assemblies |
25 |
| HP Color LaserJet 4600 models |
25 |
| HP Color LaserJet 4610n printer |
26 |
| HP Color LaserJet 4650 models |
27 |
| Identification, site requirements, and specifications |
29 |
| Model and serial numbers |
29 |
| Power and regulatory label |
30 |
| Site requirements |
30 |
| Space requirements |
32 |
| Physical specifications |
33 |
| Electrical specifications |
33 |
| Environmental specifications |
34 |
| Acoustic emissions |
34 |
| Supply storage requirements |
35 |
| Print media |
36 |
| Print-media specifications |
36 |
| Media to avoid |
38 |
| Media that can cause damage to the printer |
38 |
| Printing on special media |
39 |
| Transparencies |
39 |
| Glossy paper |
40 |
| Colored paper |
40 |
| Printing images |
40 |
| Envelopes |
40 |
| Labels |
41 |
| Heavy paper |
41 |
| HP LaserJet Tough paper |
42 |
| Preprinted forms and letterhead |
42 |
| Recycled paper |
43 |
| Weight equivalence table |
44 |
| Environmental product stewardship program |
45 |
| Protecting the environment |
45 |
| Ozone production |
45 |
| Power consumption |
45 |
| Paper use |
45 |
| Plastics |
45 |
| HP LaserJet printing supplies |
45 |
| HP Printing Supplies Returns and Recycling Program Information |
45 |
| Recycled paper |
46 |
| Material restrictions |
46 |
| For more information |
46 |
| Hewlett-Packard limited warranty statement |
47 |
| Declaration of conformity |
48 |
| Country/region laser safety statements |
50 |
| Canadian DOC regulations |
50 |
| EMI statement (Korea) |
50 |
| VCCI statement (Japan) |
50 |
| Laser Statement for Finland |
51 |
| Japan power-cord statement |
51 |
| Service approach |
53 |
| Service approach |
54 |
| Parts and supplies |
55 |
| Ordering parts, supplies, and accessories over the Internet |
55 |
| Ordering directly through the embedded Web server (for printers with network connections) |
55 |
| Ordering directly through the HP Toolbox software (HP CLJ 4650 only) |
55 |
| Exchange program |
56 |
| Supplies |
56 |
| World Wide Web |
56 |
| HP Service Parts Information |
56 |
| HP customer care |
57 |
| Online services |
57 |
| Telephone support |
57 |
| Software utilities, drivers, and electronic information |
57 |
| HP service information |
57 |
| HP service agreements |
57 |
| HP support and information for Macintosh computers |
58 |
| Ordering related documentation and software |
58 |
| Installation and configuration |
59 |
| Unpacking the printer |
60 |
| Installing the media tray |
65 |
| Connecting power |
66 |
| Installing the print cartridges |
66 |
| Installing a new overlay (HP Color LaserJet 4600 models) |
69 |
| Installing a new control-panel label (HP Color LaserJet 4650 models) |
70 |
| Testing the printer operation |
71 |
| Using PowerSave |
72 |
| To set PowerSave Time |
72 |
| To turn PowerSave on or off |
72 |
| Connecting to a computer |
73 |
| Parallel connections |
73 |
| USB configuration (HP Color LaserJet 4610n and 4650 models) |
74 |
| Auxiliary connection configuration (HP Color LaserJet 4650 models) |
74 |
| Network connections |
75 |
| Direct to network (HP Color LaserJet 4600 and 4650 models) |
75 |
| Network print server (HP Color LaserJet 4600 and 4650 models) |
75 |
| Network print server (HP Color LaserJet 4610n printer) |
77 |
| Peer-to-peer (direct to network, HP Color LaserJet 4600 and 4650 models) |
78 |
| Peer-to-peer (parallel) |
78 |
| Enhanced I/O (EIO) configuration |
78 |
| HP Jetdirect print servers |
79 |
| Available enhanced I/O interfaces |
79 |
| NetWare networks |
79 |
| Windows and Windows NT networks |
80 |
| AppleTalk networks |
80 |
| LocalTalk configuration |
80 |
| LocalTalk network configuration |
80 |
| UNIX and Linux networks |
80 |
| Wireless printing |
80 |
| IEEE 802.11b standard |
80 |
| Bluetooth |
81 |
| Printer drivers |
82 |
| Available drivers |
83 |
| Additional drivers |
84 |
| Select the right printer driver for your needs |
84 |
| Printer driver Help |
84 |
| Software for Macintosh computers |
85 |
| PPDs |
85 |
| HP LaserJet Utility |
85 |
| Installing the printing system software |
86 |
| Installing Windows printing system software for direct connections |
86 |
| Installing Windows printing system software for networks |
87 |
| To set up Windows-sharing to use the printer on a network |
88 |
| Installing Macintosh printing system software for networks |
88 |
| Installing Macintosh printing system software for direct connections (USB, HP Color LaserJet 4610n a ... |
90 |
| Installing the software after the parallel or USB cable has been connected |
91 |
| Network configuration |
93 |
| Configuring the printer for the network |
93 |
| Configuring Novell NetWare frame type parameters |
93 |
| Software for networks |
94 |
| HP Web Jetadmin |
94 |
| UNIX |
95 |
| Utilities |
95 |
| Embedded Web server (HP Color LaserJet 4600 and 4650 models only) |
96 |
| Features |
96 |
| HP Toolbox (HP Color LaserJet 4650 models only) |
96 |
| Other components and utilities |
97 |
| Setting network security on the printer |
98 |
| Locking the control panel |
98 |
| Levels of security |
98 |
| Using an ASCII PJL escape sequence to set network security |
99 |
| Maintenance |
101 |
| Cleaning the printer and accessories |
102 |
| Cleaning spilled toner |
102 |
| Vacuum specifications |
102 |
| Approximate replacement intervals for supply items |
103 |
| ETB life under different circumstances |
105 |
| Locating supplies |
107 |
| Replacing supply items |
108 |
| Changing print cartridges |
108 |
| Replacing the transfer unit |
110 |
| Replacing the transfer unit when it is not at end of life |
112 |
| Replacing the fuser |
113 |
| Replacing the fuser when it is not at end of life |
115 |
| Printer memory (HP Color LaserJet 4600 models) |
116 |
| Installing memory and font DIMMs (HP Color LaserJet 4600 models) |
116 |
| Enabling memory (HP Color LaserJet 4600 models) |
118 |
| Enabling the language font DIMM (HP Color LaserJet 4600 models) |
119 |
| Checking DIMM installation (HP Color LaserJet 4600 models) |
119 |
| Printer memory (HP Color LaserJet 4610n and 4650 models) |
120 |
| Installing memory (HP Color LaserJet 4610n and 4650 models) and fonts (HP Color LaserJet 4650 models) |
121 |
| To install DDR memory DIMMs (HP Color LaserJet 4610n and 4650 models) |
121 |
| To install a flash memory card (HP Color LaserJet 4610n and 4650 models) |
125 |
| Enabling memory (HP Color LaserJet 4610n and 4650 models) |
129 |
| To enable memory for Windows 98, ME, and NT (HP Color LaserJet 4650 models) |
129 |
| To enable memory for Windows 2000 and XP (HP Color LaserJet 4610n and 4650 models) |
129 |
| Installing an HP Jetdirect print server card (HP Color LaserJet 4600 and 4650 models only) |
130 |
| Installing an HP Jetdirect print server card (HP Color LaserJet 4610n model) |
132 |
| Theory of operation |
133 |
| Basic operation |
134 |
| Operation sequence |
135 |
| Engine-control system |
136 |
| DC controller circuit |
137 |
| Motors, fans, and environment sensor |
138 |
| Fuser power-supply circuit |
140 |
| Heater temperature control |
142 |
| High-voltage power supply |
143 |
| Low-voltage power supply |
144 |
| Formatter system |
145 |
| PowerSave |
146 |
| Input/output |
147 |
| Parallel interface |
147 |
| Expanded I/O (HP Color LaserJet 4600 models) |
147 |
| USB 1.1 connector (HP Color LaserJet 4610n and 4650 models) |
147 |
| Flash (HP Color LaserJet 4600 models) |
147 |
| Hard-disk accessory (HP Color LaserJet 4600 and 4650 models) |
147 |
| CPU |
147 |
| Printer memory |
148 |
| Read-only memory |
148 |
| Random-access memory |
148 |
| DIMM slots (HP Color LaserJet 4600 Series printer) |
148 |
| Firmware DIMM (HP Color LaserJet 4600 models) |
148 |
| Flash memory (HP Color LaserJet 4610n and 4650 models) |
148 |
| Nonvolatile memory |
148 |
| PJL overview |
149 |
| PML |
149 |
| Control panel |
149 |
| Laser/scanner assembly |
150 |
| Scanner-motor control |
151 |
| Image-formation system |
152 |
| Image-formation process |
153 |
| Print cartridges |
154 |
| Memory tag |
155 |
| Toner-level detection |
155 |
| Developer rotations |
156 |
| Toner sensor |
156 |
| Photosensitive drum rotations |
156 |
| Developing cylinder disengaging control |
157 |
| Electrostatic transfer/transport belt (ETB) unit |
158 |
| Electrostatic-latent-image-formation block |
159 |
| Step 1: Primary exposure |
159 |
| Step 2: Primary charging |
160 |
| Step 3: Laser beam exposure |
160 |
| Development block |
161 |
| Step 4: Toner charging |
161 |
| Step 5: Development |
161 |
| Transfer block |
162 |
| Step 6: Attaching |
162 |
| Step 7: Transfer |
162 |
| Step 8: Separation |
164 |
| Fusing block |
164 |
| Step 9: Fusing |
164 |
| Cleaning block |
165 |
| Step 10: ETB cleaning |
165 |
| Step 11: Photosensitive drum cleaning |
165 |
| Calibration and cleaning |
166 |
| ETB cleaning |
168 |
| Photosensitive drum cleaning |
169 |
| Color-plane registration calibration |
170 |
| Drum phase calibration |
171 |
| Image stabilization control |
171 |
| Environmental change control (HP Color LaserJet 4610n and 4650 models) |
172 |
| Image density calibration control (DMAX) |
172 |
| Image halftone calibration control (DHALF) |
173 |
| Image density detection |
174 |
| Pickup/feed system |
175 |
| Pickup/feed unit |
177 |
| Cassette detection and cassette paper-size detection |
178 |
| Overhead transparency detection |
179 |
| Small-size paper detection |
180 |
| Feed-speed control |
181 |
| Fuser/delivery unit |
182 |
| Duplex feed unit |
183 |
| 500-sheet paper feeder |
184 |
| Pickup and feed operations |
185 |
| 2 x 500-sheet feeder |
186 |
| Pickup and feed system |
187 |
| Cassette detection and cassette paper-size detection |
188 |
| Removal and replacement |
189 |
| Introduction |
190 |
| Repair notices |
190 |
| Caution regarding electrostatic discharge (ESD) |
190 |
| Required tools |
190 |
| Types of fasteners |
191 |
| Supplies |
192 |
| Print cartridges and ETB |
193 |
| Covers and external components |
194 |
| Rear cover |
194 |
| Top cover |
195 |
| Rear top cover |
197 |
| Left cover |
199 |
| Right cover |
200 |
| Multipurpose tray (tray 1) |
201 |
| Front cover |
202 |
| Control panel |
203 |
| Installing a new overlay (HP Color LaserJet 4600 models) |
205 |
| Installing a new control-panel label (HP Color LaserJet 4650 models) |
206 |
| Internal components |
207 |
| DC controller shield |
207 |
| Internal components (front) |
208 |
| Paper pickup unit |
208 |
| Paper pickup sensor PCA |
210 |
| Cassette (tray 2) paper pickup rollers |
211 |
| Paper pickup drive unit |
212 |
| Multipurpose tray pickup roller and separation pad |
213 |
| Solenoids |
215 |
| Color registration detection unit |
216 |
| Internal components (left side) |
218 |
| Environment sensor (HP Color LaserJet 4610n/4650 models only) |
218 |
| Drum drive units |
219 |
| Memory-tag antenna PCAs |
225 |
| Developing disengaging motor assembly |
226 |
| DC controller PCA |
227 |
| Memory controller PCA |
228 |
| Cassette paper-size-detection switch |
229 |
| Internal components (rear) |
230 |
| Formatter |
230 |
| Low-voltage power supply |
231 |
| Power-supply fan (HP Color LaserJet 4610n and 4650 models) |
233 |
| Formatter case |
234 |
| Laser/scanner components |
236 |
| Remove the laser/scanner cover plate |
236 |
| Remove the laser/scanner retaining bars |
238 |
| To remove the laser/scanner assemblies |
240 |
| Internal components (right side) |
241 |
| High-voltage power supply PCA |
241 |
| Toner level detection PCA |
243 |
| High-voltage contact blocks |
244 |
| Door switch |
245 |
| Internal components (top) |
246 |
| Fuser power supply PCA |
246 |
| Fuser drive unit |
248 |
| Fuser inlet paper sensor |
250 |
| Fuser delivery sensor |
251 |
| Output-bin-full sensor |
252 |
| Cartridge fan |
253 |
| Formatter fan |
254 |
| Optional 500-sheet paper feeder (HP Color LaserJet 4600 and 4650 models only) |
255 |
| 500-sheet paper feeder top cover plate |
255 |
| 500-sheet paper feeder drive unit |
256 |
| 500-sheet paper-feeder pickup rollers |
258 |
| 500-sheet paper-feeder PCA |
258 |
| Optional 2 x 500-sheet paper feeder (tray 3/tray 4) (HP Color LaserJet 4650 only) |
259 |
| 2 x 500-sheet paper feeder front cover |
259 |
| 2 x 500-sheet paper feeder rear cover |
260 |
| 2 x 500-sheet paper feeder left cover |
261 |
| 2 x 500-sheet paper feeder right cover |
262 |
| 2 x 500-sheet paper feeder upper-cassette pickup assembly |
263 |
| 2 x 500-sheet paper-feeder drive assembly |
264 |
| 2 x 500-sheet paper-feeder feed sensor |
265 |
| 2 x 500-sheet paper feeder upper- or lower-cassette paper sensor |
266 |
| 2 x 500-sheet paper feeder upper- or lower-cassette paper-detection switch |
268 |
| 2 x 500-sheet paper-feeder driver PCA |
269 |
| 2 x 500-sheet paper feeder pickup rollers |
270 |
| Troubleshooting |
271 |
| Introduction |
272 |
| Troubleshooting process |
274 |
| Pre-troubleshooting checklist |
275 |
| Troubleshooting basics |
277 |
| Troubleshooting power-on |
278 |
| Printer-error troubleshooting |
279 |
| Status messages |
279 |
| Warning messages |
279 |
| Error messages |
279 |
| Critical error messages |
279 |
| Alphabetical printer messages (HP Color LaserJet 4600 models) |
280 |
| Alphabetical printer messages (HP Color LaserJet 4610n and 4650 models) |
295 |
| Numerical printer messages (HP Color LaserJet 4600 models) |
314 |
| Numerical printer messages (HP Color LaserJet 4610n and 4650 models) |
327 |
| Replacement-parts configuration (HP Color LaserJet 4610n and 4650 models) |
345 |
| Formatter and DC controller |
345 |
| Formatter (new or previously installed in another printer) |
345 |
| DC Controller (new or previously installed in another printer) |
346 |
| Paper-path troubleshooting |
347 |
| Jams |
347 |
| Jam locations |
347 |
| Jam locations by error message |
348 |
| Jam recovery |
349 |
| To disable paper jam recovery |
350 |
| Avoiding jams |
350 |
| Persistent jams |
351 |
| Basic troubleshooting for jams |
351 |
| Data collection |
351 |
| General paper-path troubleshooting |
352 |
| Paper-path checklist |
352 |
| Jams in tray 1 |
353 |
| Jams in tray 2 |
353 |
| Jams in tray 3 or tray 3/tray 4 (2 x 500-sheet paper feeder, HP CLJ 4650 only) |
354 |
| Jams in the paper path |
355 |
| Jams in the top cover |
356 |
| Jams in the duplex path (HP CLJ 4600 and 4650 models only) |
356 |
| Media-transport troubleshooting |
357 |
| Multiple pages are fed |
357 |
| Media is wrinkled or folded |
357 |
| Paper is skewed |
358 |
| Image-formation troubleshooting |
359 |
| Online print-quality troubleshooting tools (HP Color LaserJet 4610n and 4650 models) |
359 |
| Print-quality problems associated with media |
359 |
| Overhead transparency defects |
360 |
| Print-quality problems that are associated with the environment |
360 |
| Print-quality problems that are associated with jams |
361 |
| Print-quality troubleshooting pages |
361 |
| Understanding color variations |
361 |
| Common causes of color variation |
361 |
| Color selection process |
362 |
| Matching colors |
362 |
| PANTONE®* color matching |
362 |
| Swatch book color matching |
362 |
| Using color |
363 |
| HP ImageREt 2400 (HP Color LaserJet 4600 models) |
363 |
| HP ImageREt 3600 (HP Color LaserJet 4610n and 4650 models) |
363 |
| Paper selection |
363 |
| sRGB |
363 |
| Color options |
364 |
| Print in Grayscale |
364 |
| Automatic or manual color adjustment |
364 |
| Manual color options |
364 |
| Halftone options |
365 |
| Neutral Grays |
365 |
| Edge Control |
365 |
| RGB Color |
365 |
| Adjusting color balance |
366 |
| To adjust color density |
366 |
| Image defects troubleshooting |
367 |
| Light image |
368 |
| Light color |
368 |
| Dark image |
369 |
| Dark color |
369 |
| Completely blank image |
369 |
| All black or solid color |
369 |
| Dots in vertical lines |
370 |
| Dirt on the back of the paper |
370 |
| Dirt on the front of the paper |
371 |
| Vertical lines |
371 |
| White vertical lines |
371 |
| Horizontal lines |
372 |
| White horizontal lines |
372 |
| Missing color |
372 |
| Blank spots |
373 |
| Poor fusing |
373 |
| Distortion or blurring |
374 |
| Smearing |
374 |
| Misplaced image |
374 |
| Repetitive defects troubleshooting |
375 |
| Interface troubleshooting |
379 |
| Communications checks |
379 |
| EIO troubleshooting (HP CLJ 4600 and 4650 models only) |
379 |
| AUTOEXEC.BAT standard configurations |
380 |
| Parallel MS-DOS commands |
380 |
| Printer Job Language (PJL) commands |
380 |
| @PJL [Enter] |
380 |
| UEL |
380 |
| @PJL COMMENT |
380 |
| @PJL INFO CONFIG |
381 |
| @PJL INFO ID |
381 |
| @PJL INFO USTATUS |
381 |
| @PJL INFO PAGECOUNT |
381 |
| @PJL JOB |
381 |
| @PJL EOJ |
381 |
| @PJL ECHO |
381 |
| @PJL USTATUS JOB=ON/OFF |
381 |
| @PJL USTATUSOFF |
382 |
| Control-panel troubleshooting |
383 |
| Printing a menu map |
383 |
| Information menu |
385 |
| Paper handling menu |
386 |
| Configure device menu |
387 |
| Printing menu |
387 |
| Print quality menu |
390 |
| System setup menu |
392 |
| I/O menu |
396 |
| Resets menu |
397 |
| Diagnostics menu |
398 |
| Service menu |
399 |
| Tools for troubleshooting |
401 |
| Embedded Web server (HP Color LaserJet 4600 and 4650 models only) |
401 |
| To open the embedded Web server |
401 |
| Information tab |
402 |
| Settings tab |
402 |
| Networking tab |
403 |
| Other links |
403 |
| Printer Status and Alerts software |
403 |
| To specify which status messages appear |
404 |
| To view status messages and information |
404 |
| Printer information pages |
404 |
| Menu map |
404 |
| Configuration page |
405 |
| Supplies status page |
408 |
| Usage page |
410 |
| Demo page |
411 |
| File directory page |
412 |
| PCL font list page |
412 |
| PS font list page |
414 |
| RGB samples page (HP Color LaserJet 4610n and 4650 models) |
414 |
| CMYK samples page (HP Color LaserJet 4610n and 4650 only) |
415 |
| Diagnostics |
416 |
| LED diagnostics |
416 |
| Engine diagnostics |
417 |
| Diagnostics mode |
417 |
| Diagnostics that put the engine into the special diagnostics mode |
417 |
| Diagnostic tests |
418 |
| Individual diagnostic tests |
419 |
| Print the event log page |
419 |
| View the event log on the control-panel display |
419 |
| Print the PQ troubleshooting pages |
419 |
| Disable cartridge check (special mode test) |
420 |
| Paper path sensor test (HP Color LaserJet 4610n and 4650 models) |
420 |
| Paper-path test |
421 |
| Sensor Test (special mode test) |
421 |
| Manual sensor test (special mode test; HP Color LaserJet 4610n and 4650 models) |
424 |
| Component test (special mode test) |
429 |
| Print/Stop test |
434 |
| Information menu |
434 |
| Configure device menu/printing menu |
435 |
| Configure device menu/resets menu |
435 |
| Configure device menu/print quality menu |
435 |
| Test pages |
436 |
| Engine test page |
436 |
| Formatter test page |
436 |
| Engine resets |
437 |
| Cold reset |
437 |
| To perform a cold reset |
437 |
| NVRAM initialization |
437 |
| To initialize NVRAM |
438 |
| Resetting the calibration values for the DC controller |
438 |
| To reset the calibration values for the DC controller |
438 |
| Hard disk initialization |
438 |
| To initialize the hard disk |
438 |
| Calibration bypass |
438 |
| To bypass calibration |
439 |
| Calibrate Now (HP Color LaserJet 4600 models) |
439 |
| Quick Calibrate Now (HP Color LaserJet 4610n and 4650 models) |
439 |
| Full Calibrate Now (HP Color LaserJet 4610n and 4650 models) |
440 |
| Service menu |
441 |
| Using the Service menu |
441 |
| Clear event log |
441 |
| Total page count |
441 |
| Transfer kit count |
441 |
| Fuser kit count |
441 |
| Serial number |
441 |
| Service ID |
442 |
| Restoring the Service ID |
442 |
| Converting the Service ID to an actual date |
442 |
| Cold reset paper |
443 |
| Diagrams |
444 |
| Main parts |
444 |
| Switches |
446 |
| Sensors |
448 |
| Solenoids |
451 |
| Motors and fans |
453 |
| PCAs |
455 |
| DC controller PCA |
457 |
| Connectors |
459 |
| General circuit diagram |
462 |
| Parts and diagrams |
467 |
| Introduction |
468 |
| Ordering parts and supplies |
469 |
| Parts that wear |
469 |
| Parts |
469 |
| Customer support |
469 |
| Supplies and accessories |
469 |
| Common fasteners |
475 |
| Illustrations and parts lists |
476 |
| Locations of major components |
477 |
| External covers and panels |
480 |
| Internal components |
482 |
| 500-sheet paper feeder (HP CLJ 4600/4650 models only) |
508 |
| 2 x 500-sheet paper feeder (HP CLJ 4650 models only) |
512 |
| Alphabetical parts list |
524 |
| Numerical parts list |
531 |

 1
1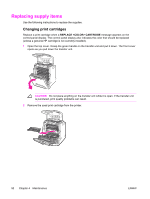 108
108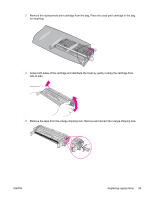 109
109 110
110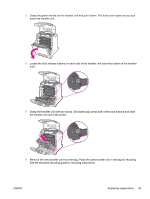 111
111 112
112 113
113 114
114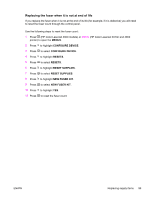 115
115 116
116 117
117 118
118

