HP 4600 Service Manual - Page 277
Troubleshooting basics, READY, OFFLINE, POWERSAVER ON, SHOW EVENT LOG, Diagnostics, PRINT EVENT LOG - blank pages
 |
UPC - 808736060875
View all HP 4600 manuals
Add to My Manuals
Save this manual to your list of manuals |
Page 277 highlights
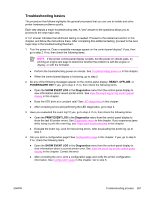
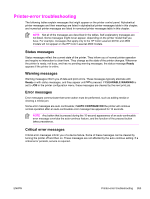
Troubleshooting basics The procedure that follows highlights the general processes that you can use to isolate and solve printer hardware problems quickly. Each step depicts a major troubleshooting step. A "yes" answer to the questions allows you to proceed to the next major step. A "no" answer indicates that additional testing is needed. Proceed to the referenced section in this chapter, and follow the instructions there. After completing this additional testing, proceed to the next major step in the troubleshooting flowchart. 1 Turn the power on. Does a readable message appear on the control-panel display? If yes, then go to step 2. If no, then check the following items. NOTE If the printer control-panel display is blank, but the power-on checks pass, try printing an engine-test page to determine whether the problem is with the engine or display, or with the formatter. ● Perform the troubleshooting power-on checks. See Troubleshooting power-on in this chapter. ● When the control-panel display is fuctioning, go to step 2 2 Do any of the following messages appear on the control-panel display: READY, OFFLINE, or POWERSAVER ON? if yes, go to step 3. If no, then check the following items. ● Open the SHOW EVENT LOG in the Diagnostics menu from the control-panel display to view informatiom about recent printer errors. See View the event log on the control-panel display in this chapter. ● Does the LED blink at a constant rate? See LED diagnostics in this chapter. ● After correcting errors and performing the LED diagnostics, go to step 3. 3 Have you evaluated the event log? If yes, go to step 4. If no, then check the following items. ● Open the PRINT EVENT LOG in the Diagnostics menu from the control-panel display to show the last 50 printer errors. See Diagnostics menu in this chapter. If you experience jams while trying to print the event log, see Paper-path troubleshooting in this chapter ● Evaluate the event log. Look for reoccurring errors. After evualuating the event log, go to step 4. 4 Can you print a configuration page? See Configuration page in this chapter. If yes, go to step 5. If no, check the following items. ● Open the SHOW EVENT LOG in the Diagnostics menu from the control-panel display to view informatiom about a current printer error. See View the event log on the control-panel display in this chapter. Correct the error. ● After correcting the error, print a configuration page and verify the printer configuration information. See Configuration page in this chapter. Go to step 5. ENWW Troubleshooting process 261
-
 1
1 -
2
-
3
-
4
-
5
-
6
-
7
-
8
-
9
-
10
-
11
-
12
-
13
-
14
-
15
-
16
-
17
-
18
-
19
-
20
-
21
-
22
-
23
-
24
-
25
-
26
-
27
-
28
-
29
-
30
-
31
-
32
-
33
-
34
-
35
-
36
-
37
-
38
-
39
-
40
-
41
-
42
-
43
-
44
-
45
-
46
-
47
-
48
-
49
-
50
-
51
-
52
-
53
-
54
-
55
-
56
-
57
-
58
-
59
-
60
-
61
-
62
-
63
-
64
-
65
-
66
-
67
-
68
-
69
-
70
-
71
-
72
-
73
-
74
-
75
-
76
-
77
-
78
-
79
-
80
-
81
-
82
-
83
-
84
-
85
-
86
-
87
-
88
-
89
-
90
-
91
-
92
-
93
-
94
-
95
-
96
-
97
-
98
-
99
-
100
-
101
-
102
-
103
-
104
-
105
-
106
-
107
-
108
-
109
-
110
-
111
-
112
-
113
-
114
-
115
-
116
-
117
-
118
-
119
-
120
-
121
-
122
-
123
-
124
-
125
-
126
-
127
-
128
-
129
-
130
-
131
-
132
-
133
-
134
-
135
-
136
-
137
-
138
-
139
-
140
-
141
-
142
-
143
-
144
-
145
-
146
-
147
-
148
-
149
-
150
-
151
-
152
-
153
-
154
-
155
-
156
-
157
-
158
-
159
-
160
-
161
-
162
-
163
-
164
-
165
-
166
-
167
-
168
-
169
-
170
-
171
-
172
-
173
-
174
-
175
-
176
-
177
-
178
-
179
-
180
-
181
-
182
-
183
-
184
-
185
-
186
-
187
-
188
-
189
-
190
-
191
-
192
-
193
-
194
-
195
-
196
-
197
-
198
-
199
-
200
-
201
-
202
-
203
-
204
-
205
-
206
-
207
-
208
-
209
-
210
-
211
-
212
-
213
-
214
-
215
-
216
-
217
-
218
-
219
-
220
-
221
-
222
-
223
-
224
-
225
-
226
-
227
-
228
-
229
-
230
-
231
-
232
-
233
-
234
-
235
-
236
-
237
-
238
-
239
-
240
-
241
-
242
-
243
-
244
-
245
-
246
-
247
-
248
-
249
-
250
-
251
-
252
-
253
-
254
-
255
-
256
-
257
-
258
-
259
-
260
-
261
-
262
-
263
-
264
-
265
-
266
-
267
-
268
-
269
-
270
-
271
-
 272
272 -
 273
273 -
 274
274 -
 275
275 -
 276
276 -
 277
277 -
 278
278 -
 279
279 -
 280
280 -
 281
281 -
 282
282 -
283
-
284
-
285
-
286
-
287
-
288
-
289
-
290
-
291
-
292
-
293
-
294
-
295
-
296
-
297
-
298
-
299
-
300
-
301
-
302
-
303
-
304
-
305
-
306
-
307
-
308
-
309
-
310
-
311
-
312
-
313
-
314
-
315
-
316
-
317
-
318
-
319
-
320
-
321
-
322
-
323
-
324
-
325
-
326
-
327
-
328
-
329
-
330
-
331
-
332
-
333
-
334
-
335
-
336
-
337
-
338
-
339
-
340
-
341
-
342
-
343
-
344
-
345
-
346
-
347
-
348
-
349
-
350
-
351
-
352
-
353
-
354
-
355
-
356
-
357
-
358
-
359
-
360
-
361
-
362
-
363
-
364
-
365
-
366
-
367
-
368
-
369
-
370
-
371
-
372
-
373
-
374
-
375
-
376
-
377
-
378
-
379
-
380
-
381
-
382
-
383
-
384
-
385
-
386
-
387
-
388
-
389
-
390
-
391
-
392
-
393
-
394
-
395
-
396
-
397
-
398
-
399
-
400
-
401
-
402
-
403
-
404
-
405
-
406
-
407
-
408
-
409
-
410
-
411
-
412
-
413
-
414
-
415
-
416
-
417
-
418
-
419
-
420
-
421
-
422
-
423
-
424
-
425
-
426
-
427
-
428
-
429
-
430
-
431
-
432
-
433
-
434
-
435
-
436
-
437
-
438
-
439
-
440
-
441
-
442
-
443
-
444
-
445
-
446
-
447
-
448
-
449
-
450
-
451
-
452
-
453
-
454
-
455
-
456
-
457
-
458
-
459
-
460
-
461
-
462
-
463
-
464
-
465
-
466
-
467
-
468
-
469
-
470
-
471
-
472
-
473
-
474
-
475
-
476
-
477
-
478
-
479
-
480
-
481
-
482
-
483
-
484
-
485
-
486
-
487
-
488
-
489
-
490
-
491
-
492
-
493
-
494
-
495
-
496
-
497
-
498
-
499
-
500
-
501
-
502
-
503
-
504
-
505
-
506
-
507
-
508
-
509
-
510
-
511
-
512
-
513
-
514
-
515
-
516
-
517
-
518
-
519
-
520
-
521
-
522
-
523
-
524
-
525
-
526
-
527
-
528
-
529
-
530
-
531
-
532
-
533
-
534
-
535
-
536
-
537
-
538
-
539
-
540
-
541
-
542
-
543
-
544
-
545
-
546
-
547
-
548
-
549
-
550
-
551
-
552
 |
 |