HP LaserJet 4345 HP LaserJet 4345mfp - User Guide - Page 104
Using features in the printer driver, Creating and using quick sets, Creating and using watermarks - mfp windows 7 driver
 |
View all HP LaserJet 4345 manuals
Add to My Manuals
Save this manual to your list of manuals |
Page 104 highlights
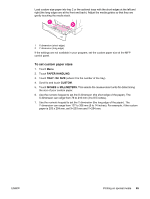
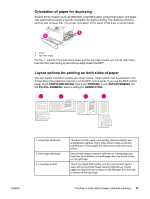
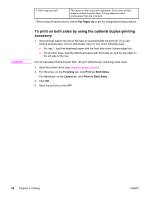
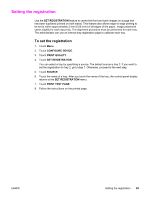
Using features in the printer driver Note When you print from a software program, many of the MFP features are available from the printer driver. For more information about Windows drivers, see Using the printer drivers. Settings in the printer driver and software program generally override control-panel settings. (Software-program settings generally override printer-driver settings.) Note Note Creating and using quick sets Use quick sets to save the current driver settings for reuse. For example, you can save the page orientation, print on both sides, and paper source settings in a quick set . For convenience, quick sets are available on most printer-driver tabs. You can save 25 Print Task Quick Sets. The printer driver might report that 25 Print Task Quick Sets have been defined when fewer than 25 are visible. Some predefined Print Task Quick Sets, which do not apply to the configuration of your MFP, might be hidden but they are still counted in the total number that can be saved. To create a quick set 1. Open the printer driver (see Using the printer drivers). 2. Select the print settings that you want to use. 3. In the Print Task Quick Sets box, type a name for the selected settings (for example "Quarterly Report" or "My Project Status"). 4. Click Save. To use quick sets 1. Open the printer driver (see Using the printer drivers). 2. Select the quick set that you want to use from the Print Task Quick Sets drop-down list. 3. Click OK. The MFP is now set to print according to the saved settings in the quick set. To restore printer-driver default settings, select Default Print Settings from the Print Task Quick Sets drop-down list. Creating and using watermarks A watermark is a notice, such as "Top Secret," that is printed in the background of each page in a document. To use an existing watermark 1. Open the printer driver (see Using the printer drivers). 2. From the Effects tab, click the Watermarks drop-down list. 3. Click the watermark that you want to use. 4. If you want the watermark to appear only on the first page of the document, click First Page Only. 5. Click OK. The MFP is now set to print the watermark that you have selected. 90 Chapter 3 Printing ENWW
-
 1
1 -
2
-
3
-
4
-
5
-
6
-
7
-
8
-
9
-
10
-
11
-
12
-
13
-
14
-
15
-
16
-
17
-
18
-
19
-
20
-
21
-
22
-
23
-
24
-
25
-
26
-
27
-
28
-
29
-
30
-
31
-
32
-
33
-
34
-
35
-
36
-
37
-
38
-
39
-
40
-
41
-
42
-
43
-
44
-
45
-
46
-
47
-
48
-
49
-
50
-
51
-
52
-
53
-
54
-
55
-
56
-
57
-
58
-
59
-
60
-
61
-
62
-
63
-
64
-
65
-
66
-
67
-
68
-
69
-
70
-
71
-
72
-
73
-
74
-
75
-
76
-
77
-
78
-
79
-
80
-
81
-
82
-
83
-
84
-
85
-
86
-
87
-
88
-
89
-
90
-
91
-
92
-
93
-
94
-
95
-
96
-
97
-
98
-
 99
99 -
 100
100 -
 101
101 -
 102
102 -
 103
103 -
 104
104 -
 105
105 -
 106
106 -
 107
107 -
 108
108 -
 109
109 -
110
-
111
-
112
-
113
-
114
-
115
-
116
-
117
-
118
-
119
-
120
-
121
-
122
-
123
-
124
-
125
-
126
-
127
-
128
-
129
-
130
-
131
-
132
-
133
-
134
-
135
-
136
-
137
-
138
-
139
-
140
-
141
-
142
-
143
-
144
-
145
-
146
-
147
-
148
-
149
-
150
-
151
-
152
-
153
-
154
-
155
-
156
-
157
-
158
-
159
-
160
-
161
-
162
-
163
-
164
-
165
-
166
-
167
-
168
-
169
-
170
-
171
-
172
-
173
-
174
-
175
-
176
-
177
-
178
-
179
-
180
-
181
-
182
-
183
-
184
-
185
-
186
-
187
-
188
-
189
-
190
-
191
-
192
-
193
-
194
-
195
-
196
-
197
-
198
-
199
-
200
-
201
-
202
-
203
-
204
-
205
-
206
-
207
-
208
-
209
-
210
-
211
-
212
-
213
-
214
-
215
-
216
-
217
-
218
-
219
-
220
-
221
-
222
-
223
-
224
-
225
-
226
-
227
-
228
-
229
-
230
-
231
-
232
-
233
-
234
-
235
-
236
-
237
-
238
-
239
-
240
-
241
-
242
-
243
-
244
-
245
-
246
-
247
-
248
-
249
-
250
-
251
-
252
-
253
-
254
-
255
-
256
-
257
-
258
-
259
-
260
-
261
-
262
-
263
-
264
-
265
-
266
-
267
-
268
-
269
-
270
-
271
-
272
-
273
-
274
-
275
-
276
-
277
-
278
-
279
-
280
-
281
-
282
-
283
-
284
-
285
-
286
-
287
-
288
-
289
-
290
-
291
-
292
-
293
-
294
-
295
-
296
-
297
-
298
-
299
-
300
-
301
-
302
-
303
-
304
-
305
-
306
-
307
-
308
-
309
-
310
-
311
-
312
-
313
-
314
-
315
-
316
-
317
-
318
-
319
-
320
-
321
-
322
-
323
-
324
 |
 |