HP LaserJet 4345 HP LaserJet 4345mfp - User Guide - Page 128
Using the address book, Creating a recipient list
 |
View all HP LaserJet 4345 manuals
Add to My Manuals
Save this manual to your list of manuals |
Page 128 highlights
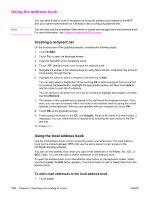
Using the address book Note You can send e-mail to a list of recipients by using the address book feature of the MFP. See your system administrator for information about configuring address lists. You can also use the embedded Web server to create and manage the e-mail address book. For more information, see Using the embedded Web server. Creating a recipient list On the touchscreen of the graphical display, complete the following steps: 1. Touch E-MAIL. 2. Touch To: to open the keyboard screen. 3. Type the first letter of the recipient's name. 4. Touch (address book icon) to open the address book. 5. Navigate the entries in the address book by using the scroll bar. Hold down the arrow to scroll quickly through the list. 6. Highlight the name to select a recipient, and then touch Add. You can also select a distribution list by touching All, or add a recipient from a local list by touching the Local button. Highlight the appropriate names, and then touch Add to add the name to your list of recipients. You can remove a recipient from your list by scrolling to highlight the recipient, and then touching Remove. 7. The names in the recipient list are placed in the text line of the keyboard screen. If you want, you can add a recipient that is not found in the address book by typing the e-mail address on the keyboard. After you are satisfied with your recipient list, touch OK. 8. Touch OK on the keyboard screen. 9. Finish typing information in the CC: and Subject: fields on the Send to E-mail screen, if necessary. You can check the list of recipients by touching the down arrow in the To: text line. 10. Press START. Using the local address book Use the local address book to store frequently-used e-mail addresses. The local address book can be shared between MFPs that use the same server to gain access to the HP Digital Sending software. You can use the address book when you type e-mail addresses in the From:, To:, CC:, or BCC: fields. You can also add or delete addresses in the address book. To open the address book, touch the address book button on the keyboard screen. When you touch Local, the Edit button appears. Touch this button to add or delete items from the address book. To add e-mail addresses to the local address book 1. Touch Local. 114 Chapter 5 Scanning and sending to e-mail ENWW
-
 1
1 -
2
-
3
-
4
-
5
-
6
-
7
-
8
-
9
-
10
-
11
-
12
-
13
-
14
-
15
-
16
-
17
-
18
-
19
-
20
-
21
-
22
-
23
-
24
-
25
-
26
-
27
-
28
-
29
-
30
-
31
-
32
-
33
-
34
-
35
-
36
-
37
-
38
-
39
-
40
-
41
-
42
-
43
-
44
-
45
-
46
-
47
-
48
-
49
-
50
-
51
-
52
-
53
-
54
-
55
-
56
-
57
-
58
-
59
-
60
-
61
-
62
-
63
-
64
-
65
-
66
-
67
-
68
-
69
-
70
-
71
-
72
-
73
-
74
-
75
-
76
-
77
-
78
-
79
-
80
-
81
-
82
-
83
-
84
-
85
-
86
-
87
-
88
-
89
-
90
-
91
-
92
-
93
-
94
-
95
-
96
-
97
-
98
-
99
-
100
-
101
-
102
-
103
-
104
-
105
-
106
-
107
-
108
-
109
-
110
-
111
-
112
-
113
-
114
-
115
-
116
-
117
-
118
-
119
-
120
-
121
-
122
-
 123
123 -
 124
124 -
 125
125 -
 126
126 -
 127
127 -
 128
128 -
 129
129 -
 130
130 -
 131
131 -
 132
132 -
 133
133 -
134
-
135
-
136
-
137
-
138
-
139
-
140
-
141
-
142
-
143
-
144
-
145
-
146
-
147
-
148
-
149
-
150
-
151
-
152
-
153
-
154
-
155
-
156
-
157
-
158
-
159
-
160
-
161
-
162
-
163
-
164
-
165
-
166
-
167
-
168
-
169
-
170
-
171
-
172
-
173
-
174
-
175
-
176
-
177
-
178
-
179
-
180
-
181
-
182
-
183
-
184
-
185
-
186
-
187
-
188
-
189
-
190
-
191
-
192
-
193
-
194
-
195
-
196
-
197
-
198
-
199
-
200
-
201
-
202
-
203
-
204
-
205
-
206
-
207
-
208
-
209
-
210
-
211
-
212
-
213
-
214
-
215
-
216
-
217
-
218
-
219
-
220
-
221
-
222
-
223
-
224
-
225
-
226
-
227
-
228
-
229
-
230
-
231
-
232
-
233
-
234
-
235
-
236
-
237
-
238
-
239
-
240
-
241
-
242
-
243
-
244
-
245
-
246
-
247
-
248
-
249
-
250
-
251
-
252
-
253
-
254
-
255
-
256
-
257
-
258
-
259
-
260
-
261
-
262
-
263
-
264
-
265
-
266
-
267
-
268
-
269
-
270
-
271
-
272
-
273
-
274
-
275
-
276
-
277
-
278
-
279
-
280
-
281
-
282
-
283
-
284
-
285
-
286
-
287
-
288
-
289
-
290
-
291
-
292
-
293
-
294
-
295
-
296
-
297
-
298
-
299
-
300
-
301
-
302
-
303
-
304
-
305
-
306
-
307
-
308
-
309
-
310
-
311
-
312
-
313
-
314
-
315
-
316
-
317
-
318
-
319
-
320
-
321
-
322
-
323
-
324
 |
 |
