HP LaserJet 4345 HP LaserJet 4345mfp - User Guide - Page 187
Cleaning the MFP, Cleaning the outside of the MFP, Cleaning the touchscreen
 |
View all HP LaserJet 4345 manuals
Add to My Manuals
Save this manual to your list of manuals |
Page 187 highlights
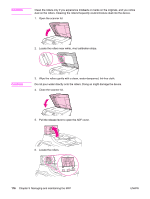
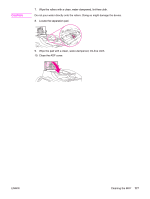
Cleaning the MFP WARNING! CAUTION To maintain print quality, clean the MFP thoroughly whenever print-quality problems occur and every time you replace the print cartridge. Avoid touching the fusing area when cleaning the MFP. It can be hot. To avoid permanent damage to the print cartridge, do not use ammonia-based cleaners on or around the MFP except as directed. Cleaning the outside of the MFP ● Clean the outside of the MFP if it is visibly marked. ● Use a soft, lint-free cloth dampened with water, or water and a mild detergent. CAUTION Cleaning the touchscreen Clean the touchscreen whenever it is necessary to remove fingerprints or dust. Wipe the touchscreen gently with a clean, water-dampened, lint-free cloth. Use water only. Solvents or cleaners can damage the touchscreen. Do not pour or spray water directly onto the touchscreen. CAUTION To clean the scanner glass ● Clean the scanner glass only if dirt is visible, or if you are experiencing a decrease in copy quality, such as streaking. ● Clean the scanner glass by wiping it gently with a clean, slightly damp, lint-free cloth. Use an ammonia-based surface cleaner only when a water-dampened cloth does not clean the scanner glass. Do not pour or spray liquids directly onto the scanner glass. Do not press hard on the glass surface. (You could break the glass). CAUTION Cleaning the fuser Use the MFP cleaning page to keep the fuser free of toner and paper particles that can sometimes accumulate. Accumulation of toner and particles can cause specks to appear on the front or back side of your print jobs. Do not attempt to clean the fuser with water or any other liquid. Use only the internal cleaning page to clean the fuser. To ensure optimum print quality, HP recommends that you use the cleaning page every time you replace the print cartridge or on an automatic interval that you can set up. The cleaning procedure takes about 2.5 minutes to complete. A CLEANING message appears on the control-panel display while the cleaning is taking place. ENWW Cleaning the MFP 173
-
 1
1 -
2
-
3
-
4
-
5
-
6
-
7
-
8
-
9
-
10
-
11
-
12
-
13
-
14
-
15
-
16
-
17
-
18
-
19
-
20
-
21
-
22
-
23
-
24
-
25
-
26
-
27
-
28
-
29
-
30
-
31
-
32
-
33
-
34
-
35
-
36
-
37
-
38
-
39
-
40
-
41
-
42
-
43
-
44
-
45
-
46
-
47
-
48
-
49
-
50
-
51
-
52
-
53
-
54
-
55
-
56
-
57
-
58
-
59
-
60
-
61
-
62
-
63
-
64
-
65
-
66
-
67
-
68
-
69
-
70
-
71
-
72
-
73
-
74
-
75
-
76
-
77
-
78
-
79
-
80
-
81
-
82
-
83
-
84
-
85
-
86
-
87
-
88
-
89
-
90
-
91
-
92
-
93
-
94
-
95
-
96
-
97
-
98
-
99
-
100
-
101
-
102
-
103
-
104
-
105
-
106
-
107
-
108
-
109
-
110
-
111
-
112
-
113
-
114
-
115
-
116
-
117
-
118
-
119
-
120
-
121
-
122
-
123
-
124
-
125
-
126
-
127
-
128
-
129
-
130
-
131
-
132
-
133
-
134
-
135
-
136
-
137
-
138
-
139
-
140
-
141
-
142
-
143
-
144
-
145
-
146
-
147
-
148
-
149
-
150
-
151
-
152
-
153
-
154
-
155
-
156
-
157
-
158
-
159
-
160
-
161
-
162
-
163
-
164
-
165
-
166
-
167
-
168
-
169
-
170
-
171
-
172
-
173
-
174
-
175
-
176
-
177
-
178
-
179
-
180
-
181
-
 182
182 -
 183
183 -
 184
184 -
 185
185 -
 186
186 -
 187
187 -
 188
188 -
 189
189 -
 190
190 -
 191
191 -
 192
192 -
193
-
194
-
195
-
196
-
197
-
198
-
199
-
200
-
201
-
202
-
203
-
204
-
205
-
206
-
207
-
208
-
209
-
210
-
211
-
212
-
213
-
214
-
215
-
216
-
217
-
218
-
219
-
220
-
221
-
222
-
223
-
224
-
225
-
226
-
227
-
228
-
229
-
230
-
231
-
232
-
233
-
234
-
235
-
236
-
237
-
238
-
239
-
240
-
241
-
242
-
243
-
244
-
245
-
246
-
247
-
248
-
249
-
250
-
251
-
252
-
253
-
254
-
255
-
256
-
257
-
258
-
259
-
260
-
261
-
262
-
263
-
264
-
265
-
266
-
267
-
268
-
269
-
270
-
271
-
272
-
273
-
274
-
275
-
276
-
277
-
278
-
279
-
280
-
281
-
282
-
283
-
284
-
285
-
286
-
287
-
288
-
289
-
290
-
291
-
292
-
293
-
294
-
295
-
296
-
297
-
298
-
299
-
300
-
301
-
302
-
303
-
304
-
305
-
306
-
307
-
308
-
309
-
310
-
311
-
312
-
313
-
314
-
315
-
316
-
317
-
318
-
319
-
320
-
321
-
322
-
323
-
324
 |
 |