HP LaserJet 4345 HP LaserJet 4345mfp - User Guide - Page 218
Resolving control‑panel messages, Control-panel messages
 |
View all HP LaserJet 4345 manuals
Add to My Manuals
Save this manual to your list of manuals |
Page 218 highlights
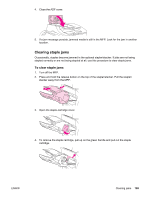
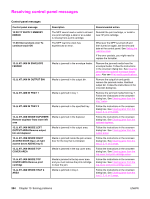
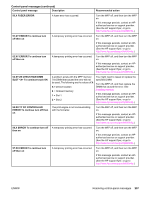
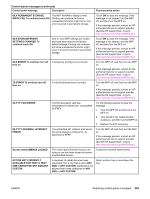
Resolving control-panel messages Control-panel messages Control panel message 10.XX.YY SUPPLY MEMORY ERROR 11.XX Internal clock error To continue touch OK 13.JJ.NT JAM IN ENVELOPE FEEDER Description Recommended action The MFP cannot read or write to at least one print cartridge e-label or an e-label is missing from a print cartridge. Reinstall the print cartridge, or install a new HP print cartridge. The MFP real time clock has experienced an error. Whenever the MFP is turned off and then turned on again, set the time and date at the control panel. See Setting the real-time clock. If the error persists, you might need to replace the formatter. Media is jammed in the envelope feeder. Remove the jammed media from the envelope feeder. Follow the instructions in the onscreen dialog box. See Clearing jams from the optional envelope-feeder area. Also see Print media specifications. 13.JJ.NT JAM IN OUTPUT BIN Media is jammed in the output bin. Remove the output bin and gently remove the jammed media. Reattach output bin. Follow the instructions in the onscreen dialog box. 13.JJ.NT JAM IN TRAY 1 Media is jammed in tray 1. Remove the jammed media from tray 1. Follow the instructions in the onscreen dialog box. See Clearing jams from the tray 1 area. 13.JJ.NT JAM IN TRAY X Media is jammed in the specified tray. 13.JJ.NT JAM INSIDE DUPLEXER Remove duplexer from lower left area Media is jammed in the duplexer. Follow the instructions in the onscreen dialog box. See Clearing jams from the tray 2, 3, 4, or 5 areas. Follow the instructions in the onscreen dialog box. See Clearing jams from the optional duplexer. 13.JJ.NT JAM INSIDE LEFT OUTPUT AREA Remove output bin and duplexer 13.JJ.NT JAM INSIDE RIGHT ACCESS DOOR Open all right access doors ABOVE tray X Media is jammed in the output area. Media is jammed inside the jam-access door for the tray that is indicated. Follow the instructions in the onscreen dialog box. See Clearing jams from the output areas. Follow the instructions in the onscreen dialog box. See Clearing jams from the tray 2, 3, 4, or 5 areas. 13.JJ.NT JAM INSIDE TOP COVER AREA 13.JJ.NT JAM INSIDE TOP COVER AREA Remove print cartridge 13.JJ.NT JAM INSIDE TRAY 2 AREA Media is jammed in the top cover area. Media is jammed in the top cover area and you must remove the print cartridge to clear the jam. Media is jammed in tray 2. Follow the instructions in the onscreen dialog box. See Clearing jams from the top-cover and print-cartridge areas. Follow the instructions in the onscreen dialog box. See Clearing jams from the top-cover and print-cartridge areas. Follow the instructions in the onscreen dialog box. See Clearing jams from the tray 2, 3, 4, or 5 areas. 204 Chapter 10 Solving problems ENWW
-
 1
1 -
2
-
3
-
4
-
5
-
6
-
7
-
8
-
9
-
10
-
11
-
12
-
13
-
14
-
15
-
16
-
17
-
18
-
19
-
20
-
21
-
22
-
23
-
24
-
25
-
26
-
27
-
28
-
29
-
30
-
31
-
32
-
33
-
34
-
35
-
36
-
37
-
38
-
39
-
40
-
41
-
42
-
43
-
44
-
45
-
46
-
47
-
48
-
49
-
50
-
51
-
52
-
53
-
54
-
55
-
56
-
57
-
58
-
59
-
60
-
61
-
62
-
63
-
64
-
65
-
66
-
67
-
68
-
69
-
70
-
71
-
72
-
73
-
74
-
75
-
76
-
77
-
78
-
79
-
80
-
81
-
82
-
83
-
84
-
85
-
86
-
87
-
88
-
89
-
90
-
91
-
92
-
93
-
94
-
95
-
96
-
97
-
98
-
99
-
100
-
101
-
102
-
103
-
104
-
105
-
106
-
107
-
108
-
109
-
110
-
111
-
112
-
113
-
114
-
115
-
116
-
117
-
118
-
119
-
120
-
121
-
122
-
123
-
124
-
125
-
126
-
127
-
128
-
129
-
130
-
131
-
132
-
133
-
134
-
135
-
136
-
137
-
138
-
139
-
140
-
141
-
142
-
143
-
144
-
145
-
146
-
147
-
148
-
149
-
150
-
151
-
152
-
153
-
154
-
155
-
156
-
157
-
158
-
159
-
160
-
161
-
162
-
163
-
164
-
165
-
166
-
167
-
168
-
169
-
170
-
171
-
172
-
173
-
174
-
175
-
176
-
177
-
178
-
179
-
180
-
181
-
182
-
183
-
184
-
185
-
186
-
187
-
188
-
189
-
190
-
191
-
192
-
193
-
194
-
195
-
196
-
197
-
198
-
199
-
200
-
201
-
202
-
203
-
204
-
205
-
206
-
207
-
208
-
209
-
210
-
211
-
212
-
 213
213 -
 214
214 -
 215
215 -
 216
216 -
 217
217 -
 218
218 -
 219
219 -
 220
220 -
 221
221 -
 222
222 -
 223
223 -
224
-
225
-
226
-
227
-
228
-
229
-
230
-
231
-
232
-
233
-
234
-
235
-
236
-
237
-
238
-
239
-
240
-
241
-
242
-
243
-
244
-
245
-
246
-
247
-
248
-
249
-
250
-
251
-
252
-
253
-
254
-
255
-
256
-
257
-
258
-
259
-
260
-
261
-
262
-
263
-
264
-
265
-
266
-
267
-
268
-
269
-
270
-
271
-
272
-
273
-
274
-
275
-
276
-
277
-
278
-
279
-
280
-
281
-
282
-
283
-
284
-
285
-
286
-
287
-
288
-
289
-
290
-
291
-
292
-
293
-
294
-
295
-
296
-
297
-
298
-
299
-
300
-
301
-
302
-
303
-
304
-
305
-
306
-
307
-
308
-
309
-
310
-
311
-
312
-
313
-
314
-
315
-
316
-
317
-
318
-
319
-
320
-
321
-
322
-
323
-
324
 |
 |