HP LaserJet 4345 HP LaserJet 4345mfp - User Guide - Page 126
E‑mail basics, Loading documents - mfp scan to folder
 |
View all HP LaserJet 4345 manuals
Add to My Manuals
Save this manual to your list of manuals |
Page 126 highlights
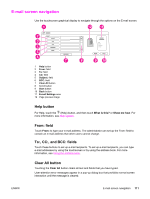
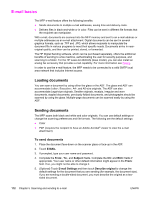
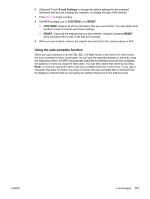
E-mail basics The MFP e-mail feature offers the following benefits: ● Sends documents to multiple e-mail addresses, saving time and delivery costs. ● Delivers files in black-and-white or in color. Files can be sent in different file formats that the recipient can manipulate. With e-mail, documents are scanned into the MFP memory and sent to an e-mail address or multiple addresses as an e-mail attachment. Digital documents can be sent in several graphics formats, such as .TFF and .JPG, which allows recipients to manipulate the document file in various programs to meet their specific needs. Documents arrive in nearoriginal quality, and then can be printed, stored, or forwarded. The HP Digital Sending software, which can be purchased separately, offers the additional benefits of sending to a fax machine, authenticating the user for security purposes, and scanning to a folder. For the HP LaserJet 4345mfp (base model), you can also install an analog fax accessory that provides e-mail capability. For more information see Faxing. In order to use the e-mail feature, the MFP needs to be connected to a valid SMTP local area network that includes Internet access. Loading documents You can scan a document by using either the glass or the ADF. The glass and ADF can accommodate Letter-, Executive-, A4-, and A5-size originals. The ADF can also accommodate Legal-size originals. Smaller originals, receipts, irregular and worn documents, stapled documents, previously folded documents, and photographs should be scanned by using the glass. Multiple-page documents can be scanned easily by using the ADF. Sending documents The MFP scans both black-and-white and color originals. You can use default settings or change the scanning preferences and file formats. The following are the default settings: ● Color ● PDF (requires the recipient to have an Adobe Acrobat® viewer to view the e-mail attachment) To send documents 1. Place the document face-down on the scanner glass or face-up in the ADF. 2. Touch E-MAIL. 3. If prompted, type your user name and password. 4. Complete the From:, To:, and Subject: fields. Complete the CC: and BCC: fields if appropriate. Your user name or other default information might appear in the From: field. If so, you might not be able to change it. 5. (Optional) Touch E-mail Settings and then touch Describe original to change the default settings for the document that you are sending (for example, the document size). If you are sending a double-sided document, you must describe the original as a twosided document. 112 Chapter 5 Scanning and sending to e-mail ENWW
-
 1
1 -
2
-
3
-
4
-
5
-
6
-
7
-
8
-
9
-
10
-
11
-
12
-
13
-
14
-
15
-
16
-
17
-
18
-
19
-
20
-
21
-
22
-
23
-
24
-
25
-
26
-
27
-
28
-
29
-
30
-
31
-
32
-
33
-
34
-
35
-
36
-
37
-
38
-
39
-
40
-
41
-
42
-
43
-
44
-
45
-
46
-
47
-
48
-
49
-
50
-
51
-
52
-
53
-
54
-
55
-
56
-
57
-
58
-
59
-
60
-
61
-
62
-
63
-
64
-
65
-
66
-
67
-
68
-
69
-
70
-
71
-
72
-
73
-
74
-
75
-
76
-
77
-
78
-
79
-
80
-
81
-
82
-
83
-
84
-
85
-
86
-
87
-
88
-
89
-
90
-
91
-
92
-
93
-
94
-
95
-
96
-
97
-
98
-
99
-
100
-
101
-
102
-
103
-
104
-
105
-
106
-
107
-
108
-
109
-
110
-
111
-
112
-
113
-
114
-
115
-
116
-
117
-
118
-
119
-
120
-
 121
121 -
 122
122 -
 123
123 -
 124
124 -
 125
125 -
 126
126 -
 127
127 -
 128
128 -
 129
129 -
 130
130 -
 131
131 -
132
-
133
-
134
-
135
-
136
-
137
-
138
-
139
-
140
-
141
-
142
-
143
-
144
-
145
-
146
-
147
-
148
-
149
-
150
-
151
-
152
-
153
-
154
-
155
-
156
-
157
-
158
-
159
-
160
-
161
-
162
-
163
-
164
-
165
-
166
-
167
-
168
-
169
-
170
-
171
-
172
-
173
-
174
-
175
-
176
-
177
-
178
-
179
-
180
-
181
-
182
-
183
-
184
-
185
-
186
-
187
-
188
-
189
-
190
-
191
-
192
-
193
-
194
-
195
-
196
-
197
-
198
-
199
-
200
-
201
-
202
-
203
-
204
-
205
-
206
-
207
-
208
-
209
-
210
-
211
-
212
-
213
-
214
-
215
-
216
-
217
-
218
-
219
-
220
-
221
-
222
-
223
-
224
-
225
-
226
-
227
-
228
-
229
-
230
-
231
-
232
-
233
-
234
-
235
-
236
-
237
-
238
-
239
-
240
-
241
-
242
-
243
-
244
-
245
-
246
-
247
-
248
-
249
-
250
-
251
-
252
-
253
-
254
-
255
-
256
-
257
-
258
-
259
-
260
-
261
-
262
-
263
-
264
-
265
-
266
-
267
-
268
-
269
-
270
-
271
-
272
-
273
-
274
-
275
-
276
-
277
-
278
-
279
-
280
-
281
-
282
-
283
-
284
-
285
-
286
-
287
-
288
-
289
-
290
-
291
-
292
-
293
-
294
-
295
-
296
-
297
-
298
-
299
-
300
-
301
-
302
-
303
-
304
-
305
-
306
-
307
-
308
-
309
-
310
-
311
-
312
-
313
-
314
-
315
-
316
-
317
-
318
-
319
-
320
-
321
-
322
-
323
-
324
 |
 |