HP LaserJet 4345 HP LaserJet 4345mfp - User Guide - Page 116
Back Side Orientation, Size and Type
 |
View all HP LaserJet 4345 manuals
Add to My Manuals
Save this manual to your list of manuals |
Page 116 highlights
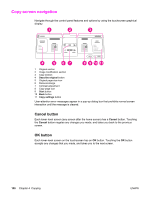
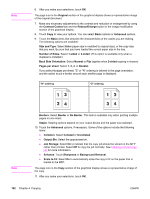
Note 6. After you make your selections, touch OK. The page icon in the Original section of the graphical display shows a representative image of the original document. 7. Make any necessary adjustments to the contrast and reduction or enlargement by using the Contrast Control bar and the Reduce/Enlarge button in the image modification section of the graphical display. 8. Touch Copy to view your options. You can select Basic options or Advanced options. 9. Touch the Basic items that describe the characteristics of the copies you are making. The following options are available: Size and Type: Select Auto (paper size is matched to original size), or the copy size that you want. Be sure that you have loaded the correct paper size in the tray. Number of Sides: Select 1-sided or 2-sided. (This option is available only when a duplexer is installed.) Back Side Orientation: Select Normal or Flip (applies when 2-sided copying is chosen). Pages per sheet: Select 1, 2, 4, or Booklet. If you select 4 pages per sheet, "Z" or "N" ordering is tailored to the page orientation, and the option to put a border around each smaller page is displayed. "N" ordering "Z" ordering Note Borders: Select Border or No Border. This item is available only when printing multiple pages on one sheet. Staple: Stapling options depend on your output device and the paper size selected. 10. Touch the Advanced options, if necessary. Some of the options include the following items: ● Collation: Select Collated or Uncollated. ● Output Bin: Select the appropriate bin. ● Job Storage: Select On to indicate that the copy job should be stored on the MFP rather than printed. Select Off to copy the job normally. See Creating a stored copy job for more information. ● Enhance: Touch Sharpness or Background Removal. ● Scale to Fit: Select On to automatically scale the copy to fit on the paper that is loaded in the MFP. The page icon in the Copy section of the graphical display shows a representative image of the copy. 11. After you make your selections, touch OK. 102 Chapter 4 Copying ENWW
-
 1
1 -
2
-
3
-
4
-
5
-
6
-
7
-
8
-
9
-
10
-
11
-
12
-
13
-
14
-
15
-
16
-
17
-
18
-
19
-
20
-
21
-
22
-
23
-
24
-
25
-
26
-
27
-
28
-
29
-
30
-
31
-
32
-
33
-
34
-
35
-
36
-
37
-
38
-
39
-
40
-
41
-
42
-
43
-
44
-
45
-
46
-
47
-
48
-
49
-
50
-
51
-
52
-
53
-
54
-
55
-
56
-
57
-
58
-
59
-
60
-
61
-
62
-
63
-
64
-
65
-
66
-
67
-
68
-
69
-
70
-
71
-
72
-
73
-
74
-
75
-
76
-
77
-
78
-
79
-
80
-
81
-
82
-
83
-
84
-
85
-
86
-
87
-
88
-
89
-
90
-
91
-
92
-
93
-
94
-
95
-
96
-
97
-
98
-
99
-
100
-
101
-
102
-
103
-
104
-
105
-
106
-
107
-
108
-
109
-
110
-
 111
111 -
 112
112 -
 113
113 -
 114
114 -
 115
115 -
 116
116 -
 117
117 -
 118
118 -
 119
119 -
 120
120 -
 121
121 -
122
-
123
-
124
-
125
-
126
-
127
-
128
-
129
-
130
-
131
-
132
-
133
-
134
-
135
-
136
-
137
-
138
-
139
-
140
-
141
-
142
-
143
-
144
-
145
-
146
-
147
-
148
-
149
-
150
-
151
-
152
-
153
-
154
-
155
-
156
-
157
-
158
-
159
-
160
-
161
-
162
-
163
-
164
-
165
-
166
-
167
-
168
-
169
-
170
-
171
-
172
-
173
-
174
-
175
-
176
-
177
-
178
-
179
-
180
-
181
-
182
-
183
-
184
-
185
-
186
-
187
-
188
-
189
-
190
-
191
-
192
-
193
-
194
-
195
-
196
-
197
-
198
-
199
-
200
-
201
-
202
-
203
-
204
-
205
-
206
-
207
-
208
-
209
-
210
-
211
-
212
-
213
-
214
-
215
-
216
-
217
-
218
-
219
-
220
-
221
-
222
-
223
-
224
-
225
-
226
-
227
-
228
-
229
-
230
-
231
-
232
-
233
-
234
-
235
-
236
-
237
-
238
-
239
-
240
-
241
-
242
-
243
-
244
-
245
-
246
-
247
-
248
-
249
-
250
-
251
-
252
-
253
-
254
-
255
-
256
-
257
-
258
-
259
-
260
-
261
-
262
-
263
-
264
-
265
-
266
-
267
-
268
-
269
-
270
-
271
-
272
-
273
-
274
-
275
-
276
-
277
-
278
-
279
-
280
-
281
-
282
-
283
-
284
-
285
-
286
-
287
-
288
-
289
-
290
-
291
-
292
-
293
-
294
-
295
-
296
-
297
-
298
-
299
-
300
-
301
-
302
-
303
-
304
-
305
-
306
-
307
-
308
-
309
-
310
-
311
-
312
-
313
-
314
-
315
-
316
-
317
-
318
-
319
-
320
-
321
-
322
-
323
-
324
 |
 |