HP LaserJet 4345 HP LaserJet 4345mfp - User Guide - Page 192
Calibrating the scanner, To print the calibration target
 |
View all HP LaserJet 4345 manuals
Add to My Manuals
Save this manual to your list of manuals |
Page 192 highlights
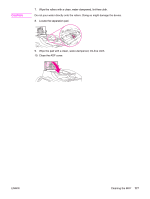
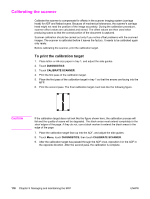
Calibrating the scanner Calibrate the scanner to compensate for offsets in the scanner imaging system (carriage head) for ADF and flatbed scans. Because of mechanical tolerances, the scanner's carriage head might not read the position of the image accurately. During the calibration procedure, scanner offset values are calculated and stored. The offset values are then used when producing scans so that the correct portion of the document is captured. Scanner calibration should be carried out only if you notice offset problems with the scanned images. The scanner is calibrated before it leaves the factory. It needs to be calibrated again only rarely. Before calibrating the scanner, print the calibration target. To print the calibration target 1. Place letter- or A4-size paper in tray 1, and adjust the side guides. 2. Touch DIAGNOSTICS 3. Touch CALIBRATE SCANNER. 4. Print the first pass of the calibration target. 5. Place the first pass of the calibration target in tray 1 so that the arrows are facing into the MFP. 6. Print the second pass. The final calibration target must look like the following figure. CAUTION If the calibration target does not look like the figure shown here, the calibration process will fail and the quality of scans will be degraded. The black areas must extend completely to the short edges of the page. If they do not, use a black marker to extend the black areas to the edge of the page. 7. Place the calibration target face-up into the ADF, and adjust the side guides. 8. Touch Menu, touch DIAGNOSTICS, then touch CALIBRATE SCANNER. 9. After the calibration target has passed through the ADF once, reposition it in the ADF in the opposite direction. After the second pass, the calibration is complete. 178 Chapter 9 Managing and maintaining the MFP ENWW
-
 1
1 -
2
-
3
-
4
-
5
-
6
-
7
-
8
-
9
-
10
-
11
-
12
-
13
-
14
-
15
-
16
-
17
-
18
-
19
-
20
-
21
-
22
-
23
-
24
-
25
-
26
-
27
-
28
-
29
-
30
-
31
-
32
-
33
-
34
-
35
-
36
-
37
-
38
-
39
-
40
-
41
-
42
-
43
-
44
-
45
-
46
-
47
-
48
-
49
-
50
-
51
-
52
-
53
-
54
-
55
-
56
-
57
-
58
-
59
-
60
-
61
-
62
-
63
-
64
-
65
-
66
-
67
-
68
-
69
-
70
-
71
-
72
-
73
-
74
-
75
-
76
-
77
-
78
-
79
-
80
-
81
-
82
-
83
-
84
-
85
-
86
-
87
-
88
-
89
-
90
-
91
-
92
-
93
-
94
-
95
-
96
-
97
-
98
-
99
-
100
-
101
-
102
-
103
-
104
-
105
-
106
-
107
-
108
-
109
-
110
-
111
-
112
-
113
-
114
-
115
-
116
-
117
-
118
-
119
-
120
-
121
-
122
-
123
-
124
-
125
-
126
-
127
-
128
-
129
-
130
-
131
-
132
-
133
-
134
-
135
-
136
-
137
-
138
-
139
-
140
-
141
-
142
-
143
-
144
-
145
-
146
-
147
-
148
-
149
-
150
-
151
-
152
-
153
-
154
-
155
-
156
-
157
-
158
-
159
-
160
-
161
-
162
-
163
-
164
-
165
-
166
-
167
-
168
-
169
-
170
-
171
-
172
-
173
-
174
-
175
-
176
-
177
-
178
-
179
-
180
-
181
-
182
-
183
-
184
-
185
-
186
-
 187
187 -
 188
188 -
 189
189 -
 190
190 -
 191
191 -
 192
192 -
 193
193 -
 194
194 -
 195
195 -
 196
196 -
 197
197 -
198
-
199
-
200
-
201
-
202
-
203
-
204
-
205
-
206
-
207
-
208
-
209
-
210
-
211
-
212
-
213
-
214
-
215
-
216
-
217
-
218
-
219
-
220
-
221
-
222
-
223
-
224
-
225
-
226
-
227
-
228
-
229
-
230
-
231
-
232
-
233
-
234
-
235
-
236
-
237
-
238
-
239
-
240
-
241
-
242
-
243
-
244
-
245
-
246
-
247
-
248
-
249
-
250
-
251
-
252
-
253
-
254
-
255
-
256
-
257
-
258
-
259
-
260
-
261
-
262
-
263
-
264
-
265
-
266
-
267
-
268
-
269
-
270
-
271
-
272
-
273
-
274
-
275
-
276
-
277
-
278
-
279
-
280
-
281
-
282
-
283
-
284
-
285
-
286
-
287
-
288
-
289
-
290
-
291
-
292
-
293
-
294
-
295
-
296
-
297
-
298
-
299
-
300
-
301
-
302
-
303
-
304
-
305
-
306
-
307
-
308
-
309
-
310
-
311
-
312
-
313
-
314
-
315
-
316
-
317
-
318
-
319
-
320
-
321
-
322
-
323
-
324
 |
 |