| Section |
Page |
| MFP basics |
15 |
| HP LaserJet 4345mfp configurations |
16 |
| HP LaserJet 4345mfp (Q3942A—base model) |
16 |
| HP LaserJet 4345x mfp (Q3943A) |
16 |
| HP LaserJet 4345xs mfp (Q3944A) |
16 |
| HP LaserJet 4345xm mfp (Q3945A) |
17 |
| Features and benefits of the MFP |
18 |
| Functions |
18 |
| Speed and throughput |
18 |
| Resolution |
18 |
| Memory |
18 |
| User interface |
18 |
| Language and fonts |
19 |
| Copying and sending |
19 |
| Print cartridge |
19 |
| Paper-handling |
20 |
| Connectivity |
20 |
| Environmental features |
20 |
| Security features |
20 |
| Minimum system requirements |
21 |
| MFP parts and accessories |
22 |
| Accessories and supplies |
23 |
| Interface ports |
24 |
| Moving the MFP |
24 |
| Locking and unlocking optional accessories |
25 |
| Software |
26 |
| Operating systems and MFP components |
26 |
| Printer drivers |
27 |
| HP disk management utility |
31 |
| Software for Macintosh computers |
31 |
| Installing the printing system software |
31 |
| Uninstalling the software |
36 |
| Loading input trays |
37 |
| Loading tray 1 |
37 |
| Loading trays 2, 3, 4 and 5 |
38 |
| Configuring the trays by using the Paper handling menu |
42 |
| Using the control panel |
43 |
| Control-panel layout |
44 |
| Control-panel features |
45 |
| Home-screen navigation |
46 |
| Help system |
47 |
| \ |
47 |
| \ |
47 |
| Menu map |
48 |
| Retrieve job menu |
49 |
| Information menu |
50 |
| Paper handling menu |
51 |
| Configure device menu |
54 |
| Originals submenu |
54 |
| Copying submenu |
55 |
| Enhancement submenu |
55 |
| Sending submenu |
56 |
| Printing submenu |
58 |
| PCL submenu |
60 |
| Print quality submenu |
62 |
| System setup submenu |
65 |
| Copy/send settings |
69 |
| MBM-3 Configuration submenu |
70 |
| Stapler/stacker submenu |
70 |
| I/O submenu |
71 |
| EIO X Jetdirect submenu |
72 |
| Embedded Jetdirect submenu |
72 |
| Resets submenu |
75 |
| Fax menu |
77 |
| Diagnostics menu |
78 |
| Service menu |
81 |
| Printing |
83 |
| Orienting media |
84 |
| Printing documents |
86 |
| To print a document |
86 |
| Selecting which tray is used for printing |
87 |
| Understanding tray order |
87 |
| Customizing tray 1 operation |
87 |
| Printing by type and size of media (locking trays) |
88 |
| Manually feeding media from tray 1 |
89 |
| Selecting the correct fuser mode |
90 |
| Selecting the output bin |
91 |
| 3‑bin mailbox output bins |
91 |
| Selecting an output location |
91 |
| Selecting face-up or face-down output for copy jobs |
92 |
| Printing on envelopes |
93 |
| Loading envelopes in tray 1 |
93 |
| Printing on special media |
95 |
| Printing on labels |
95 |
| Printing on transparencies |
95 |
| Printing on letterhead, prepunched, or preprinted paper |
96 |
| Printing on paper that has a special finish |
97 |
| Printing on small sizes, custom sizes, or heavy paper |
97 |
| Setting custom paper sizes |
98 |
| Printing on both sides of paper (optional duplexer) |
100 |
| Guidelines for printing on both sides of paper |
100 |
| Orientation of paper for duplexing |
101 |
| Layout options for printing on both sides of paper |
101 |
| To print on both sides by using the optional duplex-printing accessory |
102 |
| Setting the registration |
103 |
| To set the registration |
103 |
| Using features in the printer driver |
104 |
| Creating and using quick sets |
104 |
| Creating and using watermarks |
104 |
| Resizing documents |
105 |
| Setting a custom paper size from the printer driver |
105 |
| Printing on different paper for the first page of a print job |
105 |
| Printing multiple pages on one sheet of paper |
106 |
| Setting the stapling options |
106 |
| Selecting face-up or face-down output in the printer driver |
107 |
| Using job storage features |
108 |
| To gain access to the job storage features |
108 |
| Printing a private job |
108 |
| Deleting a private job |
109 |
| Storing a print job |
109 |
| Creating a QuickCopying job |
110 |
| Printing additional copies of QuickCopy jobs |
110 |
| Deleting a QuickCopy job |
111 |
| Proofing and holding a job |
111 |
| Printing the remaining copies of a held job |
111 |
| Deleting a held job |
112 |
| Copying |
113 |
| Copy-screen navigation |
114 |
| Cancel button |
114 |
| OK button |
114 |
| Basic copying instructions |
115 |
| Copying by using the default settings |
115 |
| Copying by using user-defined settings |
115 |
| Copying by using the scanner glass |
117 |
| Copying by using the ADF |
117 |
| Using Job Mode |
117 |
| Modifying copy settings for the current job |
118 |
| Adjusting the copy contrast |
118 |
| Reducing or enlarging copies |
118 |
| Background removal |
118 |
| Sharpness |
118 |
| Contrast |
118 |
| Copying multiple sized originals |
119 |
| Creating a stored copy job |
119 |
| Scanning and sending to e‑mail |
121 |
| What is SMTP? |
122 |
| What is LDAP? |
122 |
| E‑mail configuration |
123 |
| Automatic e‑mail configuration |
123 |
| Manual e-mail configuration |
123 |
| To find gateways by using an e‑mail program |
124 |
| E‑mail screen navigation |
125 |
| Help button |
125 |
| From: field |
125 |
| To:, CC:, and BCC: fields |
125 |
| Clear All button |
125 |
| E‑mail basics |
126 |
| Loading documents |
126 |
| Sending documents |
126 |
| Using the address book |
128 |
| Creating a recipient list |
128 |
| Using the local address book |
128 |
| Additional e‑mail features |
130 |
| Secondary e‑mail |
130 |
| Send to folder |
130 |
| Send to workflow |
130 |
| Faxing |
131 |
| Analog faxing |
132 |
| Installing the fax accessory |
132 |
| Connecting the fax accessory to a phone line |
134 |
| Configuring and using the fax features |
135 |
| Digital faxing |
136 |
| Optional output and input devices |
137 |
| 3‑bin mailbox |
138 |
| Mailbox mode |
138 |
| Stacker mode |
138 |
| Function-separator mode |
138 |
| Using the 3‑bin mailbox |
138 |
| Stapler/stacker accessory |
141 |
| To configure the printer driver to recognize the optional stapler/stacker |
141 |
| To select the stapler in the software (Windows) |
141 |
| To select the stapler in the software (Mac) |
141 |
| To select the stapler at the control panel for printed jobs |
142 |
| To select the stapler in the printer driver for printed jobs (Windows) |
142 |
| To select the stapler in the printer driver for printed jobs (Mac) |
142 |
| To set the stapler at the control panel for all copy jobs |
142 |
| To set the stapler at the control panel for a single copy job |
143 |
| To configure the MFP to stop or continue when the staple cartridge is empty |
143 |
| Loading staples |
143 |
| 500-sheet feeders and the cabinet/stand |
145 |
| Envelope feeder |
146 |
| Installing the optional envelope feeder |
146 |
| Removing the optional envelope feeder |
147 |
| Loading envelopes in the optional envelope feeder |
147 |
| Troubleshooting the output and input accessories |
150 |
| Security features |
151 |
| Securing the embedded Web server |
152 |
| To secure the embedded Web server |
152 |
| Foreign Interface Harness (FIH) |
153 |
| Requirements |
153 |
| Using the FIH |
153 |
| Secure Disk Erase |
155 |
| Data affected |
155 |
| Gaining access to Secure Disk Erase |
155 |
| Additional Information |
155 |
| Job-storage features |
156 |
| DSS authentication |
157 |
| Locking the control‑panel menus |
158 |
| To lock the control‑panel menus |
158 |
| Locking the formatter cage |
159 |
| Managing and maintaining the MFP |
161 |
| Using the embedded Web server |
162 |
| Opening the embedded Web server |
162 |
| Information tab |
163 |
| Settings tab |
163 |
| Digital Sending tab |
164 |
| Networking tab |
164 |
| Other links |
165 |
| Using the HP Toolbox |
166 |
| Supported operating systems |
166 |
| Supported browsers |
166 |
| To view the HP Toolbox |
167 |
| Status tab |
167 |
| Alerts tab |
167 |
| Device Settings window |
168 |
| Toolbox links |
168 |
| Other links |
168 |
| Using HP Web Jetadmin software |
169 |
| Configuring and verifying an IP address |
170 |
| TCP/IP assignment |
170 |
| Verifying the TCP/IP configuration |
170 |
| Changing an IP address |
170 |
| Setting the real-time clock |
172 |
| Setting the date and time |
172 |
| Setting the wake time |
173 |
| Setting the sleep delay |
174 |
| Checking the MFP configuration |
175 |
| To print an information page |
175 |
| Menu map |
175 |
| Configuration page |
175 |
| HP Jetdirect page |
177 |
| Supplies status page |
177 |
| Usage page |
178 |
| PCL or PS font list |
179 |
| Managing the print cartridge |
180 |
| HP print cartridges |
180 |
| Non-HP print cartridges |
180 |
| Print-cartridge authentication |
180 |
| Print-cartridge storage |
180 |
| Print-cartridge life expectancy |
180 |
| Checking the supply level |
181 |
| Cartridge-low and cartridge-out conditions |
181 |
| Upgrading the firmware |
183 |
| Determining the current level of firmware |
183 |
| Downloading the new firmware from the HP Web site |
183 |
| Transferring the new firmware to the MFP |
183 |
| Upgrading the HP Jetdirect firmware |
185 |
| Cleaning the MFP |
187 |
| Cleaning the outside of the MFP |
187 |
| Cleaning the touchscreen |
187 |
| To clean the scanner glass |
187 |
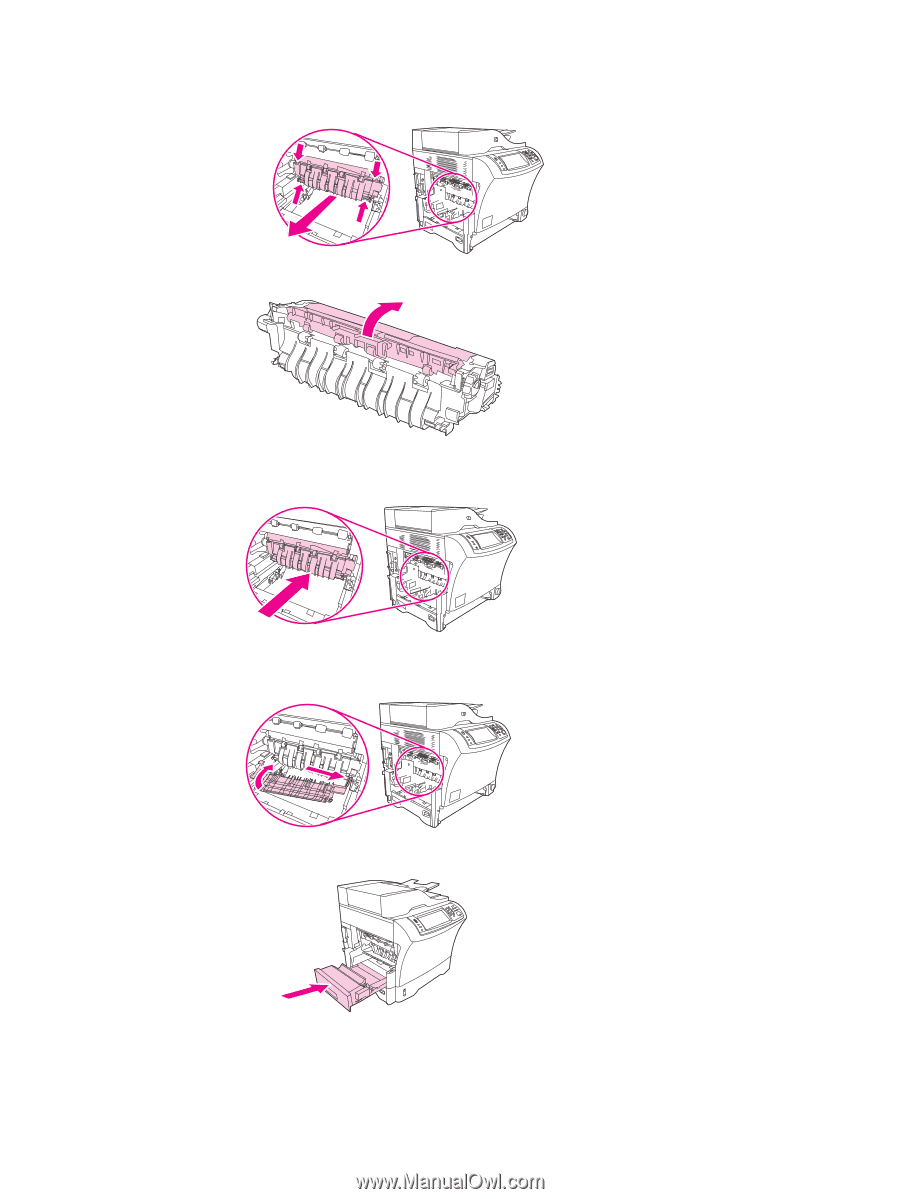
| Cleaning the fuser |
187 |
| Cleaning the ADF delivery system |
188 |
| Calibrating the scanner |
192 |
| To print the calibration target |
192 |
| Performing preventive maintenance |
193 |
| Printer preventive maintenance |
193 |
| The ADF maintenance kit |
193 |
| Solving problems |
195 |
| Solving general problems |
196 |
| Troubleshooting checklist |
196 |
| Determining MFP problems |
198 |
| Clearing jams |
199 |
| Clearing jams from the top-cover and print-cartridge areas |
200 |
| Clearing jams from the optional envelope-feeder area |
202 |
| Clearing jams from the tray 1 area |
203 |
| Clearing jams from the tray 2, 3, 4, or 5 areas |
205 |
| Clearing jams from the optional duplexer |
206 |
| Clearing jams from the output areas |
207 |
| Clearing jams from the fuser |
209 |
| Clearing jams from the ADF |
212 |
| Clearing staple jams |
213 |
| Solving repeated jams |
215 |
| Using the paper-path test |
215 |
| Understanding MFP messages |
217 |
| Using the MFP help system |
217 |
| If a message persists |
217 |
| Resolving control‑panel messages |
218 |
| Understanding accessory lights for the 3‑bin mailbox and stapler/stacker |
230 |
| Accessory lights |
230 |
| Replacing accessories or accessory components |
231 |
| Understanding lights on the formatter |
232 |
| HP Jetdirect LEDs |
232 |
| Heartbeat LED |
232 |
| Fax LED |
233 |
| Correcting print-quality and copy-quality problems |
234 |
| Print-quality checklist |
234 |
| Image defect examples |
234 |
| Light print (partial page) |
236 |
| Light print (entire page) |
237 |
| Specks |
237 |
| Dropouts |
237 |
| Lines |
238 |
| Gray background |
238 |
| Toner smear |
239 |
| Loose toner |
239 |
| Repeating defects |
240 |
| Repeating image |
240 |
| Misformed characters |
241 |
| Page skew |
241 |
| Curl or wave |
241 |
| Wrinkles or creases |
242 |
| Vertical white lines |
242 |
| Tire tracks |
243 |
| White spots on black |
243 |
| Scattered lines |
243 |
| Blurred print |
244 |
| Random image repetition |
244 |
| Blank page (ADF) |
245 |
| Horizontal lines (ADF) |
245 |
| Page skew (ADF) |
246 |
| Vertical lines (ADF) |
246 |
| Image shifted (ADF) |
246 |
| Unexpected image (ADF) |
247 |
| Repetitive defect ruler |
248 |
| Solving e‑mail problems |
249 |
| To validate the SMTP gateway address |
249 |
| To validate the LDAP gateway address |
249 |
| Solving network connectivity problems |
250 |
| Troubleshooting network printing problems |
250 |
| Verifying communication over the network |
250 |
| Supplies and accessories |
253 |
| Ordering parts, accessories, and supplies |
254 |
| Ordering directly from HP |
254 |
| Ordering through service or support providers |
254 |
| Ordering directly through the embedded Web server (for printers that are connected to a network) |
254 |
| Ordering directly through the HP Toolbox software (for printers that are directly connected to a com ... |
254 |
| Part numbers |
255 |
| Accessories |
255 |
| Print cartridges |
255 |
| Maintenance kits |
256 |
| Memory |
256 |
| Cables and interfaces |
257 |
| Print media |
257 |
| Service and support |
261 |
| Hewlett-Packard limited warranty statement |
261 |
| Print Cartridge Limited Warranty Statement |
262 |
| Availability of support and service |
263 |
| HP maintenance agreements |
263 |
| Priority Onsite Service |
263 |
| Next business day |
263 |
| Installation and maintenance-kit replacement |
263 |
| Repacking the MFP |
264 |
| To repack the MFP |
264 |
| Service information form |
265 |
| MFP specifications |
267 |
| Physical specifications |
268 |
| Electrical specifications |
269 |
| Acoustic specifications |
270 |
| Environmental specifications |
271 |
| Image area |
272 |
| Skew specifications |
273 |
| Media specifications |
275 |
| Print media specifications |
275 |
| Printing and paper storage environment |
275 |
| Envelopes |
276 |
| Labels |
278 |
| Transparencies |
278 |
| Supported types and sizes of print media |
279 |
| MFP memory and expansion |
285 |
| Memory overview |
286 |
| Determining memory requirements |
287 |
| Installing memory |
288 |
| To install memory DIMMs |
288 |
| To install a flash memory card |
290 |
| Replacing the hard-disk drive |
292 |
| Checking memory installation |
296 |
| To verify that memory devices are installed correctly |
296 |
| Saving resources (permanent resources) |
297 |
| Installing EIO cards |
298 |
| To install EIO cards |
298 |
| Regulatory information |
299 |
| Introduction |
299 |
| FCC regulations |
300 |
| Telecom |
301 |
| Environmental Product Stewardship program |
302 |
| Protecting the environment |
302 |
| Ozone production |
302 |
| Energy consumption |
302 |
| HP LaserJet printing supplies |
303 |
| Material safety data sheet |
304 |
| For more information |
304 |
| Declaration of conformity (HP LaserJet 4345mfp) |
305 |
| Declaration of conformity (HP LaserJet 4345x mfp, 4345xs mfp, and 4345xs mfp) |
306 |
| Country-/region-specific safety statements |
307 |
| Laser safety statement |
307 |
| Canadian DOC statement |
307 |
| Japanese VCCI statement |
307 |
| Korean EMI statement |
307 |
| Finnish laser statement |
308 |
| Australia |
308 |

 1
1 206
206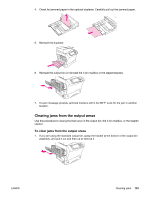 207
207 208
208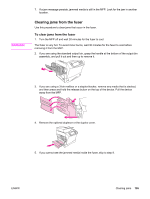 209
209 210
210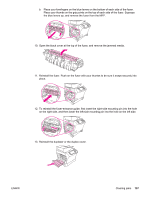 211
211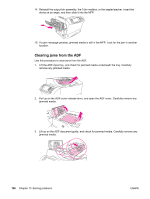 212
212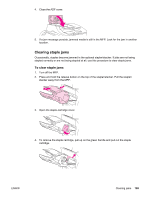 213
213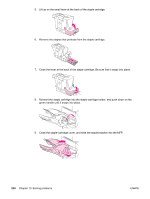 214
214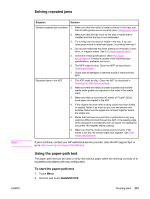 215
215 216
216