HP Workstation x2000 hp workstation x2000 - Technical Reference and Troublesho - Page 158
Removing and Replacing a Memory Module
 |
View all HP Workstation x2000 manuals
Add to My Manuals
Save this manual to your list of manuals |
Page 158 highlights
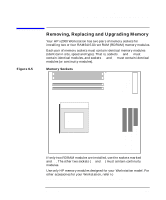
Installing and Replacing Hardware Parts Removing, Replacing and Upgrading Memory Removing and Replacing a Memory Module 1. Switch off the display and Workstation. Disconnect all power cables and any LAN or telecommunications cables. 2. Remove the Workstation's cover (refer to page 153 for instructions). To ease installation, place the Workstation on its side with the system board facing upwards. 3. If you are installing additional memory modules, you will need to remove the continuity modules. Open the two retaining clips and remove the continuity module from the socket. If you are replacing an existing memory module, open the two retaining clips and remove the existing memory module the socket. Always store any removed memory or continuity module in a safe place for future use. 4. Install your new memory modules, ensuring that the two notches on the bottom edge of each memory module are aligned with those of the socket. With the two retaining clips open, press the memory module fully into the socket until the retaining clips click into position. You can also close the retaining clips by hand to ensure that the module is correctly inserted. 5. Replace the Workstation's cover (refer to page 153). Reconnect all the power and telecommunications cables. 6. Check the Summary Screen to verify the new configuration. 158 Chapter 6
-
 1
1 -
2
-
3
-
4
-
5
-
6
-
7
-
8
-
9
-
10
-
11
-
12
-
13
-
14
-
15
-
16
-
17
-
18
-
19
-
20
-
21
-
22
-
23
-
24
-
25
-
26
-
27
-
28
-
29
-
30
-
31
-
32
-
33
-
34
-
35
-
36
-
37
-
38
-
39
-
40
-
41
-
42
-
43
-
44
-
45
-
46
-
47
-
48
-
49
-
50
-
51
-
52
-
53
-
54
-
55
-
56
-
57
-
58
-
59
-
60
-
61
-
62
-
63
-
64
-
65
-
66
-
67
-
68
-
69
-
70
-
71
-
72
-
73
-
74
-
75
-
76
-
77
-
78
-
79
-
80
-
81
-
82
-
83
-
84
-
85
-
86
-
87
-
88
-
89
-
90
-
91
-
92
-
93
-
94
-
95
-
96
-
97
-
98
-
99
-
100
-
101
-
102
-
103
-
104
-
105
-
106
-
107
-
108
-
109
-
110
-
111
-
112
-
113
-
114
-
115
-
116
-
117
-
118
-
119
-
120
-
121
-
122
-
123
-
124
-
125
-
126
-
127
-
128
-
129
-
130
-
131
-
132
-
133
-
134
-
135
-
136
-
137
-
138
-
139
-
140
-
141
-
142
-
143
-
144
-
145
-
146
-
147
-
148
-
149
-
150
-
151
-
152
-
 153
153 -
 154
154 -
 155
155 -
 156
156 -
 157
157 -
 158
158 -
 159
159 -
 160
160 -
 161
161 -
 162
162 -
 163
163 -
164
-
165
-
166
-
167
-
168
-
169
-
170
-
171
-
172
-
173
-
174
-
175
-
176
-
177
-
178
-
179
-
180
-
181
-
182
-
183
-
184
-
185
-
186
-
187
-
188
-
189
-
190
-
191
-
192
-
193
-
194
-
195
-
196
-
197
-
198
-
199
-
200
-
201
-
202
-
203
-
204
-
205
-
206
-
207
-
208
-
209
-
210
-
211
-
212
-
213
-
214
-
215
-
216
-
217
-
218
-
219
-
220
-
221
-
222
-
223
-
224
-
225
-
226
-
227
-
228
-
229
-
230
-
231
-
232
-
233
-
234
-
235
-
236
-
237
-
238
-
239
-
240
-
241
-
242
-
243
-
244
-
245
-
246
 |
 |
