HP Workstation x2000 hp workstation x2000 - Technical Reference and Troublesho - Page 160
Retainer Clip on the Chassis Beam Assembly
 |
View all HP Workstation x2000 manuals
Add to My Manuals
Save this manual to your list of manuals |
Page 160 highlights
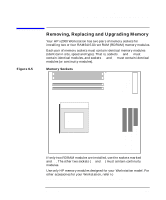
Installing and Replacing Hardware Parts Installing or Replacing an Accessory Card slot panel. Store it in a safe place. If the slot cover is tight, loosen the screws on the adjacent slots. If you are replacing an existing accessory card, remove any cables connected to the accessory card. Remove the screw that holds the old card in place and carefully pull it out. NOTE Some cards may have preferred locations and special installation instructions detailed in their manuals. 5. Aligning the new card carefully, slide it into position, then press it firmly into the slot and tighten the retaining screw. 6. If you are installing an AGP graphics card, you must adjust the universal AGP retainer clip before re-installing the chassis beam. This clip firmly holds your card in place during transit and normal operation. a. Make sure the green retainer clip is installed on the post as shown in Figure 1-4. To move or adjust the clip, squeeze the locks on each side of the clip and slide it in or out. Before installing the beam, adjust the clip to be as close to the beam as possible. Figure 6-6 Retainer Clip on the Chassis Beam Assembly The retainer clip keeps the graphics board seated on the system board when the chassis beam assembly is installed. Clip inserted on post and adjusted to be as close to beam as possible. After beam is installed, adjust clip to push snugly against graphics card edge. Retainer clip Retainer clip slot Squeeze locks to adjust b. Hook the chassis beam assembly to the left side of the chassis and 160 Chapter 6
-
 1
1 -
2
-
3
-
4
-
5
-
6
-
7
-
8
-
9
-
10
-
11
-
12
-
13
-
14
-
15
-
16
-
17
-
18
-
19
-
20
-
21
-
22
-
23
-
24
-
25
-
26
-
27
-
28
-
29
-
30
-
31
-
32
-
33
-
34
-
35
-
36
-
37
-
38
-
39
-
40
-
41
-
42
-
43
-
44
-
45
-
46
-
47
-
48
-
49
-
50
-
51
-
52
-
53
-
54
-
55
-
56
-
57
-
58
-
59
-
60
-
61
-
62
-
63
-
64
-
65
-
66
-
67
-
68
-
69
-
70
-
71
-
72
-
73
-
74
-
75
-
76
-
77
-
78
-
79
-
80
-
81
-
82
-
83
-
84
-
85
-
86
-
87
-
88
-
89
-
90
-
91
-
92
-
93
-
94
-
95
-
96
-
97
-
98
-
99
-
100
-
101
-
102
-
103
-
104
-
105
-
106
-
107
-
108
-
109
-
110
-
111
-
112
-
113
-
114
-
115
-
116
-
117
-
118
-
119
-
120
-
121
-
122
-
123
-
124
-
125
-
126
-
127
-
128
-
129
-
130
-
131
-
132
-
133
-
134
-
135
-
136
-
137
-
138
-
139
-
140
-
141
-
142
-
143
-
144
-
145
-
146
-
147
-
148
-
149
-
150
-
151
-
152
-
153
-
154
-
 155
155 -
 156
156 -
 157
157 -
 158
158 -
 159
159 -
 160
160 -
 161
161 -
 162
162 -
 163
163 -
 164
164 -
 165
165 -
166
-
167
-
168
-
169
-
170
-
171
-
172
-
173
-
174
-
175
-
176
-
177
-
178
-
179
-
180
-
181
-
182
-
183
-
184
-
185
-
186
-
187
-
188
-
189
-
190
-
191
-
192
-
193
-
194
-
195
-
196
-
197
-
198
-
199
-
200
-
201
-
202
-
203
-
204
-
205
-
206
-
207
-
208
-
209
-
210
-
211
-
212
-
213
-
214
-
215
-
216
-
217
-
218
-
219
-
220
-
221
-
222
-
223
-
224
-
225
-
226
-
227
-
228
-
229
-
230
-
231
-
232
-
233
-
234
-
235
-
236
-
237
-
238
-
239
-
240
-
241
-
242
-
243
-
244
-
245
-
246
 |
 |
