HP Workstation x2000 hp workstation x2000 - Technical Reference and Troublesho - Page 188
Replacing the System Fan
 |
View all HP Workstation x2000 manuals
Add to My Manuals
Save this manual to your list of manuals |
Page 188 highlights
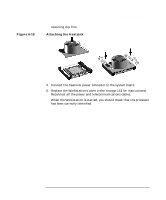
Installing and Replacing Hardware Parts Replacing the System Fan Figure 6-23 Replacing the System Fan Removing the Fan 1. Switch off the display and Workstation. Disconnect all power cables and any LAN or telecommunications cables. 2. Remove the Workstation's cover (refer to page 153 for instructions). 3. Holding the fan with one hand, use a screwdriver to gently push the retaining clips in the direction shown by the arrows on the chassis, then slide the fan up and out of the chassis. Removing the Fan 3 3 4 4. Disconnect the fan connector from the CHASSIS_FAN socket on the system board. 188 Chapter 6
-
 1
1 -
2
-
3
-
4
-
5
-
6
-
7
-
8
-
9
-
10
-
11
-
12
-
13
-
14
-
15
-
16
-
17
-
18
-
19
-
20
-
21
-
22
-
23
-
24
-
25
-
26
-
27
-
28
-
29
-
30
-
31
-
32
-
33
-
34
-
35
-
36
-
37
-
38
-
39
-
40
-
41
-
42
-
43
-
44
-
45
-
46
-
47
-
48
-
49
-
50
-
51
-
52
-
53
-
54
-
55
-
56
-
57
-
58
-
59
-
60
-
61
-
62
-
63
-
64
-
65
-
66
-
67
-
68
-
69
-
70
-
71
-
72
-
73
-
74
-
75
-
76
-
77
-
78
-
79
-
80
-
81
-
82
-
83
-
84
-
85
-
86
-
87
-
88
-
89
-
90
-
91
-
92
-
93
-
94
-
95
-
96
-
97
-
98
-
99
-
100
-
101
-
102
-
103
-
104
-
105
-
106
-
107
-
108
-
109
-
110
-
111
-
112
-
113
-
114
-
115
-
116
-
117
-
118
-
119
-
120
-
121
-
122
-
123
-
124
-
125
-
126
-
127
-
128
-
129
-
130
-
131
-
132
-
133
-
134
-
135
-
136
-
137
-
138
-
139
-
140
-
141
-
142
-
143
-
144
-
145
-
146
-
147
-
148
-
149
-
150
-
151
-
152
-
153
-
154
-
155
-
156
-
157
-
158
-
159
-
160
-
161
-
162
-
163
-
164
-
165
-
166
-
167
-
168
-
169
-
170
-
171
-
172
-
173
-
174
-
175
-
176
-
177
-
178
-
179
-
180
-
181
-
182
-
 183
183 -
 184
184 -
 185
185 -
 186
186 -
 187
187 -
 188
188 -
 189
189 -
 190
190 -
 191
191 -
 192
192 -
 193
193 -
194
-
195
-
196
-
197
-
198
-
199
-
200
-
201
-
202
-
203
-
204
-
205
-
206
-
207
-
208
-
209
-
210
-
211
-
212
-
213
-
214
-
215
-
216
-
217
-
218
-
219
-
220
-
221
-
222
-
223
-
224
-
225
-
226
-
227
-
228
-
229
-
230
-
231
-
232
-
233
-
234
-
235
-
236
-
237
-
238
-
239
-
240
-
241
-
242
-
243
-
244
-
245
-
246
 |
 |

Installing and Replacing Hardware Parts
Replacing the System Fan
Chapter 6
188
Replacing the System Fan
Removing the Fan
1.
Switch off the display and Workstation. Disconnect all power cables
and any LAN or telecommunications cables.
2.
Remove the Workstation’s cover (refer to page 153 for instructions).
3.
Holding the fan with one hand, use a screwdriver to gently push the
retaining clips in the direction shown by the arrows on the chassis,
then slide the fan up and out of the chassis.
Figure 6-23
Removing the Fan
4.
Disconnect the fan connector from the
CHASSIS_FAN
socket on the
system board.
3
3
4