Ricoh 3045 User Instructions - Page 187
Reception File Print Qty, Number of Sets, Same as Basic Set, tings, Clear, Clear/Stop
 |
View all Ricoh 3045 manuals
Add to My Manuals
Save this manual to your list of manuals |
Page 187 highlights
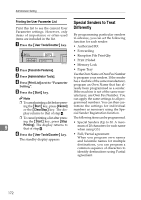
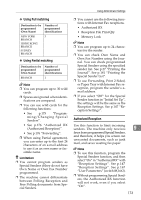
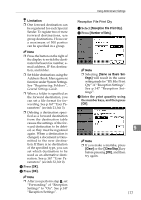
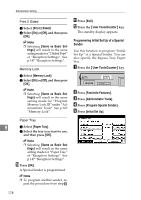
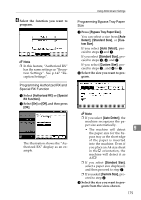
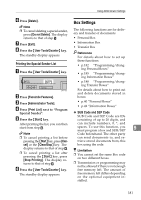
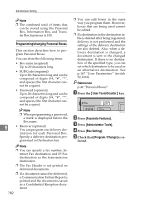
Limitation ❒ One forward destination can be registered for each Special Sender. To register two or more forward destinations, use group destinations. However a maximum of 500 parties can be specified in a group. Note ❒ Press the button on the right of the display to switch the destination between fax number, email address, IP-Fax destination, and folder. ❒ Set folder destinations using the Address Book Management function under System Settings. See "Registering Folders", General Settings Guide. ❒ When a folder is specified as the forward destination, you can set a file format for forwarding. See p.167 "User Parameters" (switch 21, bit 3). ❒ Deleting a destination specified as a forward destination from the destination table causes the settings of the forward destination to be deleted, so they must be registered again. When a destination is changed, a document is transmitted to the new destination. If there is no destination of the specified type, you can set which destination to be used as an alternative destination. See p.167 "User Parameters" (switch 32, bit 0). D Press [OK]. E Press [OK]. Note ❒ After you perform step K, set "Forwarding" of "Reception Settings" to "On". See p.147 "Reception Settings". Using Administrator Settings Reception File Print Qty A Select [Reception File Print Qty]. B Press [Number of Sets]. Note ❒ Selecting [Same as Basic Set- tings] will result in the same setting made for "RX File Print Qty" of "Reception Settings". See p.147 "Reception Settings". C Enter the print quantity using the number keys, and then press [OK]. 9 Note ❒ If you make a mistake, press [Clear] or the {Clear/Stop} key before pressing [OK], and then try again. 177
-
 1
1 -
2
-
3
-
4
-
5
-
6
-
7
-
8
-
9
-
10
-
11
-
12
-
13
-
14
-
15
-
16
-
17
-
18
-
19
-
20
-
21
-
22
-
23
-
24
-
25
-
26
-
27
-
28
-
29
-
30
-
31
-
32
-
33
-
34
-
35
-
36
-
37
-
38
-
39
-
40
-
41
-
42
-
43
-
44
-
45
-
46
-
47
-
48
-
49
-
50
-
51
-
52
-
53
-
54
-
55
-
56
-
57
-
58
-
59
-
60
-
61
-
62
-
63
-
64
-
65
-
66
-
67
-
68
-
69
-
70
-
71
-
72
-
73
-
74
-
75
-
76
-
77
-
78
-
79
-
80
-
81
-
82
-
83
-
84
-
85
-
86
-
87
-
88
-
89
-
90
-
91
-
92
-
93
-
94
-
95
-
96
-
97
-
98
-
99
-
100
-
101
-
102
-
103
-
104
-
105
-
106
-
107
-
108
-
109
-
110
-
111
-
112
-
113
-
114
-
115
-
116
-
117
-
118
-
119
-
120
-
121
-
122
-
123
-
124
-
125
-
126
-
127
-
128
-
129
-
130
-
131
-
132
-
133
-
134
-
135
-
136
-
137
-
138
-
139
-
140
-
141
-
142
-
143
-
144
-
145
-
146
-
147
-
148
-
149
-
150
-
151
-
152
-
153
-
154
-
155
-
156
-
157
-
158
-
159
-
160
-
161
-
162
-
163
-
164
-
165
-
166
-
167
-
168
-
169
-
170
-
171
-
172
-
173
-
174
-
175
-
176
-
177
-
178
-
179
-
180
-
181
-
 182
182 -
 183
183 -
 184
184 -
 185
185 -
 186
186 -
 187
187 -
 188
188 -
 189
189 -
 190
190 -
 191
191 -
 192
192 -
193
-
194
-
195
-
196
-
197
-
198
-
199
-
200
-
201
-
202
-
203
-
204
-
205
-
206
-
207
-
208
-
209
-
210
-
211
-
212
-
213
-
214
-
215
-
216
-
217
-
218
-
219
-
220
-
221
-
222
-
223
-
224
-
225
-
226
-
227
-
228
-
229
-
230
-
231
-
232
-
233
-
234
-
235
-
236
 |
 |