HP Visualize J5000 hp Visualize J5000, J7000 workstations owner's guide (a4978 - Page 119
Operating the Floppy Drive, Formatting a New Diskette, Transferring Data To and From a Floppy Diskette
 |
View all HP Visualize J5000 manuals
Add to My Manuals
Save this manual to your list of manuals |
Page 119 highlights
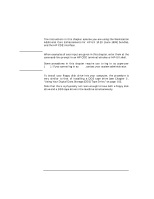
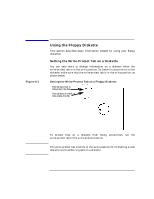
Using Your 3.5-Inch Floppy Disk Drive Operating the Floppy Drive Operating the Floppy Drive This section describes how to perform tasks with your 3.5-inch floppy disk drive. Formatting a New Diskette Unless a floppy disk is preformatted for use on PCs, you must always format a new floppy diskette with the mediainit utility before using the diskette. To format a new floppy diskette, follow these steps: 1. Log in as root. 2. Make sure that the write-protect tab on the floppy diskette is in the write position, as shown in the illustration two pages back. 3. Insert the diskette into the floppy disk drive. 4. Type the following at the prompt and press Enter: mediainit -i 2 〈devicefile〉 where 〈devicefile〉 is the device file as listed by SAM (double-click the Peripheral Devices icon, double-click Device List icon, single-click the CD drive from the list, and then select the Actions menu item Show Device Files). Transferring Data To and From a Floppy Diskette This section describes how to transfer data to and from your floppy diskette (saving and restoring) using the HP-UX tar command with your floppy drive's device file. You need to set the write-protect tab to the write position to transfer data to the diskette. The write-protect tab can be in either position when restoring data from a diskette or listing the files on a diskette. Saving Files to a Floppy Diskette Use the following instructions to save files to a floppy diskette: 1. Check the write-protect tab on the floppy diskette to ensure that it is in the write position. Chapter 6 119
-
 1
1 -
2
-
3
-
4
-
5
-
6
-
7
-
8
-
9
-
10
-
11
-
12
-
13
-
14
-
15
-
16
-
17
-
18
-
19
-
20
-
21
-
22
-
23
-
24
-
25
-
26
-
27
-
28
-
29
-
30
-
31
-
32
-
33
-
34
-
35
-
36
-
37
-
38
-
39
-
40
-
41
-
42
-
43
-
44
-
45
-
46
-
47
-
48
-
49
-
50
-
51
-
52
-
53
-
54
-
55
-
56
-
57
-
58
-
59
-
60
-
61
-
62
-
63
-
64
-
65
-
66
-
67
-
68
-
69
-
70
-
71
-
72
-
73
-
74
-
75
-
76
-
77
-
78
-
79
-
80
-
81
-
82
-
83
-
84
-
85
-
86
-
87
-
88
-
89
-
90
-
91
-
92
-
93
-
94
-
95
-
96
-
97
-
98
-
99
-
100
-
101
-
102
-
103
-
104
-
105
-
106
-
107
-
108
-
109
-
110
-
111
-
112
-
113
-
 114
114 -
 115
115 -
 116
116 -
 117
117 -
 118
118 -
 119
119 -
 120
120 -
 121
121 -
 122
122 -
 123
123 -
 124
124 -
125
-
126
-
127
-
128
-
129
-
130
-
131
-
132
-
133
-
134
-
135
-
136
-
137
-
138
-
139
-
140
-
141
-
142
-
143
-
144
-
145
-
146
-
147
-
148
-
149
-
150
-
151
-
152
-
153
-
154
-
155
-
156
-
157
-
158
-
159
-
160
-
161
-
162
-
163
-
164
-
165
-
166
-
167
-
168
-
169
-
170
-
171
-
172
-
173
-
174
-
175
-
176
-
177
-
178
-
179
-
180
-
181
-
182
-
183
-
184
-
185
-
186
-
187
-
188
-
189
-
190
-
191
-
192
-
193
-
194
-
195
-
196
-
197
-
198
-
199
-
200
-
201
-
202
-
203
-
204
-
205
-
206
-
207
-
208
-
209
-
210
-
211
-
212
 |
 |