HP Visualize J5000 hp Visualize J5000, J7000 workstations owner's guide (a4978 - Page 77
Putting a Disk Drive into its Tray, can generate large accelerations hundreds of gees
 |
View all HP Visualize J5000 manuals
Add to My Manuals
Save this manual to your list of manuals |
Page 77 highlights
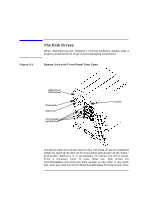
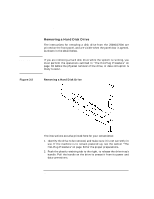
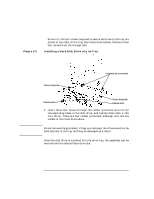
CAUTION Hot-Pluggable Hard Disk Drives The Disk Drives 3. Wait about 30 seconds for the drive to spin down (handling of a disk drive while it is still spinning can cause disk damage and/or loss of data). 4. Carefully pull the drive straight out. If you also need to remove the disk drive from the disk-drive tray-to replace a faulty drive, for example-remove the four screws that secure the drive to the tray. These screws go through rubber grommets; leave the grommets in place as you remove the screws. Putting a Disk Drive into its Tray When you receive and unpack a new disk drive, it will not include the tray that is needed in order to insert it into your J5000/J7000 computer; these trays are already in your computer's disk-drive bays. You will need to assemble the disk drive into its tray before you can slide the disk drive and tray assembly into the computer and expect its connections to be made correctly. 1. Unpack the new disk drive, avoiding both mechanical and electrical shocks; never let it drop onto the floor or onto a desk-always set it down gently-and observe ESD (electrostatic discharge) precautions, as described in the Preface of this document. A drop of just a few inches onto a hard surface such as a desk or the floor can generate large accelerations (hundreds of gees), which may damage the device. 2. Unlock (if necessary) and open the door on the front of the computer. Remove the disk-drive tray from the slot into which you will insert the new drive. To remove the disk-drive tray, release the hook that locks the drive tray's release lever into place (see Figure 3-3, below), and pull the release lever toward you. The tray will come out. 3. If a disk drive was already in the tray (for example, if you're replacing a faulty drive), remove the four screws securing the drive to the tray, and pull the drive straight up out of the tray. If the tray never had a Chapter 3 77
-
 1
1 -
2
-
3
-
4
-
5
-
6
-
7
-
8
-
9
-
10
-
11
-
12
-
13
-
14
-
15
-
16
-
17
-
18
-
19
-
20
-
21
-
22
-
23
-
24
-
25
-
26
-
27
-
28
-
29
-
30
-
31
-
32
-
33
-
34
-
35
-
36
-
37
-
38
-
39
-
40
-
41
-
42
-
43
-
44
-
45
-
46
-
47
-
48
-
49
-
50
-
51
-
52
-
53
-
54
-
55
-
56
-
57
-
58
-
59
-
60
-
61
-
62
-
63
-
64
-
65
-
66
-
67
-
68
-
69
-
70
-
71
-
 72
72 -
 73
73 -
 74
74 -
 75
75 -
 76
76 -
 77
77 -
 78
78 -
 79
79 -
 80
80 -
 81
81 -
 82
82 -
83
-
84
-
85
-
86
-
87
-
88
-
89
-
90
-
91
-
92
-
93
-
94
-
95
-
96
-
97
-
98
-
99
-
100
-
101
-
102
-
103
-
104
-
105
-
106
-
107
-
108
-
109
-
110
-
111
-
112
-
113
-
114
-
115
-
116
-
117
-
118
-
119
-
120
-
121
-
122
-
123
-
124
-
125
-
126
-
127
-
128
-
129
-
130
-
131
-
132
-
133
-
134
-
135
-
136
-
137
-
138
-
139
-
140
-
141
-
142
-
143
-
144
-
145
-
146
-
147
-
148
-
149
-
150
-
151
-
152
-
153
-
154
-
155
-
156
-
157
-
158
-
159
-
160
-
161
-
162
-
163
-
164
-
165
-
166
-
167
-
168
-
169
-
170
-
171
-
172
-
173
-
174
-
175
-
176
-
177
-
178
-
179
-
180
-
181
-
182
-
183
-
184
-
185
-
186
-
187
-
188
-
189
-
190
-
191
-
192
-
193
-
194
-
195
-
196
-
197
-
198
-
199
-
200
-
201
-
202
-
203
-
204
-
205
-
206
-
207
-
208
-
209
-
210
-
211
-
212
 |
 |