HP Visualize J5000 hp Visualize J5000, J7000 workstations owner's guide (a4978 - Page 50
Installing DIMMs,
 |
View all HP Visualize J5000 manuals
Add to My Manuals
Save this manual to your list of manuals |
Page 50 highlights
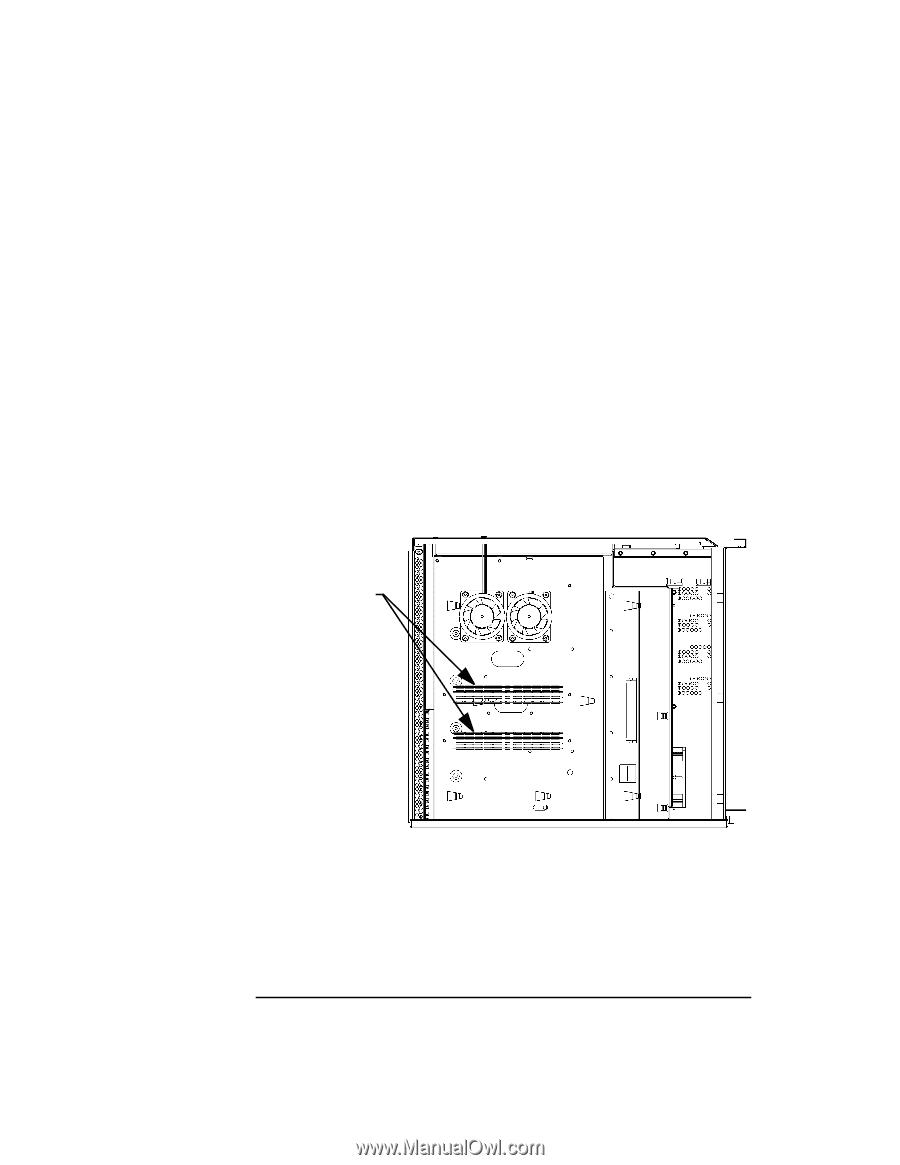
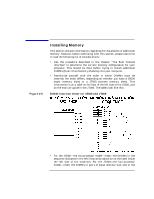
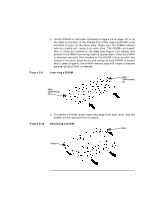
Figure 2-6 Changing Your Computer's Hardware Configuration Installing Memory order indicated in the right illustration above (or on the label on the air guide). For details on the mechanics of inserting DIMMs, see the following pages. • When you have finished installing the additional DIMMs, use the Boot Console Interface to verify that the computer recognizes them. Installing DIMMs Perform the following steps to add DIMMs to your computer. 1. Open the system unit according to the directions in "Opening the System Unit" on page 43. You'll need to remove the top panel and the left side panel (looking from the front). Here is roughly what the inside of a J5000 looks like: the DIMMs are accessible as soon as you remove the side panel: The J5000 DIMM Slots (as seen from the open left side) DIMM Slots The J7000, on the other hand, requires one additional step before the DIMMs are accessible. Because it has twice the number of processors as the J5000, the J7000 requires greater cooling capacity to prevent components from overheating. This is effected, in part, by two sheet-metal air guides that channel the airflow directly at the processors' turbocoolers. One of these air guides, in addition to channeling the airflow to the processors, also hides the DIMM slots, 50 Chapter 2
-
 1
1 -
2
-
3
-
4
-
5
-
6
-
7
-
8
-
9
-
10
-
11
-
12
-
13
-
14
-
15
-
16
-
17
-
18
-
19
-
20
-
21
-
22
-
23
-
24
-
25
-
26
-
27
-
28
-
29
-
30
-
31
-
32
-
33
-
34
-
35
-
36
-
37
-
38
-
39
-
40
-
41
-
42
-
43
-
44
-
 45
45 -
 46
46 -
 47
47 -
 48
48 -
 49
49 -
 50
50 -
 51
51 -
 52
52 -
 53
53 -
 54
54 -
 55
55 -
56
-
57
-
58
-
59
-
60
-
61
-
62
-
63
-
64
-
65
-
66
-
67
-
68
-
69
-
70
-
71
-
72
-
73
-
74
-
75
-
76
-
77
-
78
-
79
-
80
-
81
-
82
-
83
-
84
-
85
-
86
-
87
-
88
-
89
-
90
-
91
-
92
-
93
-
94
-
95
-
96
-
97
-
98
-
99
-
100
-
101
-
102
-
103
-
104
-
105
-
106
-
107
-
108
-
109
-
110
-
111
-
112
-
113
-
114
-
115
-
116
-
117
-
118
-
119
-
120
-
121
-
122
-
123
-
124
-
125
-
126
-
127
-
128
-
129
-
130
-
131
-
132
-
133
-
134
-
135
-
136
-
137
-
138
-
139
-
140
-
141
-
142
-
143
-
144
-
145
-
146
-
147
-
148
-
149
-
150
-
151
-
152
-
153
-
154
-
155
-
156
-
157
-
158
-
159
-
160
-
161
-
162
-
163
-
164
-
165
-
166
-
167
-
168
-
169
-
170
-
171
-
172
-
173
-
174
-
175
-
176
-
177
-
178
-
179
-
180
-
181
-
182
-
183
-
184
-
185
-
186
-
187
-
188
-
189
-
190
-
191
-
192
-
193
-
194
-
195
-
196
-
197
-
198
-
199
-
200
-
201
-
202
-
203
-
204
-
205
-
206
-
207
-
208
-
209
-
210
-
211
-
212
 |
 |