HP Visualize J5000 hp Visualize J5000, J7000 workstations owner's guide (a4978 - Page 54
Installing Memory, Displaying the Memory Configuration
 |
View all HP Visualize J5000 manuals
Add to My Manuals
Save this manual to your list of manuals |
Page 54 highlights
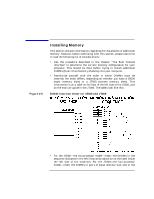
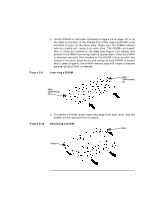
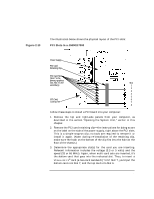
Changing Your Computer's Hardware Configuration Installing Memory 4. Re-install the air guide with the four screws removed earlier (so it again looks like Figure 2-7 on page 51), close the system unit and reconnect all cables. 5. Verify that this installation was successful by following the steps in "Displaying the Memory Configuration" on page 156. If you have only replaced a faulty DIMM, you must execute the pdt clear command in the service menu of the Boot Console Interface. Answer yes (Y) to the prompt "Continue? (Y/N) > 54 Chapter 2
-
 1
1 -
2
-
3
-
4
-
5
-
6
-
7
-
8
-
9
-
10
-
11
-
12
-
13
-
14
-
15
-
16
-
17
-
18
-
19
-
20
-
21
-
22
-
23
-
24
-
25
-
26
-
27
-
28
-
29
-
30
-
31
-
32
-
33
-
34
-
35
-
36
-
37
-
38
-
39
-
40
-
41
-
42
-
43
-
44
-
45
-
46
-
47
-
48
-
 49
49 -
 50
50 -
 51
51 -
 52
52 -
 53
53 -
 54
54 -
 55
55 -
 56
56 -
 57
57 -
 58
58 -
 59
59 -
60
-
61
-
62
-
63
-
64
-
65
-
66
-
67
-
68
-
69
-
70
-
71
-
72
-
73
-
74
-
75
-
76
-
77
-
78
-
79
-
80
-
81
-
82
-
83
-
84
-
85
-
86
-
87
-
88
-
89
-
90
-
91
-
92
-
93
-
94
-
95
-
96
-
97
-
98
-
99
-
100
-
101
-
102
-
103
-
104
-
105
-
106
-
107
-
108
-
109
-
110
-
111
-
112
-
113
-
114
-
115
-
116
-
117
-
118
-
119
-
120
-
121
-
122
-
123
-
124
-
125
-
126
-
127
-
128
-
129
-
130
-
131
-
132
-
133
-
134
-
135
-
136
-
137
-
138
-
139
-
140
-
141
-
142
-
143
-
144
-
145
-
146
-
147
-
148
-
149
-
150
-
151
-
152
-
153
-
154
-
155
-
156
-
157
-
158
-
159
-
160
-
161
-
162
-
163
-
164
-
165
-
166
-
167
-
168
-
169
-
170
-
171
-
172
-
173
-
174
-
175
-
176
-
177
-
178
-
179
-
180
-
181
-
182
-
183
-
184
-
185
-
186
-
187
-
188
-
189
-
190
-
191
-
192
-
193
-
194
-
195
-
196
-
197
-
198
-
199
-
200
-
201
-
202
-
203
-
204
-
205
-
206
-
207
-
208
-
209
-
210
-
211
-
212
 |
 |

54
Chapter 2
Changing Your Computer’s Hardware Configuration
Installing Memory
4.
Re-install the air guide with the four screws removed earlier (so it
again looks like Figure 2-7 on page
51), close the system unit and
reconnect all cables.
5.
Verify that this installation was successful by following the steps in
“Displaying the Memory Configuration” on page 156.
If you have only replaced a faulty DIMM, you must execute the
pdt
clear
command in the service menu of the Boot Console Interface.
Answer yes (Y) to the prompt “Continue? (Y/N) >