HP Visualize J5000 hp Visualize J5000, J7000 workstations owner's guide (a4978 - Page 46
Opening the Top Cover, Removing the Thumbscrews
 |
View all HP Visualize J5000 manuals
Add to My Manuals
Save this manual to your list of manuals |
Page 46 highlights
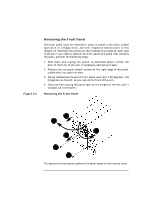
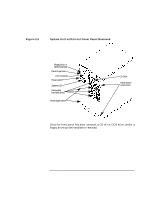
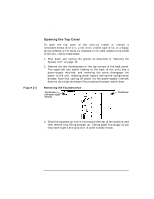
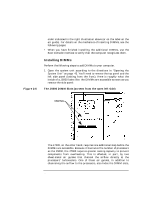
Figure 2-3 Changing Your Computer's Hardware Configuration Opening the System Unit Opening the Top Cover To open the top cover of the unit-to install or remove a removable-media drive (i.e., a CD drive, a DDS tape drive, or a floppy drive), DIMMs, or I/O cards, for example, or for other access to the inside of the unit-follow these steps: 1. Shut down and unplug the system as described in "Opening the System Unit" on page 43. 2. Remove the two thumbscrews in the top corners of the back panel. The upper-left one (when looking at the back of the unit) has a power-supply interlock, and removing the screw disengages the power to the unit, reducing shock hazard during the configuration process. Note that cutting off power via the power-supply interlock does not do a clean shutdown like pressing the power switch does. Removing the Thumbscrews Thumbscrew (with power-supply interlock) Thumbscrew 3. Slide the top panel an inch or two toward the rear of the machine, and then remove it by lifting straight up. The top panel fits snugly, so you may have to get a firm grip on it in order to slide it back. 46 Chapter 2
-
 1
1 -
2
-
3
-
4
-
5
-
6
-
7
-
8
-
9
-
10
-
11
-
12
-
13
-
14
-
15
-
16
-
17
-
18
-
19
-
20
-
21
-
22
-
23
-
24
-
25
-
26
-
27
-
28
-
29
-
30
-
31
-
32
-
33
-
34
-
35
-
36
-
37
-
38
-
39
-
40
-
 41
41 -
 42
42 -
 43
43 -
 44
44 -
 45
45 -
 46
46 -
 47
47 -
 48
48 -
 49
49 -
 50
50 -
 51
51 -
52
-
53
-
54
-
55
-
56
-
57
-
58
-
59
-
60
-
61
-
62
-
63
-
64
-
65
-
66
-
67
-
68
-
69
-
70
-
71
-
72
-
73
-
74
-
75
-
76
-
77
-
78
-
79
-
80
-
81
-
82
-
83
-
84
-
85
-
86
-
87
-
88
-
89
-
90
-
91
-
92
-
93
-
94
-
95
-
96
-
97
-
98
-
99
-
100
-
101
-
102
-
103
-
104
-
105
-
106
-
107
-
108
-
109
-
110
-
111
-
112
-
113
-
114
-
115
-
116
-
117
-
118
-
119
-
120
-
121
-
122
-
123
-
124
-
125
-
126
-
127
-
128
-
129
-
130
-
131
-
132
-
133
-
134
-
135
-
136
-
137
-
138
-
139
-
140
-
141
-
142
-
143
-
144
-
145
-
146
-
147
-
148
-
149
-
150
-
151
-
152
-
153
-
154
-
155
-
156
-
157
-
158
-
159
-
160
-
161
-
162
-
163
-
164
-
165
-
166
-
167
-
168
-
169
-
170
-
171
-
172
-
173
-
174
-
175
-
176
-
177
-
178
-
179
-
180
-
181
-
182
-
183
-
184
-
185
-
186
-
187
-
188
-
189
-
190
-
191
-
192
-
193
-
194
-
195
-
196
-
197
-
198
-
199
-
200
-
201
-
202
-
203
-
204
-
205
-
206
-
207
-
208
-
209
-
210
-
211
-
212
 |
 |