HP Visualize J5000 hp Visualize J5000, J7000 workstations owner's guide (a4978 - Page 43
Opening the System Unit,
 |
View all HP Visualize J5000 manuals
Add to My Manuals
Save this manual to your list of manuals |
Page 43 highlights
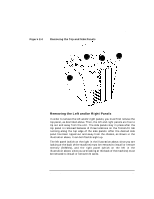
CAUTION Changing Your Computer's Hardware Configuration Opening the System Unit Opening the System Unit Some hardware-configuration operations, like installing and removing hard disk drives, can be done simply by opening the door on the front of the unit; the disk drives are accessible through the open door. Other operations require a bit more access to the interior of the computer, so more panels will need to be removed. Such operations include the installation and removal of the following devices (along with a list of which panels will need to be removed): • CD drive (front panel, top cover) • DDS drive (front panel, top cover) • Floppy drive (front panel, top cover) • Memory (top cover, left side) • I/O cards (top cover, right side) Before opening the front, top, left, or right panels of the unit, make sure that the system is powered down and unplugged. Note: do not remove the rear thumbscrews before powering down the unit, or the system power will be interrupted due to the interlock. 1. Power off the system (either by executing shutdown -h as root and then turning off the power, or by simply hitting the power switch, which accomplishes the same thing), the monitor, and any peripheral devices. 2. Unplug the power cord of the system unit and any peripheral devices from AC wall outlets. 3. Attach the static-grounding wrist strap by following the instructions on the package. Attach the sticky end of the wrist strap to bare metal on the back panel of the system unit. Do not attempt to operate the computer with any of the front, top, or side covers removed. In addition to maintaining FCC/EMI compliance, the covers are needed to ensure proper airflow, and hence, sufficient system cooling. Operating the unit without its covers in place may void the warranty. Chapter 2 43
-
 1
1 -
2
-
3
-
4
-
5
-
6
-
7
-
8
-
9
-
10
-
11
-
12
-
13
-
14
-
15
-
16
-
17
-
18
-
19
-
20
-
21
-
22
-
23
-
24
-
25
-
26
-
27
-
28
-
29
-
30
-
31
-
32
-
33
-
34
-
35
-
36
-
37
-
 38
38 -
 39
39 -
 40
40 -
 41
41 -
 42
42 -
 43
43 -
 44
44 -
 45
45 -
 46
46 -
 47
47 -
 48
48 -
49
-
50
-
51
-
52
-
53
-
54
-
55
-
56
-
57
-
58
-
59
-
60
-
61
-
62
-
63
-
64
-
65
-
66
-
67
-
68
-
69
-
70
-
71
-
72
-
73
-
74
-
75
-
76
-
77
-
78
-
79
-
80
-
81
-
82
-
83
-
84
-
85
-
86
-
87
-
88
-
89
-
90
-
91
-
92
-
93
-
94
-
95
-
96
-
97
-
98
-
99
-
100
-
101
-
102
-
103
-
104
-
105
-
106
-
107
-
108
-
109
-
110
-
111
-
112
-
113
-
114
-
115
-
116
-
117
-
118
-
119
-
120
-
121
-
122
-
123
-
124
-
125
-
126
-
127
-
128
-
129
-
130
-
131
-
132
-
133
-
134
-
135
-
136
-
137
-
138
-
139
-
140
-
141
-
142
-
143
-
144
-
145
-
146
-
147
-
148
-
149
-
150
-
151
-
152
-
153
-
154
-
155
-
156
-
157
-
158
-
159
-
160
-
161
-
162
-
163
-
164
-
165
-
166
-
167
-
168
-
169
-
170
-
171
-
172
-
173
-
174
-
175
-
176
-
177
-
178
-
179
-
180
-
181
-
182
-
183
-
184
-
185
-
186
-
187
-
188
-
189
-
190
-
191
-
192
-
193
-
194
-
195
-
196
-
197
-
198
-
199
-
200
-
201
-
202
-
203
-
204
-
205
-
206
-
207
-
208
-
209
-
210
-
211
-
212
 |
 |