Pfaff creative 2140 Owner's Manual - Page 20
subsequent, seams, automatically, specified, length.
 |
View all Pfaff creative 2140 manuals
Add to My Manuals
Save this manual to your list of manuals |
Page 20 highlights
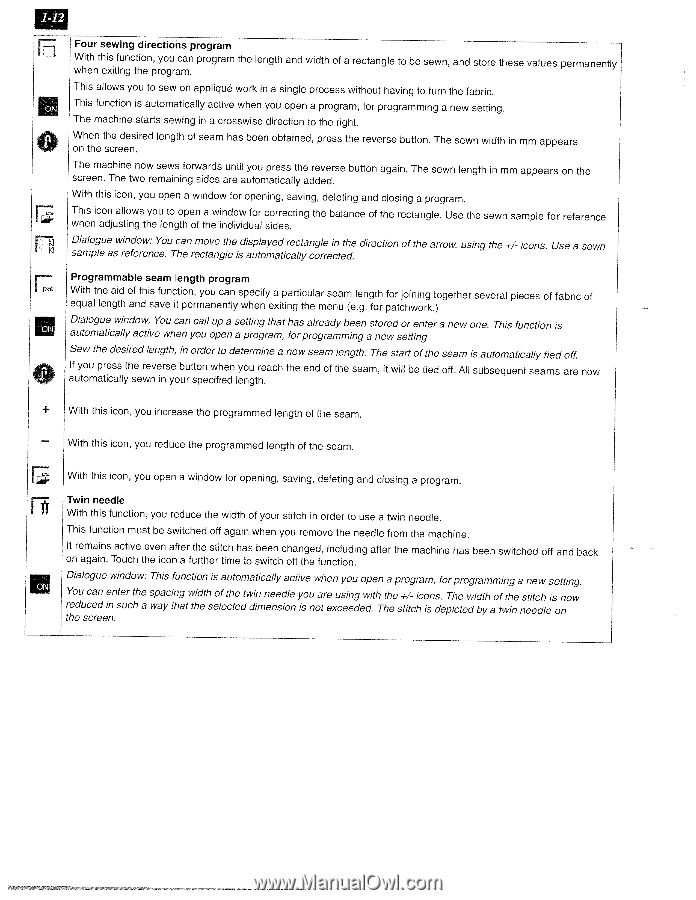
. Four sewing directions program With this function, you can when exiting the program. program the length and width of a rectangle to be sewn, and store these values permanently This allows you to sew on appliqué work in a single process without having to turn the fabric. This function is automatically active when you open a program, for programming a new setting. The machine starts sewing in a crosswise direction to the right. When on the the desired screen. length of seam has been obtained, press the reverse button. The sewn width in mm appears The machine now sews forwards until you press the reverse screen. The two remaining sides are automatically added. button again. The sewn length In mm appears on the With this icon, you open a window for opening, saving, deleting and closing a program. This icon allows you to open a window for when adjusting the length of the individual correcting sides. the balance of the rectangle. Use the sewn sample for reference Dialogue window: You can move the displayed rectangle in the sample as reference. The rectangle is automatically corrected. direction of the arrow; using the ÷/ icons. Use a sewn Programmable seam length program With the aid equal length of this function, you can specify a particular seam length and save it permanently when exiting the menu (e.g. for for joining together patchwork.) several pieces of fabric of Dialogue window: You can call up a setting that has already been stored or enter a new one. This function is automatically active when you open a program, for programming a new setting Sew the desired length, in order to determine a new seam length. The start of the seam is automatically tied off. If you press the reverse button when you reach automatically sewn in your specified length. the end of the seam, it will be tied off. All subsequent seams are now ÷ With this icon, you increase the programmed length of the seam. With this icon, you reduce the programmed length of the seam. With this icon, you open a window for opening, saving, deleting and closing a program. Twin needle U With this function, you reduce the width of your stitch in order to use a twin needle. This function must be switched off again when you remove the needle from the machine. It remains active even after the stitch has on again. Touch the icon a further time to been changed, including switch off the function. after the machine has been switched off and back Dialogue window: This function is automatically active when you open a program. for programming a new setting. You can enter the reduced in such a the screen. spacing width of the twin needle way that the selected dimension you are using with the +/- icons. The width of the is not exceeded. The stitch is depicted by a twin stitch is now needle on
-
 1
1 -
2
-
3
-
4
-
5
-
6
-
7
-
8
-
9
-
10
-
11
-
12
-
13
-
14
-
 15
15 -
 16
16 -
 17
17 -
 18
18 -
 19
19 -
 20
20 -
 21
21 -
 22
22 -
 23
23 -
 24
24 -
 25
25 -
26
-
27
-
28
-
29
-
30
-
31
-
32
-
33
-
34
-
35
-
36
-
37
-
38
-
39
-
40
-
41
-
42
-
43
-
44
-
45
-
46
-
47
-
48
-
49
-
50
-
51
-
52
-
53
-
54
-
55
-
56
-
57
-
58
-
59
-
60
-
61
-
62
-
63
-
64
-
65
-
66
-
67
-
68
-
69
-
70
-
71
-
72
-
73
-
74
-
75
-
76
-
77
-
78
-
79
-
80
-
81
-
82
-
83
-
84
-
85
-
86
-
87
-
88
-
89
-
90
-
91
-
92
-
93
-
94
-
95
-
96
-
97
-
98
-
99
-
100
-
101
-
102
-
103
-
104
-
105
-
106
-
107
-
108
-
109
-
110
-
111
-
112
-
113
-
114
-
115
-
116
-
117
-
118
-
119
-
120
-
121
-
122
-
123
-
124
-
125
-
126
-
127
-
128
-
129
-
130
-
131
-
132
-
133
-
134
-
135
-
136
-
137
-
138
-
139
-
140
-
141
-
142
-
143
-
144
-
145
-
146
-
147
-
148
-
149
-
150
-
151
-
152
-
153
-
154
-
155
-
156
-
157
-
158
-
159
-
160
-
161
-
162
-
163
-
164
-
165
-
166
-
167
-
168
-
169
-
170
-
171
-
172
-
173
-
174
-
175
-
176
-
177
-
178
-
179
-
180
-
181
-
182
-
183
-
184
-
185
-
186
-
187
-
188
-
189
-
190
-
191
 |
 |