eMachines T6528 NG3 Hardware Reference - Page 178
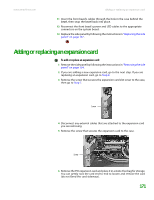
Adding or replacing an expansion card
 |
View all eMachines T6528 manuals
Add to My Manuals
Save this manual to your list of manuals |
Page 178 highlights
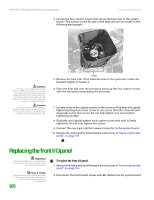
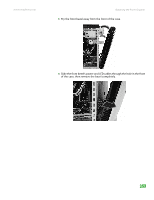
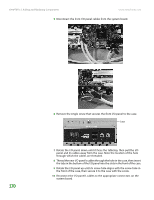
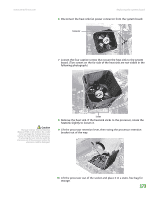
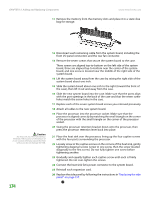
www.emachines.com Adding or replacing an expansion card 11 Insert the front bezel's cables through the hole in the case behind the bezel, then snap the bezel back into place. 12 Reconnect the front bezel's power and LED cables to the appropriate connectors on the system board. 13 Replace the side panel by following the instructions in "Replacing the side panel" on page 157. Adding or replacing an expansion card To add or replace an expansion card: 1 Remove the side panel by following the instructions in "Removing the side panel" on page 154. 2 If you are adding a new expansion card, go to the next step. If you are replacing an expansion card, go to Step 4. 3 Remove the screw that secures the expansion card slot cover to the case, then go to Step 7. Screw 4 Disconnect any external cables that are attached to the expansion card you are removing. 5 Remove the screw that secures the expansion card to the case. Screw 6 Remove the PCI expansion card and place it in a static-free bag for storage. You can gently rock the card end-to-end to loosen and remove the card (do not bend the card sideways). 171
-
 1
1 -
2
-
3
-
4
-
5
-
6
-
7
-
8
-
9
-
10
-
11
-
12
-
13
-
14
-
15
-
16
-
17
-
18
-
19
-
20
-
21
-
22
-
23
-
24
-
25
-
26
-
27
-
28
-
29
-
30
-
31
-
32
-
33
-
34
-
35
-
36
-
37
-
38
-
39
-
40
-
41
-
42
-
43
-
44
-
45
-
46
-
47
-
48
-
49
-
50
-
51
-
52
-
53
-
54
-
55
-
56
-
57
-
58
-
59
-
60
-
61
-
62
-
63
-
64
-
65
-
66
-
67
-
68
-
69
-
70
-
71
-
72
-
73
-
74
-
75
-
76
-
77
-
78
-
79
-
80
-
81
-
82
-
83
-
84
-
85
-
86
-
87
-
88
-
89
-
90
-
91
-
92
-
93
-
94
-
95
-
96
-
97
-
98
-
99
-
100
-
101
-
102
-
103
-
104
-
105
-
106
-
107
-
108
-
109
-
110
-
111
-
112
-
113
-
114
-
115
-
116
-
117
-
118
-
119
-
120
-
121
-
122
-
123
-
124
-
125
-
126
-
127
-
128
-
129
-
130
-
131
-
132
-
133
-
134
-
135
-
136
-
137
-
138
-
139
-
140
-
141
-
142
-
143
-
144
-
145
-
146
-
147
-
148
-
149
-
150
-
151
-
152
-
153
-
154
-
155
-
156
-
157
-
158
-
159
-
160
-
161
-
162
-
163
-
164
-
165
-
166
-
167
-
168
-
169
-
170
-
171
-
172
-
 173
173 -
 174
174 -
 175
175 -
 176
176 -
 177
177 -
 178
178 -
 179
179 -
 180
180 -
 181
181 -
 182
182 -
 183
183 -
184
-
185
-
186
-
187
-
188
-
189
-
190
-
191
-
192
-
193
-
194
-
195
-
196
-
197
-
198
-
199
-
200
-
201
-
202
-
203
-
204
-
205
-
206
-
207
-
208
-
209
-
210
-
211
-
212
-
213
-
214
 |
 |