eMachines T6528 NG3 Hardware Reference - Page 64
Configuring your router, Testing your network, To con the Linksys EtherFast Cable/DSL router
 |
View all eMachines T6528 manuals
Add to My Manuals
Save this manual to your list of manuals |
Page 64 highlights
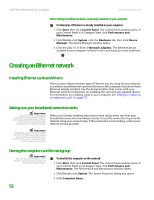
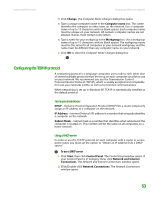
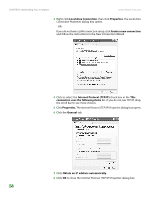
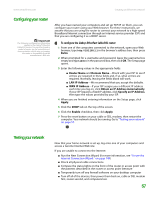
www.emachines.com Creating an Ethernet network Configuring your router Important The following configuration information applies to the Linksys® EtherFast Cable/DSL routers. For any other brand or model of router, see the manufacturer's documentation, which may accompany the router or be available from the manufacturer's Web site. After you have named your computers and set up TCP/IP on them, you can configure your router using your Web browser. For these instructions, we assume that you are using the router to connect your network to a high-speed Broadband Internet connection through an Internet service provider (ISP) and that you are configuring it as a DHCP server. To configure the Linksys EtherFast Cable/DSL router: 1 From one of the computers connected to the network, open your Web browser, type http://192.168.1.1 in the browser's address box, then press ENTER. 2 When prompted for a username and password, leave the username box empty and type admin in the password box, then click OK. The Setup page opens. 3 Enter the following values in the appropriate fields: ■ Router Name and Domain Name-Check with your ISP to see if entries are required in these fields and, if so, what entries are required. Normally, leaving the fields blank will work. ■ LAN IP Address-We recommend that you accept the defaults. ■ WAN IP Address-If your ISP assigns you a different IP address each time you log on, click Obtain an IP Address Automatically. If your ISP requires a fixed IP address, click Specify an IP Address, then type the values provided by your ISP. 4 When you are finished entering information on the Setup page, click Apply. 5 Click the DHCP tab on the top of the screen. 6 Click the Enable checkbox, then click Apply. 7 Press the reset button on your cable or DSL modem, then restart the computer. Your network should be running. Go to "Testing your network" on page 57. Testing your network Now that your home network is set up, log onto one of your computers and access a favorite Internet Web site. If you are unable to connect to the Internet: ■ Run the New Connection Wizard (for more information, see "To use the Internet Connection Wizard:" on page 149) ■ Check all physical cable connections ■ Compare the status lights on the front of the router or access point with the patterns described in the router or access point literature ■ Temporarily turn off any firewall software on your desktop computer ■ Turn off all of the devices, then power them back on, cable or DSL modem first, router second, and computers last. 57
-
 1
1 -
2
-
3
-
4
-
5
-
6
-
7
-
8
-
9
-
10
-
11
-
12
-
13
-
14
-
15
-
16
-
17
-
18
-
19
-
20
-
21
-
22
-
23
-
24
-
25
-
26
-
27
-
28
-
29
-
30
-
31
-
32
-
33
-
34
-
35
-
36
-
37
-
38
-
39
-
40
-
41
-
42
-
43
-
44
-
45
-
46
-
47
-
48
-
49
-
50
-
51
-
52
-
53
-
54
-
55
-
56
-
57
-
58
-
 59
59 -
 60
60 -
 61
61 -
 62
62 -
 63
63 -
 64
64 -
 65
65 -
 66
66 -
 67
67 -
 68
68 -
 69
69 -
70
-
71
-
72
-
73
-
74
-
75
-
76
-
77
-
78
-
79
-
80
-
81
-
82
-
83
-
84
-
85
-
86
-
87
-
88
-
89
-
90
-
91
-
92
-
93
-
94
-
95
-
96
-
97
-
98
-
99
-
100
-
101
-
102
-
103
-
104
-
105
-
106
-
107
-
108
-
109
-
110
-
111
-
112
-
113
-
114
-
115
-
116
-
117
-
118
-
119
-
120
-
121
-
122
-
123
-
124
-
125
-
126
-
127
-
128
-
129
-
130
-
131
-
132
-
133
-
134
-
135
-
136
-
137
-
138
-
139
-
140
-
141
-
142
-
143
-
144
-
145
-
146
-
147
-
148
-
149
-
150
-
151
-
152
-
153
-
154
-
155
-
156
-
157
-
158
-
159
-
160
-
161
-
162
-
163
-
164
-
165
-
166
-
167
-
168
-
169
-
170
-
171
-
172
-
173
-
174
-
175
-
176
-
177
-
178
-
179
-
180
-
181
-
182
-
183
-
184
-
185
-
186
-
187
-
188
-
189
-
190
-
191
-
192
-
193
-
194
-
195
-
196
-
197
-
198
-
199
-
200
-
201
-
202
-
203
-
204
-
205
-
206
-
207
-
208
-
209
-
210
-
211
-
212
-
213
-
214
 |
 |