eMachines T6528 NG3 Hardware Reference - Page 67
Using the network, Viewing shared drives and folders, Mapping a network drive
 |
View all eMachines T6528 manuals
Add to My Manuals
Save this manual to your list of manuals |
Page 67 highlights
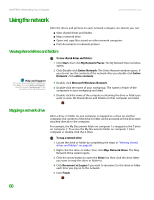
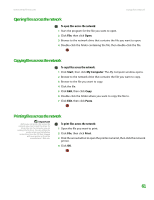
CHAPTER 6: Networking Your Computer www.emachines.com Using the network After the drives and printers on each network computer are shared, you can: ■ View shared drives and folders ■ Map a network drive ■ Open and copy files stored on other network computers ■ Print documents on network printers Viewing shared drives and folders Help and Support For more information about workgroups, click Start, then click Help and Support. Type the keyword workgroups in the Search box, then click the arrow. To view shared drives and folders: 1 Click Start, then click My Network Places. The My Network Places window opens. 2 Click/Double-click Entire Network. The Entire Network window opens. If you do not see the contents of the network after you double-click Entire Network, click entire contents. 3 Double-click Microsoft Windows Network. 4 Double-click the name of your workgroup. The names of each of the computers in your workgroup are listed. 5 Double-click the name of the computer containing the drive or folder you want to view. All shared drives and folders on that computer are listed. Mapping a network drive After a drive or folder on one computer is mapped as a drive on another computer, the contents of the drive or folder can be accessed as if the drive were attached directly to the computer. For example, the My Documents folder on computer 1 is mapped as the Z drive on computer 2. To access the My Documents folder on computer 1 from computer 2, double-click the Z drive. To map a network drive: 1 Locate the drive or folder by completing the steps in "Viewing shared drives and folders" on page 60. 2 Right-click the drive or folder, then click Map Network Drive. The Map Network Drive wizard opens. 3 Click the arrow button to open the Drive list, then click the drive letter you want to map this drive or folder to. 4 Click Reconnect at Logon if you want to reconnect to this drive or folder each time you log on to the network. 5 Click Finish. 60
-
 1
1 -
2
-
3
-
4
-
5
-
6
-
7
-
8
-
9
-
10
-
11
-
12
-
13
-
14
-
15
-
16
-
17
-
18
-
19
-
20
-
21
-
22
-
23
-
24
-
25
-
26
-
27
-
28
-
29
-
30
-
31
-
32
-
33
-
34
-
35
-
36
-
37
-
38
-
39
-
40
-
41
-
42
-
43
-
44
-
45
-
46
-
47
-
48
-
49
-
50
-
51
-
52
-
53
-
54
-
55
-
56
-
57
-
58
-
59
-
60
-
61
-
 62
62 -
 63
63 -
 64
64 -
 65
65 -
 66
66 -
 67
67 -
 68
68 -
 69
69 -
 70
70 -
 71
71 -
 72
72 -
73
-
74
-
75
-
76
-
77
-
78
-
79
-
80
-
81
-
82
-
83
-
84
-
85
-
86
-
87
-
88
-
89
-
90
-
91
-
92
-
93
-
94
-
95
-
96
-
97
-
98
-
99
-
100
-
101
-
102
-
103
-
104
-
105
-
106
-
107
-
108
-
109
-
110
-
111
-
112
-
113
-
114
-
115
-
116
-
117
-
118
-
119
-
120
-
121
-
122
-
123
-
124
-
125
-
126
-
127
-
128
-
129
-
130
-
131
-
132
-
133
-
134
-
135
-
136
-
137
-
138
-
139
-
140
-
141
-
142
-
143
-
144
-
145
-
146
-
147
-
148
-
149
-
150
-
151
-
152
-
153
-
154
-
155
-
156
-
157
-
158
-
159
-
160
-
161
-
162
-
163
-
164
-
165
-
166
-
167
-
168
-
169
-
170
-
171
-
172
-
173
-
174
-
175
-
176
-
177
-
178
-
179
-
180
-
181
-
182
-
183
-
184
-
185
-
186
-
187
-
188
-
189
-
190
-
191
-
192
-
193
-
194
-
195
-
196
-
197
-
198
-
199
-
200
-
201
-
202
-
203
-
204
-
205
-
206
-
207
-
208
-
209
-
210
-
211
-
212
-
213
-
214
 |
 |