Netgear D7800 User Manual - Page 258
Set Up a VPN Connection, Specify VPN Service in the Modem Router, To specify the VPN service
 |
View all Netgear D7800 manuals
Add to My Manuals
Save this manual to your list of manuals |
Page 258 highlights
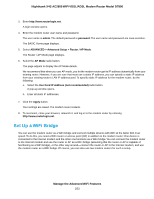
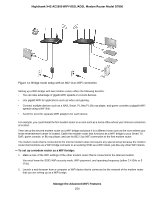
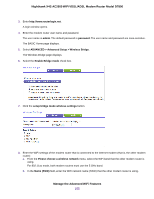
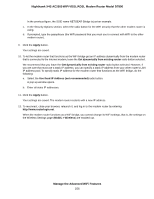
Nighthawk X4S AC2600 WiFi VDSL/ADSL Modem Router Model D7800 Set Up a VPN Connection A virtual private network (VPN) lets you use the Internet to securely access your network when you are not home. This type of VPN access is called a client-to-gateway tunnel. The computer is the client, and the modem router is the gateway. To use the VPN feature, you must log in to the modem router and enable VPN, and you must install and run VPN client software on the computer. Note The modem router does not support iOS or Android VPN client software. VPN uses DDNS or a static IP address to connect with your modem router. To use a DDNS service, register for an account with a host name (sometimes called a domain name). You use the host name to access your network. The modem router supports these accounts: NETGEAR, No-IP, and Dyn. See Set Up and Manage Dynamic DNS on page 168. If your Internet service provider (ISP) assigned a static WAN IP address (such as 50.196.x.x or 10.x.x.x) that never changes to your Internet account, the VPN can use that IP address to connect to your home network. Specify VPN Service in the Modem Router You must specify the VPN service settings in the modem router before you can use a VPN connection. To specify the VPN service: 1. Launch a web browser from a computer or WiFi device that is connected to the network. 2. Enter http://www.routerlogin.net. A login window opens. 3. Enter the modem router user name and password. The user name is admin. The default password is password. The user name and password are case-sensitive. The BASIC Home page displays. 4. Select ADVANCED > Advanced Setup > VPN Service. The VPN Service page displays. 5. Select the Enable VPN Service check box. By default, the VPN uses the UDP service type and uses port 12974. If you want to customize the service type and port, we recommend that you change these settings before you install the OpenVPN software. 6. To change the service type, scroll down and select the TCP radio button. 7. To change the port, scroll down to the Service Port field, and type the port number that you want to use. Use VPN to Access Your Network 258
-
 1
1 -
2
-
3
-
4
-
5
-
6
-
7
-
8
-
9
-
10
-
11
-
12
-
13
-
14
-
15
-
16
-
17
-
18
-
19
-
20
-
21
-
22
-
23
-
24
-
25
-
26
-
27
-
28
-
29
-
30
-
31
-
32
-
33
-
34
-
35
-
36
-
37
-
38
-
39
-
40
-
41
-
42
-
43
-
44
-
45
-
46
-
47
-
48
-
49
-
50
-
51
-
52
-
53
-
54
-
55
-
56
-
57
-
58
-
59
-
60
-
61
-
62
-
63
-
64
-
65
-
66
-
67
-
68
-
69
-
70
-
71
-
72
-
73
-
74
-
75
-
76
-
77
-
78
-
79
-
80
-
81
-
82
-
83
-
84
-
85
-
86
-
87
-
88
-
89
-
90
-
91
-
92
-
93
-
94
-
95
-
96
-
97
-
98
-
99
-
100
-
101
-
102
-
103
-
104
-
105
-
106
-
107
-
108
-
109
-
110
-
111
-
112
-
113
-
114
-
115
-
116
-
117
-
118
-
119
-
120
-
121
-
122
-
123
-
124
-
125
-
126
-
127
-
128
-
129
-
130
-
131
-
132
-
133
-
134
-
135
-
136
-
137
-
138
-
139
-
140
-
141
-
142
-
143
-
144
-
145
-
146
-
147
-
148
-
149
-
150
-
151
-
152
-
153
-
154
-
155
-
156
-
157
-
158
-
159
-
160
-
161
-
162
-
163
-
164
-
165
-
166
-
167
-
168
-
169
-
170
-
171
-
172
-
173
-
174
-
175
-
176
-
177
-
178
-
179
-
180
-
181
-
182
-
183
-
184
-
185
-
186
-
187
-
188
-
189
-
190
-
191
-
192
-
193
-
194
-
195
-
196
-
197
-
198
-
199
-
200
-
201
-
202
-
203
-
204
-
205
-
206
-
207
-
208
-
209
-
210
-
211
-
212
-
213
-
214
-
215
-
216
-
217
-
218
-
219
-
220
-
221
-
222
-
223
-
224
-
225
-
226
-
227
-
228
-
229
-
230
-
231
-
232
-
233
-
234
-
235
-
236
-
237
-
238
-
239
-
240
-
241
-
242
-
243
-
244
-
245
-
246
-
247
-
248
-
249
-
250
-
251
-
252
-
 253
253 -
 254
254 -
 255
255 -
 256
256 -
 257
257 -
 258
258 -
 259
259 -
 260
260 -
 261
261 -
 262
262 -
 263
263 -
264
-
265
-
266
-
267
-
268
-
269
-
270
-
271
-
272
-
273
-
274
-
275
-
276
-
277
-
278
-
279
-
280
-
281
-
282
-
283
-
284
-
285
-
286
-
287
-
288
-
289
-
290
-
291
-
292
-
293
-
294
-
295
-
296
-
297
-
298
-
299
 |
 |