Netgear D7800 User Manual - Page 261
Install OpenVPN Software on a Mac Computer, Use VPN to Access Your Network
 |
View all Netgear D7800 manuals
Add to My Manuals
Save this manual to your list of manuals |
Page 261 highlights
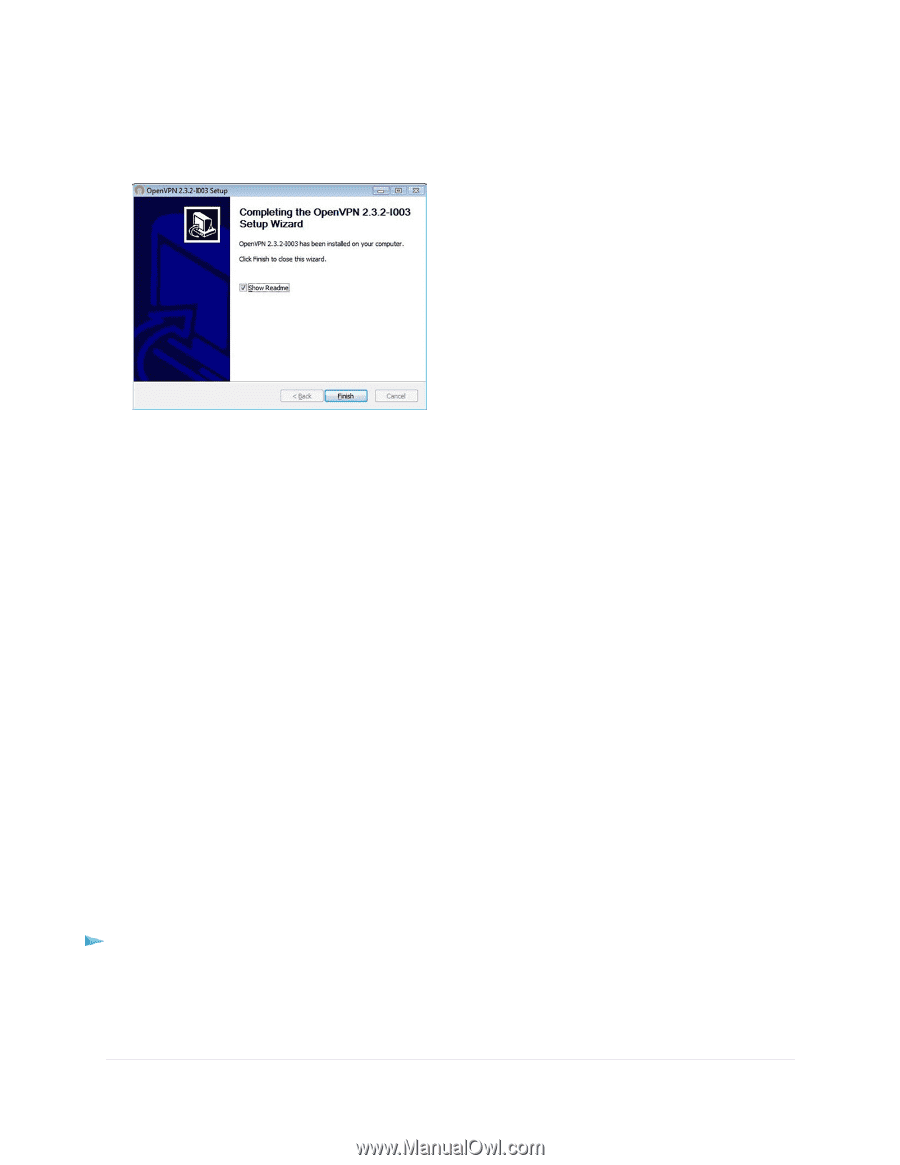
Nighthawk X4S AC2600 WiFi VDSL/ADSL Modem Router Model D7800 The window displays the progress of the installation and then displays the final installation window. 16. Click the Finish button. 17. Unzip the configuration files that you downloaded in Step 6 and copy them to the folder in which the OpenVPN client utility is installed on your computer. If your device is a Windows 64-bit system, the OpenVPN client utility is installed by default in the C:\Program files\OpenVPN\config\ folder. 18. Modify the VPN interface name to NETGEAR-VPN: a. In Windows, select Start > Control Panel > Network and Internet > Network Connections (or Network and Sharing Center). The network information displays. b. In the local area connection list, find the local area connection with the device name TAP-Windows Adapter. c. Select the local area connection and change its name (not its device name) to NETGEAR-VPN. If you do not change the VPN interface name, the VPN tunnel connection will fail. For more information about using OpenVPN on a Windows computer, visit openvpn.net/index.php/open-source/documentation/howto.html#quick. Install OpenVPN Software on a Mac Computer You must install Open VPN software on each computer that you plan to use for VPN connections to your modem router. To install VPN client software on a Mac computer: 1. Launch a web browser from a computer or WiFi device that is connected to the network. 2. Enter http://www.routerlogin.net. Use VPN to Access Your Network 261
-
 1
1 -
2
-
3
-
4
-
5
-
6
-
7
-
8
-
9
-
10
-
11
-
12
-
13
-
14
-
15
-
16
-
17
-
18
-
19
-
20
-
21
-
22
-
23
-
24
-
25
-
26
-
27
-
28
-
29
-
30
-
31
-
32
-
33
-
34
-
35
-
36
-
37
-
38
-
39
-
40
-
41
-
42
-
43
-
44
-
45
-
46
-
47
-
48
-
49
-
50
-
51
-
52
-
53
-
54
-
55
-
56
-
57
-
58
-
59
-
60
-
61
-
62
-
63
-
64
-
65
-
66
-
67
-
68
-
69
-
70
-
71
-
72
-
73
-
74
-
75
-
76
-
77
-
78
-
79
-
80
-
81
-
82
-
83
-
84
-
85
-
86
-
87
-
88
-
89
-
90
-
91
-
92
-
93
-
94
-
95
-
96
-
97
-
98
-
99
-
100
-
101
-
102
-
103
-
104
-
105
-
106
-
107
-
108
-
109
-
110
-
111
-
112
-
113
-
114
-
115
-
116
-
117
-
118
-
119
-
120
-
121
-
122
-
123
-
124
-
125
-
126
-
127
-
128
-
129
-
130
-
131
-
132
-
133
-
134
-
135
-
136
-
137
-
138
-
139
-
140
-
141
-
142
-
143
-
144
-
145
-
146
-
147
-
148
-
149
-
150
-
151
-
152
-
153
-
154
-
155
-
156
-
157
-
158
-
159
-
160
-
161
-
162
-
163
-
164
-
165
-
166
-
167
-
168
-
169
-
170
-
171
-
172
-
173
-
174
-
175
-
176
-
177
-
178
-
179
-
180
-
181
-
182
-
183
-
184
-
185
-
186
-
187
-
188
-
189
-
190
-
191
-
192
-
193
-
194
-
195
-
196
-
197
-
198
-
199
-
200
-
201
-
202
-
203
-
204
-
205
-
206
-
207
-
208
-
209
-
210
-
211
-
212
-
213
-
214
-
215
-
216
-
217
-
218
-
219
-
220
-
221
-
222
-
223
-
224
-
225
-
226
-
227
-
228
-
229
-
230
-
231
-
232
-
233
-
234
-
235
-
236
-
237
-
238
-
239
-
240
-
241
-
242
-
243
-
244
-
245
-
246
-
247
-
248
-
249
-
250
-
251
-
252
-
253
-
254
-
255
-
 256
256 -
 257
257 -
 258
258 -
 259
259 -
 260
260 -
 261
261 -
 262
262 -
 263
263 -
 264
264 -
 265
265 -
 266
266 -
267
-
268
-
269
-
270
-
271
-
272
-
273
-
274
-
275
-
276
-
277
-
278
-
279
-
280
-
281
-
282
-
283
-
284
-
285
-
286
-
287
-
288
-
289
-
290
-
291
-
292
-
293
-
294
-
295
-
296
-
297
-
298
-
299
 |
 |