HP MSA 1040 HP MSA 1040 SMU Reference Guide (762784-001, March 2014) - Page 21
About volume cache options, Using write-back or write-through caching, Optimizing read-ahead caching
 |
View all HP MSA 1040 manuals
Add to My Manuals
Save this manual to your list of manuals |
Page 21 highlights
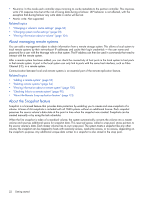
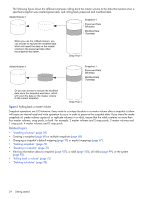
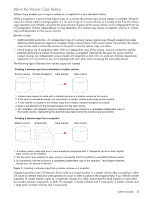
About volume cache options You can set options that optimize reads and writes performed for each volume. Using write-back or write-through caching CAUTION: Only disable write-back caching if you fully understand how the host operating system, application, and adapter move data. If used incorrectly, you might hinder system performance. You can change a volume's write-back cache setting. Write-back is a cache-writing strategy in which the controller receives the data to be written to disks, stores it in the memory buffer, and immediately sends the host operating system a signal that the write operation is complete, without waiting until the data is actually written to the disk. Write-back cache mirrors all of the data from one controller module cache to the other. Write-back cache improves the performance of write operations and the throughput of the controller. When write-back cache is disabled, write-through becomes the cache-writing strategy. Using write-through cache, the controller writes the data to the disks before signaling the host operating system that the process is complete. Write-through cache has lower write operation and throughput performance than write-back, but it is the safer strategy, with minimum risk of data loss on power failure. However, write-through cache does not mirror the write data because the data is written to the disk before posting command completion and mirroring is not required. You can set conditions that cause the controller to change from write-back caching to write-through caching. In both caching strategies, active-active failover of the controllers is enabled. You can enable and disable the write-back cache for each volume. By default, volume write-back cache is enabled. Because controller cache is backed by super-capacitor technology, if the system loses power, data is not lost. For most applications, this is the preferred setting. If you are doing random access to this volume, leave the write-back cache enabled. TIP: The best practice for a fault-tolerant configuration is to use write-back caching. Optimizing read-ahead caching CAUTION: Only change read-ahead cache settings if you fully understand how the host operating system, application, and adapter move data so that you can adjust the settings accordingly. You can optimize a volume for sequential reads or streaming data by changing its read-ahead cache settings. Read ahead can be forward (that is, increasing LBAs) or reverse (that is, decreasing LBAs). Increasing the read-ahead cache size can greatly improve performance for multiple sequential read streams. However, increasing read-ahead size will likely decrease random read performance. • Adaptive. This option works well for most applications: it enables adaptive read-ahead, which allows the controller to dynamically calculate the optimum read-ahead size for the current workload. This is the default. • Stripe. This option sets the read-ahead size to one stripe. The controllers treat non-RAID and RAID-1 vdisks internally as if they have a stripe size of 512 KB, even though they are not striped. • Specific size options. These options let you select an amount of data for all accesses. • Disabled. This option turns off read-ahead cache. This is useful if the host is triggering read ahead for what are random accesses. This can happen if the host breaks up the random I/O into two smaller reads, triggering read ahead. You can also change the optimization mode. • Standard. This mode works well for typical applications where accesses are a combination of sequential and random; this method is the default. For example, use this mode for transaction-based and database update applications that write small files in random order. System concepts 21
-
 1
1 -
2
-
3
-
4
-
5
-
6
-
7
-
8
-
9
-
10
-
11
-
12
-
13
-
14
-
15
-
 16
16 -
 17
17 -
 18
18 -
 19
19 -
 20
20 -
 21
21 -
 22
22 -
 23
23 -
 24
24 -
 25
25 -
 26
26 -
27
-
28
-
29
-
30
-
31
-
32
-
33
-
34
-
35
-
36
-
37
-
38
-
39
-
40
-
41
-
42
-
43
-
44
-
45
-
46
-
47
-
48
-
49
-
50
-
51
-
52
-
53
-
54
-
55
-
56
-
57
-
58
-
59
-
60
-
61
-
62
-
63
-
64
-
65
-
66
-
67
-
68
-
69
-
70
-
71
-
72
-
73
-
74
-
75
-
76
-
77
-
78
-
79
-
80
-
81
-
82
-
83
-
84
-
85
-
86
-
87
-
88
-
89
-
90
-
91
-
92
-
93
-
94
-
95
-
96
-
97
-
98
-
99
-
100
-
101
-
102
-
103
-
104
-
105
-
106
-
107
-
108
-
109
-
110
-
111
-
112
-
113
-
114
-
115
-
116
-
117
-
118
-
119
-
120
-
121
-
122
-
123
-
124
-
125
-
126
-
127
-
128
-
129
-
130
-
131
-
132
-
133
-
134
-
135
-
136
-
137
-
138
-
139
-
140
-
141
-
142
-
143
-
144
-
145
-
146
-
147
-
148
-
149
-
150
-
151
-
152
-
153
-
154
-
155
-
156
-
157
-
158
-
159
-
160
-
161
-
162
-
163
-
164
-
165
-
166
-
167
-
168
-
169
-
170
-
171
-
172
-
173
-
174
-
175
-
176
-
177
-
178
-
179
-
180
-
181
-
182
-
183
-
184
-
185
-
186
-
187
-
188
-
189
-
190
 |
 |