Yamaha 01V96 Owner's Manual - Page 134
Using the Solo Function, To solo and monitor Input Channels, press the corresponding LAYER button
 |
View all Yamaha 01V96 manuals
Add to My Manuals
Save this manual to your list of manuals |
Page 134 highlights
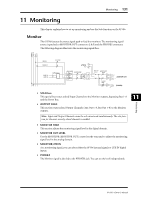
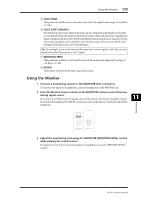
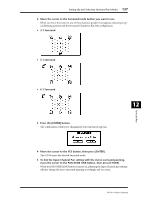
134 Chapter 11-Monitoring Using the Solo Function You can solo and monitor Input Channels, Aux Out 1-8, and Bus Out 1-8 using the [SOLO] buttons on the top panel. 1 Press the [DIO/SETUP] button repeatedly until the DIO/Setup | Monitor page appears. 2 Set the SOLO parameter to On. Set other parameters on the page, if necessary. 3 To solo and monitor Input Channels, press the corresponding LAYER button to select a Layer that contains the desired channels, then press the channel [SOLO] buttons. The channel [SOLO] button indicators and the SOLO [SOLO] indicator light up. Only the soloed Input Channel signals are fed to the Monitor outputs. Tip: If the SEL MODE parameter is set to Mix Solo on the DIO/Setup | Monitor page, you can solo multiple Channels simultaneously. 4 To solo and monitor Output Channels, press the LAYER [MASTER] button, then press the channel [SOLO] buttons. Input and Output Channels (Aux Out 1-8, Bus Out 1-8) cannot be solo-monitored simultaneously. For example, if you solo an Input Channel, then solo an Output Channel, the first solo channel is cancelled. If you solo an Output Channel first, then solo an Input Channel, canceling the Input Channel's solo will activate the Output Channel's solo. 5 You can unsolo all soloed channels by pressing all illuminated channel [SOLO] buttons. The button indicators turn off. You can also unsolo all soloed channels by pressing the SOLO [CLEAR] button. 01V96-Owner's Manual
-
 1
1 -
2
-
3
-
4
-
5
-
6
-
7
-
8
-
9
-
10
-
11
-
12
-
13
-
14
-
15
-
16
-
17
-
18
-
19
-
20
-
21
-
22
-
23
-
24
-
25
-
26
-
27
-
28
-
29
-
30
-
31
-
32
-
33
-
34
-
35
-
36
-
37
-
38
-
39
-
40
-
41
-
42
-
43
-
44
-
45
-
46
-
47
-
48
-
49
-
50
-
51
-
52
-
53
-
54
-
55
-
56
-
57
-
58
-
59
-
60
-
61
-
62
-
63
-
64
-
65
-
66
-
67
-
68
-
69
-
70
-
71
-
72
-
73
-
74
-
75
-
76
-
77
-
78
-
79
-
80
-
81
-
82
-
83
-
84
-
85
-
86
-
87
-
88
-
89
-
90
-
91
-
92
-
93
-
94
-
95
-
96
-
97
-
98
-
99
-
100
-
101
-
102
-
103
-
104
-
105
-
106
-
107
-
108
-
109
-
110
-
111
-
112
-
113
-
114
-
115
-
116
-
117
-
118
-
119
-
120
-
121
-
122
-
123
-
124
-
125
-
126
-
127
-
128
-
 129
129 -
 130
130 -
 131
131 -
 132
132 -
 133
133 -
 134
134 -
 135
135 -
 136
136 -
 137
137 -
 138
138 -
 139
139 -
140
-
141
-
142
-
143
-
144
-
145
-
146
-
147
-
148
-
149
-
150
-
151
-
152
-
153
-
154
-
155
-
156
-
157
-
158
-
159
-
160
-
161
-
162
-
163
-
164
-
165
-
166
-
167
-
168
-
169
-
170
-
171
-
172
-
173
-
174
-
175
-
176
-
177
-
178
-
179
-
180
-
181
-
182
-
183
-
184
-
185
-
186
-
187
-
188
-
189
-
190
-
191
-
192
-
193
-
194
-
195
-
196
-
197
-
198
-
199
-
200
-
201
-
202
-
203
-
204
-
205
-
206
-
207
-
208
-
209
-
210
-
211
-
212
-
213
-
214
-
215
-
216
-
217
-
218
-
219
-
220
-
221
-
222
-
223
-
224
-
225
-
226
-
227
-
228
-
229
-
230
-
231
-
232
-
233
-
234
-
235
-
236
-
237
-
238
-
239
-
240
-
241
-
242
-
243
-
244
-
245
-
246
-
247
-
248
-
249
-
250
-
251
-
252
-
253
-
254
-
255
-
256
-
257
-
258
-
259
-
260
-
261
-
262
-
263
-
264
-
265
-
266
-
267
-
268
-
269
-
270
-
271
-
272
-
273
-
274
-
275
-
276
-
277
-
278
-
279
-
280
-
281
-
282
-
283
-
284
-
285
-
286
-
287
-
288
-
289
-
290
-
291
-
292
-
293
-
294
-
295
-
296
-
297
-
298
-
299
-
300
-
301
-
302
-
303
-
304
-
305
-
306
-
307
-
308
-
309
-
310
-
311
-
312
-
313
-
314
-
315
-
316
-
317
-
318
-
319
-
320
-
321
-
322
-
323
-
324
-
325
-
326
-
327
-
328
-
329
-
330
-
331
-
332
-
333
-
334
 |
 |
