Yamaha 01V96 Owner's Manual - Page 64
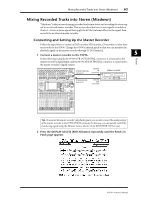
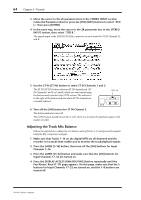
Adjusting the Track Mix Balance, Use the ST IN [ST IN] button to select ST IN Channels 1 and 2.
 |
View all Yamaha 01V96 manuals
Add to My Manuals
Save this manual to your list of manuals |
Page 64 highlights
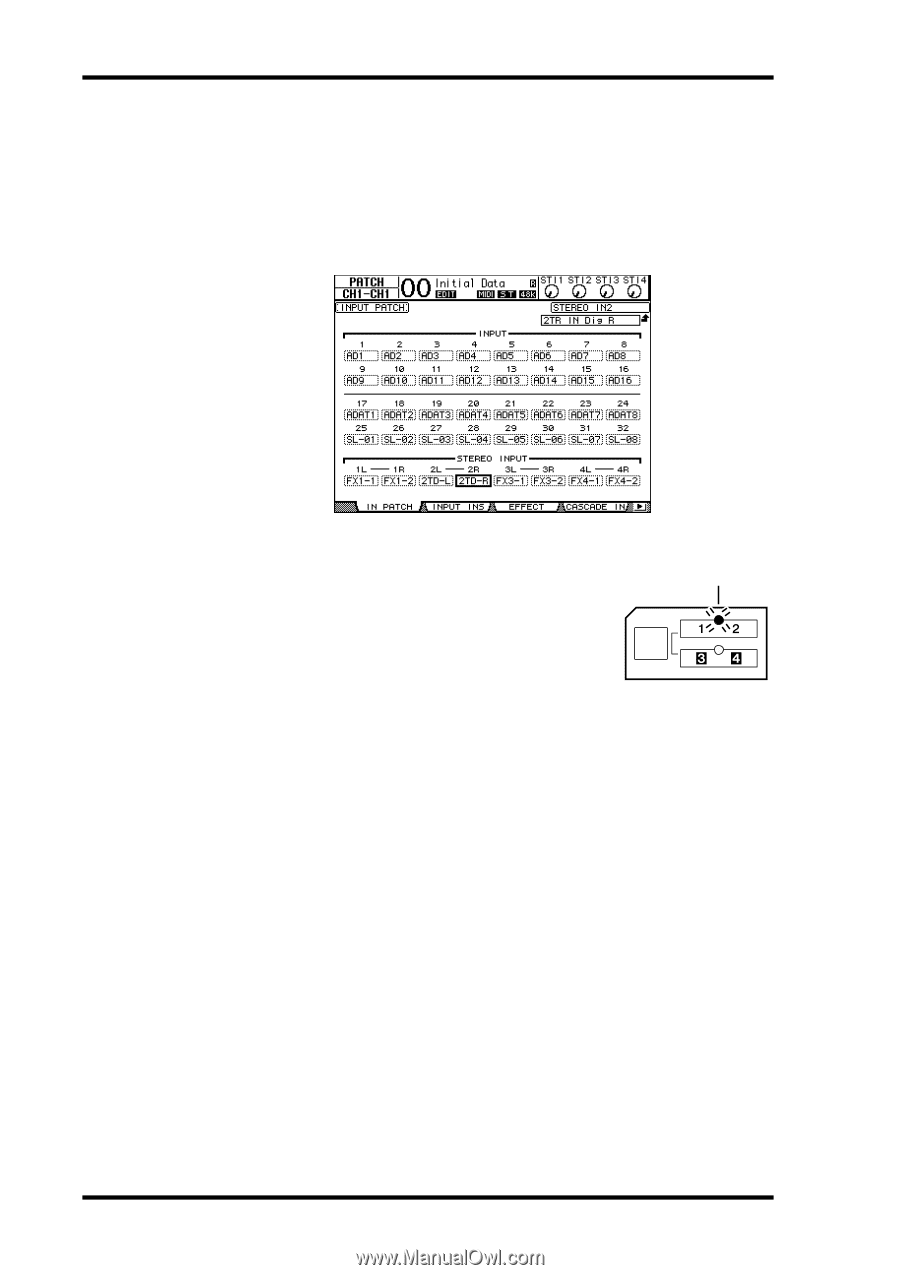
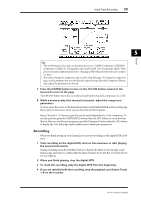
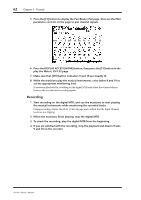
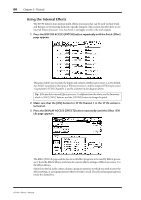
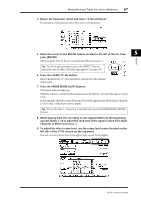
64 Chapter 5-Tutorial 3 Move the cursor to the 2L parameter box in the STEREO INPUT section, rotate the Parameter wheel or press the [INC]/[DEC] buttons to select "2TD L," then press [ENTER]. 4 In the same way, move the cursor to the 2R parameter box in the STEREO INPUT section, then select "2TD R." The signals input at the 2TR IN DIGITAL connector are now routed to ST IN Channel 2 L and R. 5 Use the ST IN [ST IN] button to select ST IN Channels 1 and 2. The ST IN [ST IN] button selects an ST IN channel pair (ST IN Channels 1 and 2 or 3 and 4) which you can control using the buttons and controls in the ST IN section. The indicators to the right of the button indicate which ST IN channels are currently selected. ST IN Lights up. 6 Turn off the [ON] button for ST IN Channel 2. The button indicator turns off. This [ON] button should be turned on only when you monitor the playback signal of the master recorder. Adjusting the Track Mix Balance Follow the steps below to adjust the mix balance among Tracks 1-16 and process the signals using the EQ, compressor and gate. 1 Make sure that Tracks 1-16 on the digital MTR are all disarmed and the recorder is in a mode that enables you to monitor the track playback signals. 2 Press the LAYER [1-16] button, then turn off the [ON] buttons for Input Channels 1-16. 3 Press the LAYER [17-32] button and make sure that the [ON] buttons for Input Channels 17-32 are turned on. 4 Press the DISPLAY ACCESS [PAN/ROUTING] button repeatedly until the Pan/Route | Rout17-STI page appears. On this page, make sure that the S buttons for Input Channels 17-32 are turned on, and the 1-8 buttons are turned off. 01V96-Owner's Manual
-
 1
1 -
2
-
3
-
4
-
5
-
6
-
7
-
8
-
9
-
10
-
11
-
12
-
13
-
14
-
15
-
16
-
17
-
18
-
19
-
20
-
21
-
22
-
23
-
24
-
25
-
26
-
27
-
28
-
29
-
30
-
31
-
32
-
33
-
34
-
35
-
36
-
37
-
38
-
39
-
40
-
41
-
42
-
43
-
44
-
45
-
46
-
47
-
48
-
49
-
50
-
51
-
52
-
53
-
54
-
55
-
56
-
57
-
58
-
 59
59 -
 60
60 -
 61
61 -
 62
62 -
 63
63 -
 64
64 -
 65
65 -
 66
66 -
 67
67 -
 68
68 -
 69
69 -
70
-
71
-
72
-
73
-
74
-
75
-
76
-
77
-
78
-
79
-
80
-
81
-
82
-
83
-
84
-
85
-
86
-
87
-
88
-
89
-
90
-
91
-
92
-
93
-
94
-
95
-
96
-
97
-
98
-
99
-
100
-
101
-
102
-
103
-
104
-
105
-
106
-
107
-
108
-
109
-
110
-
111
-
112
-
113
-
114
-
115
-
116
-
117
-
118
-
119
-
120
-
121
-
122
-
123
-
124
-
125
-
126
-
127
-
128
-
129
-
130
-
131
-
132
-
133
-
134
-
135
-
136
-
137
-
138
-
139
-
140
-
141
-
142
-
143
-
144
-
145
-
146
-
147
-
148
-
149
-
150
-
151
-
152
-
153
-
154
-
155
-
156
-
157
-
158
-
159
-
160
-
161
-
162
-
163
-
164
-
165
-
166
-
167
-
168
-
169
-
170
-
171
-
172
-
173
-
174
-
175
-
176
-
177
-
178
-
179
-
180
-
181
-
182
-
183
-
184
-
185
-
186
-
187
-
188
-
189
-
190
-
191
-
192
-
193
-
194
-
195
-
196
-
197
-
198
-
199
-
200
-
201
-
202
-
203
-
204
-
205
-
206
-
207
-
208
-
209
-
210
-
211
-
212
-
213
-
214
-
215
-
216
-
217
-
218
-
219
-
220
-
221
-
222
-
223
-
224
-
225
-
226
-
227
-
228
-
229
-
230
-
231
-
232
-
233
-
234
-
235
-
236
-
237
-
238
-
239
-
240
-
241
-
242
-
243
-
244
-
245
-
246
-
247
-
248
-
249
-
250
-
251
-
252
-
253
-
254
-
255
-
256
-
257
-
258
-
259
-
260
-
261
-
262
-
263
-
264
-
265
-
266
-
267
-
268
-
269
-
270
-
271
-
272
-
273
-
274
-
275
-
276
-
277
-
278
-
279
-
280
-
281
-
282
-
283
-
284
-
285
-
286
-
287
-
288
-
289
-
290
-
291
-
292
-
293
-
294
-
295
-
296
-
297
-
298
-
299
-
300
-
301
-
302
-
303
-
304
-
305
-
306
-
307
-
308
-
309
-
310
-
311
-
312
-
313
-
314
-
315
-
316
-
317
-
318
-
319
-
320
-
321
-
322
-
323
-
324
-
325
-
326
-
327
-
328
-
329
-
330
-
331
-
332
-
333
-
334
 |
 |