Yamaha 01V96 Owner's Manual - Page 215
Assigning Scenes to Program Changes for Remote Recall, Tx ON/OFF, ECHO ON/OFF
 |
View all Yamaha 01V96 manuals
Add to My Manuals
Save this manual to your list of manuals |
Page 215 highlights
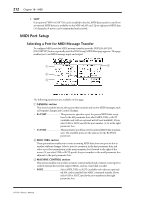
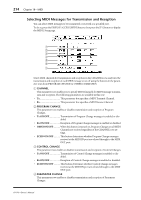
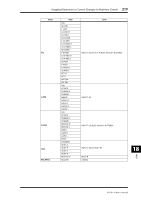
Assigning Scenes to Program Changes for Remote Recall 215 • Tx ON/OFF Transmission of Parameter Change messages is enabled or disabled. • Rx ON/OFF Reception of Parameter Change messages is enabled or disabled. • ECHO ON/OFF............This button determines whether Parameter Change messages received at the MIDI IN port are echoed through to the MIDI OUT port. E BULK This parameter row enables or disables reception of Bulk Dump data. • Rx ON/OFF Reception of Bulk Dump data is enabled or disabled. F OTHER COMMANDS • ECHO ON/OFF............This button determines whether other MIDI messages received at the MIDI IN port are echoed through to the MIDI OUT port. G Fader Resolution This parameter specifies the resolution of the value output when you operate the 01V96's faders. To transfer fader value data between two cascaded 01V96s, or to record the 01V96 operation to or play it back from a sequencer, select the HIGH button. When the LOW button is selected, the fader resolution switches to 256 steps. Assigning Scenes to Program Changes for Remote Recall You can assign 01V96 Scenes to MIDI Program Changes for remote recall. When you recall a Scene on the 01V96, the unit transmits the assigned Program Change to the connected MIDI device. When the 01V96 receives a Program Change, the assigned Scene is recalled. Initially, Scenes 1 through 99 are assigned sequentially to Program Changes 1 through 99, and Scene #0 is assigned to Program Change #100, although you can change these assignments. Tip: You can store a Scene to Program Change assignment table to an external device by using MIDI Bulk Dump or the included Studio Manager software. 1 Press the DISPLAY ACCESS [DIO/SETUP] button repeatedly until the DIO/Setup | MIDI/Host page appears, then specify ports for transmission and reception of MIDI messages (see page 212). 2 Make connections using the ports selected in Step 1 so that the 01V96 can transfer MIDI messages to and from the external device. 3 Press the DISPLAY ACCESS [MIDI] button, then press the [F2] button. The MIDI | Pgm Asgn page appears. 18 01V96-Owner's Manual MIDI
-
 1
1 -
2
-
3
-
4
-
5
-
6
-
7
-
8
-
9
-
10
-
11
-
12
-
13
-
14
-
15
-
16
-
17
-
18
-
19
-
20
-
21
-
22
-
23
-
24
-
25
-
26
-
27
-
28
-
29
-
30
-
31
-
32
-
33
-
34
-
35
-
36
-
37
-
38
-
39
-
40
-
41
-
42
-
43
-
44
-
45
-
46
-
47
-
48
-
49
-
50
-
51
-
52
-
53
-
54
-
55
-
56
-
57
-
58
-
59
-
60
-
61
-
62
-
63
-
64
-
65
-
66
-
67
-
68
-
69
-
70
-
71
-
72
-
73
-
74
-
75
-
76
-
77
-
78
-
79
-
80
-
81
-
82
-
83
-
84
-
85
-
86
-
87
-
88
-
89
-
90
-
91
-
92
-
93
-
94
-
95
-
96
-
97
-
98
-
99
-
100
-
101
-
102
-
103
-
104
-
105
-
106
-
107
-
108
-
109
-
110
-
111
-
112
-
113
-
114
-
115
-
116
-
117
-
118
-
119
-
120
-
121
-
122
-
123
-
124
-
125
-
126
-
127
-
128
-
129
-
130
-
131
-
132
-
133
-
134
-
135
-
136
-
137
-
138
-
139
-
140
-
141
-
142
-
143
-
144
-
145
-
146
-
147
-
148
-
149
-
150
-
151
-
152
-
153
-
154
-
155
-
156
-
157
-
158
-
159
-
160
-
161
-
162
-
163
-
164
-
165
-
166
-
167
-
168
-
169
-
170
-
171
-
172
-
173
-
174
-
175
-
176
-
177
-
178
-
179
-
180
-
181
-
182
-
183
-
184
-
185
-
186
-
187
-
188
-
189
-
190
-
191
-
192
-
193
-
194
-
195
-
196
-
197
-
198
-
199
-
200
-
201
-
202
-
203
-
204
-
205
-
206
-
207
-
208
-
209
-
 210
210 -
 211
211 -
 212
212 -
 213
213 -
 214
214 -
 215
215 -
 216
216 -
 217
217 -
 218
218 -
 219
219 -
 220
220 -
221
-
222
-
223
-
224
-
225
-
226
-
227
-
228
-
229
-
230
-
231
-
232
-
233
-
234
-
235
-
236
-
237
-
238
-
239
-
240
-
241
-
242
-
243
-
244
-
245
-
246
-
247
-
248
-
249
-
250
-
251
-
252
-
253
-
254
-
255
-
256
-
257
-
258
-
259
-
260
-
261
-
262
-
263
-
264
-
265
-
266
-
267
-
268
-
269
-
270
-
271
-
272
-
273
-
274
-
275
-
276
-
277
-
278
-
279
-
280
-
281
-
282
-
283
-
284
-
285
-
286
-
287
-
288
-
289
-
290
-
291
-
292
-
293
-
294
-
295
-
296
-
297
-
298
-
299
-
300
-
301
-
302
-
303
-
304
-
305
-
306
-
307
-
308
-
309
-
310
-
311
-
312
-
313
-
314
-
315
-
316
-
317
-
318
-
319
-
320
-
321
-
322
-
323
-
324
-
325
-
326
-
327
-
328
-
329
-
330
-
331
-
332
-
333
-
334
 |
 |
