Yamaha 01V96 Owner's Manual - Page 216
Assigning Parameters to Control Changes for Real-time Control
 |
View all Yamaha 01V96 manuals
Add to My Manuals
Save this manual to your list of manuals |
Page 216 highlights
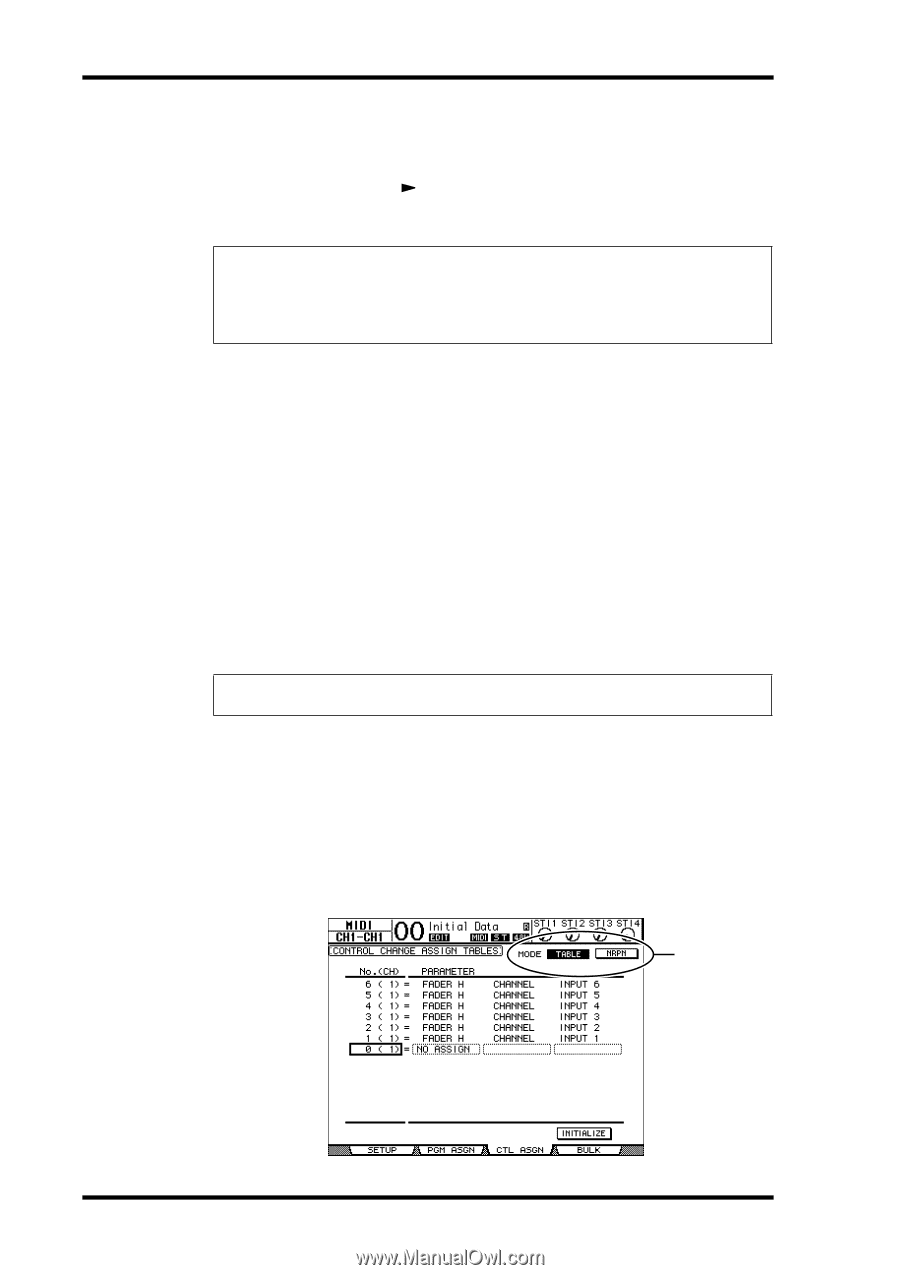
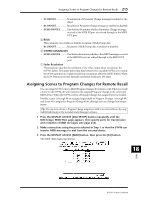
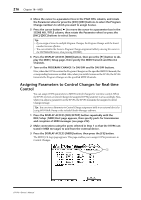
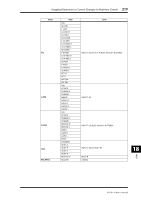
216 Chapter 18-MIDI 4 Move the cursor to a parameter box in the PGM CHG column, and rotate the Parameter wheel or press the [INC]/[DEC] buttons to select the Program Change numbers to which you want to assign Scenes. 5 Press the cursor button [ ] to move the cursor to a parameter box in the SCENE NO./TITLE column, then rotate the Parameter wheel or press the [INC]/[DEC] buttons to select Scenes. Tip: • If you assign a Scene to multiple Program Changes, the Program Change with the lowest number becomes effective. • You can initialize the Scene to Program Change assignment table by moving the cursor to the INITIALIZE button, then pressing [ENTER]. 6 Press the DISPLAY ACCESS [MIDI] button, then press the [F1] button to display the MIDI | Setup page, then specify the MIDI Transmit and Receive Channels. 7 Turn on the PROGRAM CHANGE Tx ON/OFF and Rx ON/OFF buttons. Now, when the 01V96 receives the Program Changes on the specified MIDI Channels, the corresponding Scenes are recalled. Also, when you switch Scenes on the 01V96, the 01V96 transmits the Program Changes on the specified MIDI Channels. Assigning Parameters to Control Changes for Real-time Control You can assign 01V96 parameters to MIDI Control Changes for real-time control. When the 01V96 receives a Control Change, the assigned 01V96 parameter is set accordingly. Also, when you adjust a parameter on the 01V96, the 01V96 transmits the assigned Control Change message. Tip: You can store a Parameter to Control Change assignment table to an external device by using MIDI Bulk Dump or the included Studio Manager software. 1 Press the DISPLAY ACCESS [DIO/SETUP] button repeatedly until the DIO/Setup | MIDI/Host page appears, then specify ports for transmission and reception of MIDI messages (see page 212). 2 Make connections using the ports selected in Step 1 so that the 01V96 can transfer MIDI messages to and from the external device. 3 Press the DISPLAY ACCESS [MIDI] button, then press the [F3] button. The MIDI | Ctl Asgn page appears. This page enables you to assign 01V96 parameters to Control Changes. 1 01V96-Owner's Manual
-
 1
1 -
2
-
3
-
4
-
5
-
6
-
7
-
8
-
9
-
10
-
11
-
12
-
13
-
14
-
15
-
16
-
17
-
18
-
19
-
20
-
21
-
22
-
23
-
24
-
25
-
26
-
27
-
28
-
29
-
30
-
31
-
32
-
33
-
34
-
35
-
36
-
37
-
38
-
39
-
40
-
41
-
42
-
43
-
44
-
45
-
46
-
47
-
48
-
49
-
50
-
51
-
52
-
53
-
54
-
55
-
56
-
57
-
58
-
59
-
60
-
61
-
62
-
63
-
64
-
65
-
66
-
67
-
68
-
69
-
70
-
71
-
72
-
73
-
74
-
75
-
76
-
77
-
78
-
79
-
80
-
81
-
82
-
83
-
84
-
85
-
86
-
87
-
88
-
89
-
90
-
91
-
92
-
93
-
94
-
95
-
96
-
97
-
98
-
99
-
100
-
101
-
102
-
103
-
104
-
105
-
106
-
107
-
108
-
109
-
110
-
111
-
112
-
113
-
114
-
115
-
116
-
117
-
118
-
119
-
120
-
121
-
122
-
123
-
124
-
125
-
126
-
127
-
128
-
129
-
130
-
131
-
132
-
133
-
134
-
135
-
136
-
137
-
138
-
139
-
140
-
141
-
142
-
143
-
144
-
145
-
146
-
147
-
148
-
149
-
150
-
151
-
152
-
153
-
154
-
155
-
156
-
157
-
158
-
159
-
160
-
161
-
162
-
163
-
164
-
165
-
166
-
167
-
168
-
169
-
170
-
171
-
172
-
173
-
174
-
175
-
176
-
177
-
178
-
179
-
180
-
181
-
182
-
183
-
184
-
185
-
186
-
187
-
188
-
189
-
190
-
191
-
192
-
193
-
194
-
195
-
196
-
197
-
198
-
199
-
200
-
201
-
202
-
203
-
204
-
205
-
206
-
207
-
208
-
209
-
210
-
 211
211 -
 212
212 -
 213
213 -
 214
214 -
 215
215 -
 216
216 -
 217
217 -
 218
218 -
 219
219 -
 220
220 -
 221
221 -
222
-
223
-
224
-
225
-
226
-
227
-
228
-
229
-
230
-
231
-
232
-
233
-
234
-
235
-
236
-
237
-
238
-
239
-
240
-
241
-
242
-
243
-
244
-
245
-
246
-
247
-
248
-
249
-
250
-
251
-
252
-
253
-
254
-
255
-
256
-
257
-
258
-
259
-
260
-
261
-
262
-
263
-
264
-
265
-
266
-
267
-
268
-
269
-
270
-
271
-
272
-
273
-
274
-
275
-
276
-
277
-
278
-
279
-
280
-
281
-
282
-
283
-
284
-
285
-
286
-
287
-
288
-
289
-
290
-
291
-
292
-
293
-
294
-
295
-
296
-
297
-
298
-
299
-
300
-
301
-
302
-
303
-
304
-
305
-
306
-
307
-
308
-
309
-
310
-
311
-
312
-
313
-
314
-
315
-
316
-
317
-
318
-
319
-
320
-
321
-
322
-
323
-
324
-
325
-
326
-
327
-
328
-
329
-
330
-
331
-
332
-
333
-
334
 |
 |