Yamaha 01V96 Owner's Manual - Page 192
Control Surface Operation, Channel Strip FADER MODE
 |
View all Yamaha 01V96 manuals
Add to My Manuals
Save this manual to your list of manuals |
Page 192 highlights
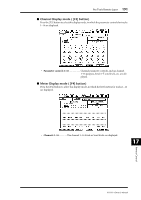
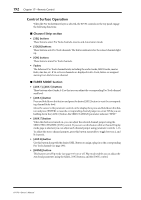
192 Chapter 17-Remote Control Control Surface Operation When the Pro Tools Remote layer is selected, the 01V96 controls on the top panel engage the following functions: ■ Channel Strip section • [SEL] buttons These buttons select Pro Tools channels, inserts, and Automation mode. • [SOLO] buttons These buttons solo Pro Tools channels. The button indicators for the soloed channels light up. • [ON] buttons These buttons mute Pro Tools channels. • Faders The faders set Pro Tools channel levels, including the audio tracks, MIDI tracks, master fader, Aux Ins, etc. If 16 or fewer channels are displayed in Pro Tools, faders are assigned starting from the left-most channel. ■ FADER MODE Section • [AUX 1]-[AUX 5] buttons These buttons select Sends A-E so that you can adjust the corresponding Pro Tools channel send level. • [AUX 6] button Press and hold down this button and press the desired [SEL] button to reset the corresponding channel fader level. Move the cursor to the parameter control on the display, then press and hold down this button and press [ENTER] to reset the corresponding channel panpot to center. While you are holding down the [AUX 6] button, the SELECT ASSIGN parameter indicates "DFLT." • [AUX 7] button When this button is turned on, you can adjust the selected channel panpot using the SELECTED CHANNEL [PAN] control. If you turn on this button while a Channel Display mode page is selected, you can adjust each channel panpot using parameter controls 1-16. To adjust the stereo channel panpots, press this button repeatedly to toggle between L and R channels. • [AUX 8] button Use this button along with the desired [SEL] button to assign a plug-in to the corresponding Pro Tools channel (see page 198). • [HOME] button This button turns Flip mode (see page 197) on or off. Flip mode enables you to adjust the Aux Send parameters using the faders, [ON] buttons, and the [PAN] control. 01V96-Owner's Manual
-
 1
1 -
2
-
3
-
4
-
5
-
6
-
7
-
8
-
9
-
10
-
11
-
12
-
13
-
14
-
15
-
16
-
17
-
18
-
19
-
20
-
21
-
22
-
23
-
24
-
25
-
26
-
27
-
28
-
29
-
30
-
31
-
32
-
33
-
34
-
35
-
36
-
37
-
38
-
39
-
40
-
41
-
42
-
43
-
44
-
45
-
46
-
47
-
48
-
49
-
50
-
51
-
52
-
53
-
54
-
55
-
56
-
57
-
58
-
59
-
60
-
61
-
62
-
63
-
64
-
65
-
66
-
67
-
68
-
69
-
70
-
71
-
72
-
73
-
74
-
75
-
76
-
77
-
78
-
79
-
80
-
81
-
82
-
83
-
84
-
85
-
86
-
87
-
88
-
89
-
90
-
91
-
92
-
93
-
94
-
95
-
96
-
97
-
98
-
99
-
100
-
101
-
102
-
103
-
104
-
105
-
106
-
107
-
108
-
109
-
110
-
111
-
112
-
113
-
114
-
115
-
116
-
117
-
118
-
119
-
120
-
121
-
122
-
123
-
124
-
125
-
126
-
127
-
128
-
129
-
130
-
131
-
132
-
133
-
134
-
135
-
136
-
137
-
138
-
139
-
140
-
141
-
142
-
143
-
144
-
145
-
146
-
147
-
148
-
149
-
150
-
151
-
152
-
153
-
154
-
155
-
156
-
157
-
158
-
159
-
160
-
161
-
162
-
163
-
164
-
165
-
166
-
167
-
168
-
169
-
170
-
171
-
172
-
173
-
174
-
175
-
176
-
177
-
178
-
179
-
180
-
181
-
182
-
183
-
184
-
185
-
186
-
 187
187 -
 188
188 -
 189
189 -
 190
190 -
 191
191 -
 192
192 -
 193
193 -
 194
194 -
 195
195 -
 196
196 -
 197
197 -
198
-
199
-
200
-
201
-
202
-
203
-
204
-
205
-
206
-
207
-
208
-
209
-
210
-
211
-
212
-
213
-
214
-
215
-
216
-
217
-
218
-
219
-
220
-
221
-
222
-
223
-
224
-
225
-
226
-
227
-
228
-
229
-
230
-
231
-
232
-
233
-
234
-
235
-
236
-
237
-
238
-
239
-
240
-
241
-
242
-
243
-
244
-
245
-
246
-
247
-
248
-
249
-
250
-
251
-
252
-
253
-
254
-
255
-
256
-
257
-
258
-
259
-
260
-
261
-
262
-
263
-
264
-
265
-
266
-
267
-
268
-
269
-
270
-
271
-
272
-
273
-
274
-
275
-
276
-
277
-
278
-
279
-
280
-
281
-
282
-
283
-
284
-
285
-
286
-
287
-
288
-
289
-
290
-
291
-
292
-
293
-
294
-
295
-
296
-
297
-
298
-
299
-
300
-
301
-
302
-
303
-
304
-
305
-
306
-
307
-
308
-
309
-
310
-
311
-
312
-
313
-
314
-
315
-
316
-
317
-
318
-
319
-
320
-
321
-
322
-
323
-
324
-
325
-
326
-
327
-
328
-
329
-
330
-
331
-
332
-
333
-
334
 |
 |
