Yamaha 01V96 Owner's Manual - Page 201
Automation, DAW SHUTTLE to which you assigned the DAW SCRUB parameter in Step 1.
 |
View all Yamaha 01V96 manuals
Add to My Manuals
Save this manual to your list of manuals |
Page 201 highlights
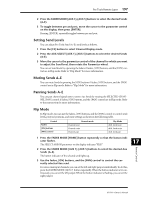
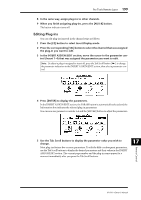
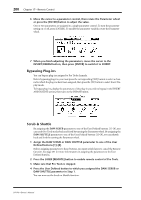
Pro Tools Remote Layer 201 5 Rotate the Parameter wheel. Rotate the Parameter wheel clockwise to scrub or shuttle forwards. Turn it counterclockwise to scrub or shuttle backwards. The minimum scrub playback step varies depending on the zoom setting in the Pro Tools Edit window. 6 To cancel the Scrub or Shuttle function, press the User Defined button or DAW SHUTTLE to which you assigned the DAW SCRUB parameter in Step 1. Alternatively, you can cancel the Scrub or Shuttle function by pressing the User Defined button to which the DAW STOP parameter is assigned. The Scrub function is automatically cancelled if you commence playback or fast forward. Note: The Scrub/Shuttle operation might be stopped unexpectedly by Pro Tools. Therefore, whenever you use the Scrub or Shuttle function, make sure that the P.WHEEL MODE parameter indicates "SCRUB" or "SHUTTLE." You can check the Scrub/Shuttle function status by viewing the corresponding User Defined button indicator. Automation If you assign a parameter that controls Pro Tools Automation mode (such as DAW Auto Read, DAW Auto Touch, etc.) to one of the User Defined buttons, you can control the Automation settings for each channel by using that User Defined button. See page 231 for more information on assigning parameters to User Defined buttons. Press the STEREO OUT channel [SEL] button. The button indicator lights up, and the Channel 1-16 [SEL] buttons become available for the Automation mode setting. Press the desired channel [SEL] buttons while pressing the programmed User Defined button to switch the corresponding channels' Automation settings. While the channel [SEL] buttons are available for the Automation mode setting, pressing the [SEL] buttons will cause the Fader Touch or Untouch command to be transmitted to Pro Tools. This is useful for Automation punch in and out recording. Note: Operating a fader also causes the Fader Touch command to be transmitted. Also, whenever the transport mode changes (such as Play and Stop), the Fader Untouch command is transmitted. Depending on the currently-selected Automation mode, the channel [SEL] button indicators operate as follows: User Defined Keys Function DAW AUTO WRITE DAW AUTO TOUTCH DAW AUTO LATCH DAW AUTO READ DAW AUTO OFF Pro Tools Automation Mode Auto write Auto touch Auto latch Auto read Auto off [SEL] Button Indicators Flashing red (Record Ready) Red (Recording) Illuminated steadily Off 17 Remote Control 01V96-Owner's Manual
-
 1
1 -
2
-
3
-
4
-
5
-
6
-
7
-
8
-
9
-
10
-
11
-
12
-
13
-
14
-
15
-
16
-
17
-
18
-
19
-
20
-
21
-
22
-
23
-
24
-
25
-
26
-
27
-
28
-
29
-
30
-
31
-
32
-
33
-
34
-
35
-
36
-
37
-
38
-
39
-
40
-
41
-
42
-
43
-
44
-
45
-
46
-
47
-
48
-
49
-
50
-
51
-
52
-
53
-
54
-
55
-
56
-
57
-
58
-
59
-
60
-
61
-
62
-
63
-
64
-
65
-
66
-
67
-
68
-
69
-
70
-
71
-
72
-
73
-
74
-
75
-
76
-
77
-
78
-
79
-
80
-
81
-
82
-
83
-
84
-
85
-
86
-
87
-
88
-
89
-
90
-
91
-
92
-
93
-
94
-
95
-
96
-
97
-
98
-
99
-
100
-
101
-
102
-
103
-
104
-
105
-
106
-
107
-
108
-
109
-
110
-
111
-
112
-
113
-
114
-
115
-
116
-
117
-
118
-
119
-
120
-
121
-
122
-
123
-
124
-
125
-
126
-
127
-
128
-
129
-
130
-
131
-
132
-
133
-
134
-
135
-
136
-
137
-
138
-
139
-
140
-
141
-
142
-
143
-
144
-
145
-
146
-
147
-
148
-
149
-
150
-
151
-
152
-
153
-
154
-
155
-
156
-
157
-
158
-
159
-
160
-
161
-
162
-
163
-
164
-
165
-
166
-
167
-
168
-
169
-
170
-
171
-
172
-
173
-
174
-
175
-
176
-
177
-
178
-
179
-
180
-
181
-
182
-
183
-
184
-
185
-
186
-
187
-
188
-
189
-
190
-
191
-
192
-
193
-
194
-
195
-
 196
196 -
 197
197 -
 198
198 -
 199
199 -
 200
200 -
 201
201 -
 202
202 -
 203
203 -
 204
204 -
 205
205 -
 206
206 -
207
-
208
-
209
-
210
-
211
-
212
-
213
-
214
-
215
-
216
-
217
-
218
-
219
-
220
-
221
-
222
-
223
-
224
-
225
-
226
-
227
-
228
-
229
-
230
-
231
-
232
-
233
-
234
-
235
-
236
-
237
-
238
-
239
-
240
-
241
-
242
-
243
-
244
-
245
-
246
-
247
-
248
-
249
-
250
-
251
-
252
-
253
-
254
-
255
-
256
-
257
-
258
-
259
-
260
-
261
-
262
-
263
-
264
-
265
-
266
-
267
-
268
-
269
-
270
-
271
-
272
-
273
-
274
-
275
-
276
-
277
-
278
-
279
-
280
-
281
-
282
-
283
-
284
-
285
-
286
-
287
-
288
-
289
-
290
-
291
-
292
-
293
-
294
-
295
-
296
-
297
-
298
-
299
-
300
-
301
-
302
-
303
-
304
-
305
-
306
-
307
-
308
-
309
-
310
-
311
-
312
-
313
-
314
-
315
-
316
-
317
-
318
-
319
-
320
-
321
-
322
-
323
-
324
-
325
-
326
-
327
-
328
-
329
-
330
-
331
-
332
-
333
-
334
 |
 |