Samsung SM-G900A User Manual At&t Wireless Sm-g900a Galaxy S 5 Kit Kat Eng - Page 74
Synchronizing Accounts, Address Book Options, Options in Address Book
 |
View all Samsung SM-G900A manuals
Add to My Manuals
Save this manual to your list of manuals |
Page 74 highlights
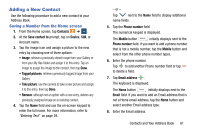
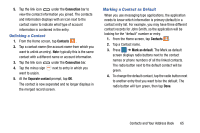
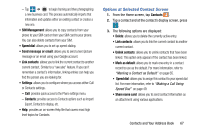
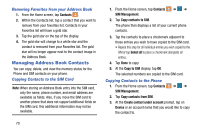
Synchronizing Accounts From the Accounts menu you decide if you want applications to synchronize, send, and receive data at any given time, or if you want the applications to synchronize automatically. After determining how you want the accounts to synchronize, indicate which account to synchronize with your Contacts list. 1. From the Home screen, tap Contacts . 2. Press ➔ Settings ➔ Contacts then tap Accounts. If you have previously added any accounts, the Sync settings prompt is displayed with your current accounts listed. 3. Tap an account that you would like to synchronize. 4. At the Sync settings screen, tap the options that you would like to synchronize for that account. 5. Tap Sync now to synchronize the account. The account is synchronized. 6. Press to return to the Contacts list. Note: You can also synchronize your accounts using the Settings menu. For more information, refer to "Synchronizing Accounts" on page 107. Address Book Options You can access Address Book options while at the main Address Book page or while in the details page for a specific entry. Options in Address Book 1. From the Home screen, tap Contacts . then press 2. The following options are displayed: • Select: allows you to select entries by placing a check mark alongside a desired entry. • Delete: allows you to delete one or more of your selected contacts. • Business cards: allows you to create new business cards or access previously photographed business cards. 66
-
 1
1 -
2
-
3
-
4
-
5
-
6
-
7
-
8
-
9
-
10
-
11
-
12
-
13
-
14
-
15
-
16
-
17
-
18
-
19
-
20
-
21
-
22
-
23
-
24
-
25
-
26
-
27
-
28
-
29
-
30
-
31
-
32
-
33
-
34
-
35
-
36
-
37
-
38
-
39
-
40
-
41
-
42
-
43
-
44
-
45
-
46
-
47
-
48
-
49
-
50
-
51
-
52
-
53
-
54
-
55
-
56
-
57
-
58
-
59
-
60
-
61
-
62
-
63
-
64
-
65
-
66
-
67
-
68
-
 69
69 -
 70
70 -
 71
71 -
 72
72 -
 73
73 -
 74
74 -
 75
75 -
 76
76 -
 77
77 -
 78
78 -
 79
79 -
80
-
81
-
82
-
83
-
84
-
85
-
86
-
87
-
88
-
89
-
90
-
91
-
92
-
93
-
94
-
95
-
96
-
97
-
98
-
99
-
100
-
101
-
102
-
103
-
104
-
105
-
106
-
107
-
108
-
109
-
110
-
111
-
112
-
113
-
114
-
115
-
116
-
117
-
118
-
119
-
120
-
121
-
122
-
123
-
124
-
125
-
126
-
127
-
128
-
129
-
130
-
131
-
132
-
133
-
134
-
135
-
136
-
137
-
138
-
139
-
140
-
141
-
142
-
143
-
144
-
145
-
146
-
147
-
148
-
149
-
150
-
151
-
152
-
153
-
154
-
155
-
156
-
157
-
158
-
159
-
160
-
161
-
162
-
163
-
164
-
165
-
166
-
167
-
168
-
169
-
170
-
171
-
172
-
173
-
174
-
175
-
176
-
177
-
178
-
179
-
180
-
181
-
182
-
183
-
184
-
185
-
186
-
187
-
188
-
189
-
190
-
191
-
192
-
193
-
194
-
195
-
196
-
197
-
198
-
199
-
200
-
201
-
202
-
203
-
204
-
205
-
206
-
207
-
208
-
209
-
210
-
211
-
212
-
213
-
214
 |
 |
