Samsung SM-G900A User Manual At&t Wireless Sm-g900a Galaxy S 5 Kit Kat Eng - Page 76
Groups, Adding a Contact to a Group, Creating a New Group
 |
View all Samsung SM-G900A manuals
Add to My Manuals
Save this manual to your list of manuals |
Page 76 highlights
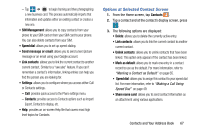
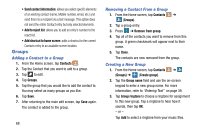
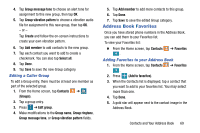
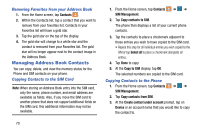
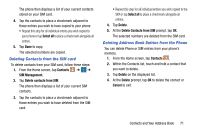
• Send contact information: allows you select specific elements of an existing contact (name, Mobile number, email, etc.) and send them to a recipient via a text message. This option does not send the entire Contact entry but only selected elements. • Add to reject list: allows you to add an entry's number to the reject list. • Add shortcut to home screen: adds a shortcut to the current Contacts entry to an available screen location. Groups Adding a Contact to a Group 1. From the Home screen, tap Contacts . 2. Tap the Contact that you want to add to a group. 3. Tap to edit. 4. Tap Groups. 5. Tap the group that you would like to add the contact to. You may select as many groups as you like. 6. Tap Save. 7. After returning to the main edit screen, tap Save again. The contact is added to the group. 68 Removing a Contact From a Group 1. From the Home screen, tap Contacts ➔ (Groups). 2. Tap a group entry. 3. Press ➔ Remove from group. 4. Tap all of the contacts you want to remove from this group. A green checkmark will appear next to their name. 5. Tap Done. The contacts are now removed from the group. Creating a New Group 1. From the Home screen, tap Contacts ➔ (Groups) ➔ (Create group). 2. Tap the Group name field and use the on-screen keypad to enter a new group name. For more information, refer to "Entering Text" on page 39. 3. Tap Group ringtone to choose a ringtone for assignment to this new group. Tap a ringtone to hear how it sounds, then tap OK. - or - Tap Add to select a ringtone from your music files.
-
 1
1 -
2
-
3
-
4
-
5
-
6
-
7
-
8
-
9
-
10
-
11
-
12
-
13
-
14
-
15
-
16
-
17
-
18
-
19
-
20
-
21
-
22
-
23
-
24
-
25
-
26
-
27
-
28
-
29
-
30
-
31
-
32
-
33
-
34
-
35
-
36
-
37
-
38
-
39
-
40
-
41
-
42
-
43
-
44
-
45
-
46
-
47
-
48
-
49
-
50
-
51
-
52
-
53
-
54
-
55
-
56
-
57
-
58
-
59
-
60
-
61
-
62
-
63
-
64
-
65
-
66
-
67
-
68
-
69
-
70
-
 71
71 -
 72
72 -
 73
73 -
 74
74 -
 75
75 -
 76
76 -
 77
77 -
 78
78 -
 79
79 -
 80
80 -
 81
81 -
82
-
83
-
84
-
85
-
86
-
87
-
88
-
89
-
90
-
91
-
92
-
93
-
94
-
95
-
96
-
97
-
98
-
99
-
100
-
101
-
102
-
103
-
104
-
105
-
106
-
107
-
108
-
109
-
110
-
111
-
112
-
113
-
114
-
115
-
116
-
117
-
118
-
119
-
120
-
121
-
122
-
123
-
124
-
125
-
126
-
127
-
128
-
129
-
130
-
131
-
132
-
133
-
134
-
135
-
136
-
137
-
138
-
139
-
140
-
141
-
142
-
143
-
144
-
145
-
146
-
147
-
148
-
149
-
150
-
151
-
152
-
153
-
154
-
155
-
156
-
157
-
158
-
159
-
160
-
161
-
162
-
163
-
164
-
165
-
166
-
167
-
168
-
169
-
170
-
171
-
172
-
173
-
174
-
175
-
176
-
177
-
178
-
179
-
180
-
181
-
182
-
183
-
184
-
185
-
186
-
187
-
188
-
189
-
190
-
191
-
192
-
193
-
194
-
195
-
196
-
197
-
198
-
199
-
200
-
201
-
202
-
203
-
204
-
205
-
206
-
207
-
208
-
209
-
210
-
211
-
212
-
213
-
214
 |
 |