HP OmniBook 500 hp omnibook 500 - Corporate Evaluator's Guide - Page 167
Click Start, Programs, HP e-DiagTools, e-DiagTools for Windows., Once the update process begins - bios update
 |
View all HP OmniBook 500 manuals
Add to My Manuals
Save this manual to your list of manuals |
Page 167 highlights
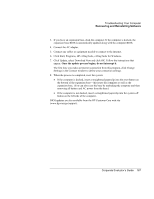
Troubleshooting Your Computer Recovering and Reinstalling Software 3. If you have an expansion base, dock the computer. If the computer is docked, the expansion base BIOS is automatically updated along with the computer BIOS. 4. Connect the AC adapter. 5. Connect any cables or equipment needed to connect to the Internet. 6. Click Start, Programs, HP e-DiagTools, e-DiagTools for Windows. 7. Click Update, select Download Now and click OK. Follow the instructions that appear. Once the update process begins, do not interrupt it. The first time you make an Internet connection from this program, click Change Settings in the Connect window to define your connection settings. 8. When the process is completed, reset the system: • If the computer is docked, insert a straightened paperclip into the reset button on the bottom of the expansion base-this resets the computer as well as the expansion base. (You can also reset the base by undocking the computer and then removing all battery and AC power from the base.) • If the computer is not docked, insert a straightened paperclip into the system-off button on the left side of the computer. BIOS updates are also available from the HP Customer Care web site (www.hp.com/go/support). Corporate Evaluator's Guide 167
-
 1
1 -
2
-
3
-
4
-
5
-
6
-
7
-
8
-
9
-
10
-
11
-
12
-
13
-
14
-
15
-
16
-
17
-
18
-
19
-
20
-
21
-
22
-
23
-
24
-
25
-
26
-
27
-
28
-
29
-
30
-
31
-
32
-
33
-
34
-
35
-
36
-
37
-
38
-
39
-
40
-
41
-
42
-
43
-
44
-
45
-
46
-
47
-
48
-
49
-
50
-
51
-
52
-
53
-
54
-
55
-
56
-
57
-
58
-
59
-
60
-
61
-
62
-
63
-
64
-
65
-
66
-
67
-
68
-
69
-
70
-
71
-
72
-
73
-
74
-
75
-
76
-
77
-
78
-
79
-
80
-
81
-
82
-
83
-
84
-
85
-
86
-
87
-
88
-
89
-
90
-
91
-
92
-
93
-
94
-
95
-
96
-
97
-
98
-
99
-
100
-
101
-
102
-
103
-
104
-
105
-
106
-
107
-
108
-
109
-
110
-
111
-
112
-
113
-
114
-
115
-
116
-
117
-
118
-
119
-
120
-
121
-
122
-
123
-
124
-
125
-
126
-
127
-
128
-
129
-
130
-
131
-
132
-
133
-
134
-
135
-
136
-
137
-
138
-
139
-
140
-
141
-
142
-
143
-
144
-
145
-
146
-
147
-
148
-
149
-
150
-
151
-
152
-
153
-
154
-
155
-
156
-
157
-
158
-
159
-
160
-
161
-
 162
162 -
 163
163 -
 164
164 -
 165
165 -
 166
166 -
 167
167 -
 168
168 -
 169
169 -
 170
170 -
 171
171 -
 172
172 -
173
-
174
-
175
-
176
-
177
-
178
-
179
-
180
-
181
-
182
-
183
-
184
-
185
-
186
-
187
-
188
-
189
-
190
-
191
-
192
-
193
-
194
-
195
-
196
-
197
-
198
-
199
 |
 |