Kyocera KM-5530 KM/Ri 4530/5530 Operation Guide Rev 5F - Page 101
Modify Copy key. The Modify Copy screen will
 |
View all Kyocera KM-5530 manuals
Add to My Manuals
Save this manual to your list of manuals |
Page 101 highlights
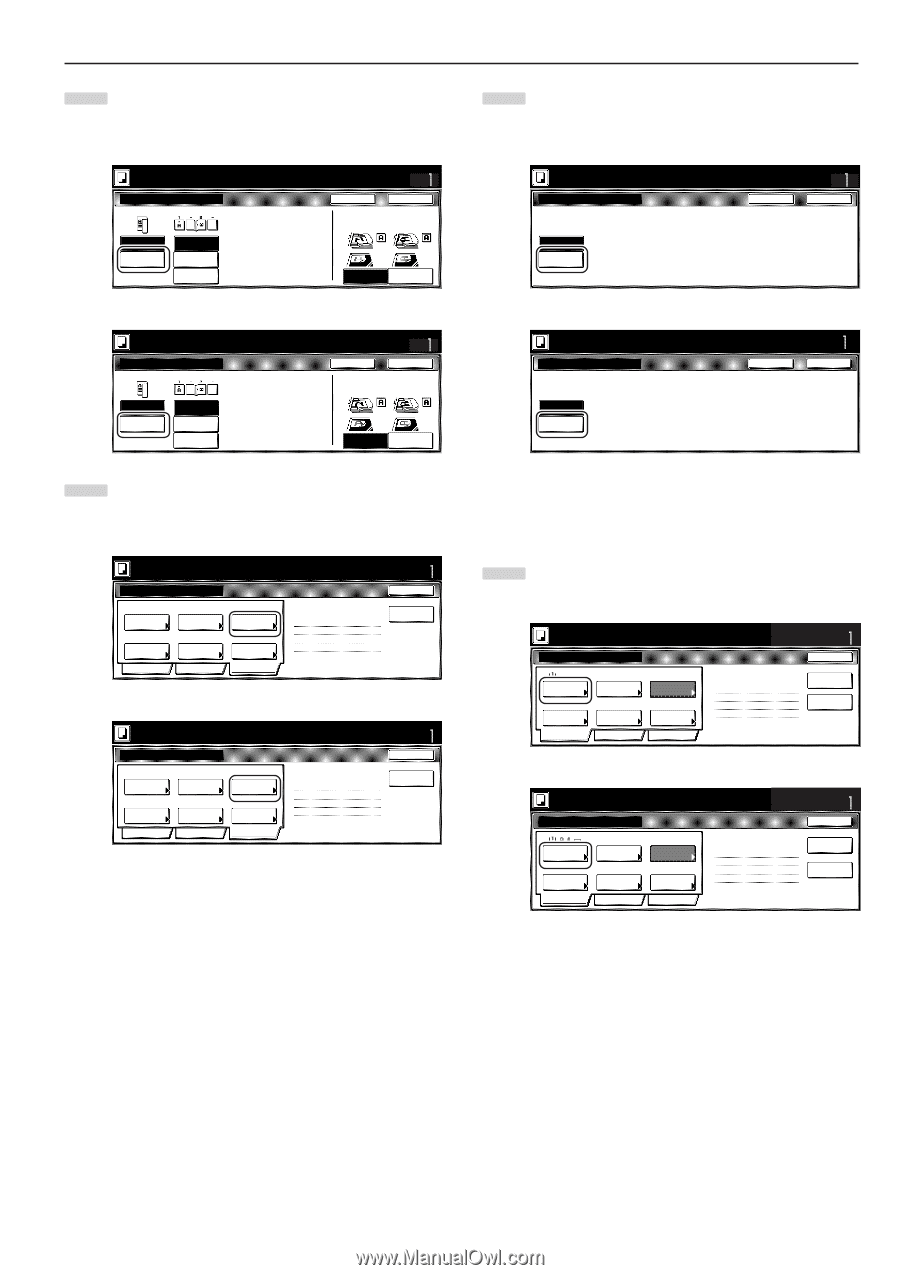
3 Touch the "2 sided copy" key and then touch the "Open from left" ["Left binding"] key. Finally, touch the "Close" key. The touch panel will return to the screen in step 2. Inch specifications Ready to Job build. Place originals then press Start key. 1 sided/ 2 sided copy Finished 1 sided copy 2 sided copy Open from left Open from right Open from top Set Back Close Check direction Check direction of original top side. Rear Left top corner Metric specifications Ready to Job build. Set original. Press Start key. 1-sided / 2-sided Copy Finished 1-sided Copy 2-sided Copy Left binding Right binding Top binding Set Back Close Check direction Check direction of original. Back Edge Left top corner 4 Touch the "Edit" key. Then, in the resulting screen, touch the "Modify Copy" key. The "Modify Copy" screen will be displayed. Inch specifications Ready to Job build. Place originals then press Start key. Job Build - Step1 Off Border Erase None Margin/ Centering Basic Auto Select orig.size None Page # Quality Off Modify Copy Tray A Select of Output Edit 2 sided copy-Left Finished page # : 0 Set End Insert page Print from Rear page Metric specifications Ready to Job build. Set original. Press Start key. Job Build - Step1 None Erase Mode None Margin/ Imag.shift Basic Auto Select size original None Page numbering Quality None Modify copy Tray A Select of Output Edit 2-sided Copy-Left Finished page #: 0 Set End Insert blank page Print from Rear page Section 5 OTHER CONVENIENT FUNCTIONS 5 Touch the "On" key. Touch the "Close" key. The touch panel will return to the screen in step 4. Inch specifications Ready to Job build. Place originals then press Start key. Modify Copy Back Set Close Off When select [On], data can be saved. Yo u c a n r e c a l l a n d r e - p r i n t a t a ny t i m e. On And you can set the password to secure saved document. Metric specifications Ready to Job build. Set original. Press Start key. Modify copy Back Set Close Off When select [On], job can be saved. WhenYtohuecmanodreecisalsl eatn[dOrne]-,pirtincat nat anytime. On save aYojoubcdaantaseatnadpraespsrwinot ritdatnoystiemceu.re saved And ydoouccuamnesnet.t that other user are not able to reprint. ● Making the settings for the first original ("A" in the illustration on page 5-58.) The multi-bypass is to be selected for color paper feed under the "Select paper" screen. 6 Touch the "Select paper" key. The "Select paper" screen will be displayed. Inch specifications Ready to Job build. Place originals then press Start key. Job Build - Step3 11x81/2" Select paper None Finished Basic 1-sided Original type AMS Reduce /Enlarge Quality 2 sided copy 1 sided/ 2 sided Back Edge Orig. set direction Edit 2 sided copy-Left Finished page #:0 Set End Insert page Print from Rear page Metric specifications Ready to Job build. Set original. Press Start key. Job Build-Step 3 Select paper None Finished Basic 1-sided Original type AMS Reduce/ Enlarge Quality 2-sided Copy 1-sided/ 2-sided Back Edge Orig. set direction Edit 2-sided Copy-Left Finished page #: 0 Set End Insert blank page Print from Rear page 5-59
-
 1
1 -
2
-
3
-
4
-
5
-
6
-
7
-
8
-
9
-
10
-
11
-
12
-
13
-
14
-
15
-
16
-
17
-
18
-
19
-
20
-
21
-
22
-
23
-
24
-
25
-
26
-
27
-
28
-
29
-
30
-
31
-
32
-
33
-
34
-
35
-
36
-
37
-
38
-
39
-
40
-
41
-
42
-
43
-
44
-
45
-
46
-
47
-
48
-
49
-
50
-
51
-
52
-
53
-
54
-
55
-
56
-
57
-
58
-
59
-
60
-
61
-
62
-
63
-
64
-
65
-
66
-
67
-
68
-
69
-
70
-
71
-
72
-
73
-
74
-
75
-
76
-
77
-
78
-
79
-
80
-
81
-
82
-
83
-
84
-
85
-
86
-
87
-
88
-
89
-
90
-
91
-
92
-
93
-
94
-
95
-
 96
96 -
 97
97 -
 98
98 -
 99
99 -
 100
100 -
 101
101 -
 102
102 -
 103
103 -
 104
104 -
 105
105 -
 106
106 -
107
-
108
-
109
-
110
-
111
-
112
-
113
-
114
-
115
-
116
-
117
-
118
-
119
-
120
-
121
-
122
-
123
-
124
-
125
-
126
-
127
-
128
-
129
-
130
-
131
-
132
-
133
-
134
-
135
-
136
-
137
-
138
-
139
-
140
-
141
-
142
-
143
-
144
-
145
-
146
-
147
-
148
-
149
-
150
-
151
-
152
-
153
-
154
-
155
-
156
-
157
-
158
-
159
-
160
-
161
-
162
-
163
-
164
-
165
-
166
-
167
-
168
-
169
-
170
-
171
-
172
-
173
-
174
-
175
-
176
-
177
-
178
-
179
-
180
-
181
-
182
-
183
-
184
-
185
-
186
-
187
-
188
-
189
-
190
-
191
-
192
-
193
-
194
-
195
-
196
-
197
-
198
-
199
-
200
-
201
-
202
-
203
-
204
-
205
-
206
-
207
-
208
-
209
-
210
-
211
-
212
-
213
-
214
-
215
-
216
-
217
-
218
-
219
-
220
-
221
-
222
-
223
-
224
-
225
-
226
-
227
-
228
-
229
-
230
-
231
-
232
-
233
-
234
-
235
-
236
-
237
-
238
-
239
-
240
-
241
-
242
-
243
-
244
-
245
-
246
-
247
-
248
-
249
-
250
-
251
-
252
 |
 |