Kyocera KM-5530 KM/Ri 4530/5530 Operation Guide Rev 5F - Page 216
Document Finisher B
 |
View all Kyocera KM-5530 manuals
Add to My Manuals
Save this manual to your list of manuals |
Page 216 highlights
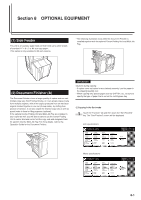
Section 8 OPTIONAL EQUIPMENT 5 Selecting the location of copy ejection 1 Touch the "Function" tab and then touch the "Select of Output" key. The "Select of Output" screen will be displayed. Inch specifications Ready to copy. Auto Rotation Eco Print Modify Copy OHP backing Orig. set direction Select of Output Proof Copy Invert Memo pages Mirror Paper size Set 11x81/2" Up Down Basic User choice Function Metric specifications Ready to copy. Auto Rotation Eco print Modify copy OHP back Orig. set direction Select of Output Test copy Invert Program Memo pages Mirror Paper size Set Up Down Basic User choice Function Program 2 Select the desired location for the ejection of finished copies. Inch specifications Ready to copy. Select of Output Auto Tray A Tray 1 Tray 2 Tray 3 Tray 4 Tray 5 Register Paper size Set 11x81/2" Back Close Select proper output tray to avoid mixing job. Yo u c a n c o n f i r m o u t p u t t ray w i t h o u t p u t management. Metric specifications Ready to copy. Select of Output Auto Tray A Tray 1 Tray 2 Tray 3 Tray 4 Tray 5 Register Paper size Set Back Close Select proper output tray to avoid job mixing. Yo u c a n c o n f i r m o u t p u t t ray w i t h o u t p u t management. 6 Once all of the originals have been completely scanned, touch the "Scanning finished" key. Copying will start and the finished copies will be ejected in the selected tray. 7 Once copying is completed, removed the finished copy sets from the corresponding tray(s). 6 Stacking mode If the number of copies that is ejected onto Tray B during large volume copying in the Non-sort mode reaches the acceptable limit (max: 200), all copies from the 201st onward will be ejected onto Tray A. (3) Document Finisher (B) The Document Finisher stores a large quantity of copies and can sort multiple copy sets (Sort/Finished mode), or it can groups copies made from multiple originals, with all the copies produced from an individual original stacked together in one set (Group mode), by shifting their position of ejection. It can also staple the finished copy sets as well. If the optional Multi Job Tray is installed in your copier as well, you will also be able to designate finished copies for ejection into the Multi Job Tray. For more details, refer to the Operation Guide for the Document Finisher and to "(2) Document Finisher (A)" on page 8-1. NOTE If you select "Auto", the copies will be ejected into the next empty tray. 3 Touch the "Close" key. The touch panel will return to the screen in step 1. 4 Set the originals to be copied. 5 Press the [Start] key. Scanning of the originals will start. NOTE If you do not set the originals in the Document Processor, perform the appropriate procedure to set all of the originals to be copied. 8-6
-
 1
1 -
2
-
3
-
4
-
5
-
6
-
7
-
8
-
9
-
10
-
11
-
12
-
13
-
14
-
15
-
16
-
17
-
18
-
19
-
20
-
21
-
22
-
23
-
24
-
25
-
26
-
27
-
28
-
29
-
30
-
31
-
32
-
33
-
34
-
35
-
36
-
37
-
38
-
39
-
40
-
41
-
42
-
43
-
44
-
45
-
46
-
47
-
48
-
49
-
50
-
51
-
52
-
53
-
54
-
55
-
56
-
57
-
58
-
59
-
60
-
61
-
62
-
63
-
64
-
65
-
66
-
67
-
68
-
69
-
70
-
71
-
72
-
73
-
74
-
75
-
76
-
77
-
78
-
79
-
80
-
81
-
82
-
83
-
84
-
85
-
86
-
87
-
88
-
89
-
90
-
91
-
92
-
93
-
94
-
95
-
96
-
97
-
98
-
99
-
100
-
101
-
102
-
103
-
104
-
105
-
106
-
107
-
108
-
109
-
110
-
111
-
112
-
113
-
114
-
115
-
116
-
117
-
118
-
119
-
120
-
121
-
122
-
123
-
124
-
125
-
126
-
127
-
128
-
129
-
130
-
131
-
132
-
133
-
134
-
135
-
136
-
137
-
138
-
139
-
140
-
141
-
142
-
143
-
144
-
145
-
146
-
147
-
148
-
149
-
150
-
151
-
152
-
153
-
154
-
155
-
156
-
157
-
158
-
159
-
160
-
161
-
162
-
163
-
164
-
165
-
166
-
167
-
168
-
169
-
170
-
171
-
172
-
173
-
174
-
175
-
176
-
177
-
178
-
179
-
180
-
181
-
182
-
183
-
184
-
185
-
186
-
187
-
188
-
189
-
190
-
191
-
192
-
193
-
194
-
195
-
196
-
197
-
198
-
199
-
200
-
201
-
202
-
203
-
204
-
205
-
206
-
207
-
208
-
209
-
210
-
 211
211 -
 212
212 -
 213
213 -
 214
214 -
 215
215 -
 216
216 -
 217
217 -
 218
218 -
 219
219 -
 220
220 -
 221
221 -
222
-
223
-
224
-
225
-
226
-
227
-
228
-
229
-
230
-
231
-
232
-
233
-
234
-
235
-
236
-
237
-
238
-
239
-
240
-
241
-
242
-
243
-
244
-
245
-
246
-
247
-
248
-
249
-
250
-
251
-
252
 |
 |
