Kyocera KM-5530 KM/Ri 4530/5530 Operation Guide Rev 5F - Page 133
The Print status screen
 |
View all Kyocera KM-5530 manuals
Add to My Manuals
Save this manual to your list of manuals |
Page 133 highlights
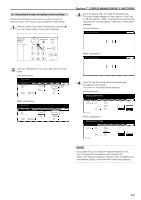
Section 6 DOCUMENT AND OUTPUT MANAGEMENT FUNCTIONS (3) The "Print status" screen This screen displays the currently set printing conditions and the job queue of documents waiting to be printed. Inch specifications 1 8 7 Print management Job 123 124 127 128 Move ahead Prt status User Original 100 User1 30 User2 2 1 Move behind interrupt print Job history Set Registration State 100 10/10 23:00 Printing 5 10/10 23:00 Waiting 3 10/10 23:00 Waiting 5 10/10 23:00 Waiting Cancel· Delete Conf/Crrt. details End 10/10 23:50 Metric specifications 1 8 7 Print management Job 123 124 127 128 Move up Prnt status User Original 100 Set Registration 100 10/10 23:00 State Printing User1 User2 Move behind 30 2 1 interrupt print 5 10/10 23:00 3 10/10 23:00 5 10/10 23:00 Cancel / Delete Waiting Waiting Waiting Check/ Rev. details Job history End 10/10 23:50 2 39 4 5 6 1 Job queue Displays information about each job in the queue. The job at the top of the list is that job that is currently being printed. The rest of the jobs will be printed in order from the top down. A " " icon under the "Job" heading indicates a copy job, while a " " icon indicates a print job. 2 "Move ahead" key Touching this key moves the currently selected (highlighted) job upward in the job queue. A job can be moved as far as the second highest position in the list. In this case, print out for that job will begin as soon as the current job is completed. 3 "Move behind" key Touching this key moves the currently selected (highlighted) job downward in the job queue. 4 "Interrupt print" key Touching this key interrupts the job that is currently being printed and start print out for the currently selected (highlighted) job. (The selected job will be moved to the top of the list.) 5 "Cancel•Delete" key Touching this key cancels the currently selected (highlighted) job and deletes it from the job queue. 2 39 4 5 6 6 "Conf/Crrt.details" ["Check/Correct details"] key Touching this key displays the "Conf/Crrt.details" ["Check/Correct details"] screen, enabling you, for example, to check the contents of, or change the number of copies to be made for, the currently selected (highlighted) job. Inch specifications Check/Correct details Close Item User name Job name Orig. page Set Print size Input source Registration date Output Job 5 Details 1 1 11x81/2" Copy 11/01 15:31 Finisher tray A Change Preset Metric specifications Check/revise details Close Item User name Job name Original Set Print size Input source Registration date Output Job 5 Details 1 1 A4 Copy 11/01 15:31 Finisher tray A Change Preset 7 "M" and "N" cursor keys Use these keys to select a job from the job queue. 8 "End" key Touching this key quits the output management function. In this case, the touch panel will return to the contents of the "Basic" tab. 9 "Job history" key Touching this key switches the display to the "Job history" screen. 6-21
-
 1
1 -
2
-
3
-
4
-
5
-
6
-
7
-
8
-
9
-
10
-
11
-
12
-
13
-
14
-
15
-
16
-
17
-
18
-
19
-
20
-
21
-
22
-
23
-
24
-
25
-
26
-
27
-
28
-
29
-
30
-
31
-
32
-
33
-
34
-
35
-
36
-
37
-
38
-
39
-
40
-
41
-
42
-
43
-
44
-
45
-
46
-
47
-
48
-
49
-
50
-
51
-
52
-
53
-
54
-
55
-
56
-
57
-
58
-
59
-
60
-
61
-
62
-
63
-
64
-
65
-
66
-
67
-
68
-
69
-
70
-
71
-
72
-
73
-
74
-
75
-
76
-
77
-
78
-
79
-
80
-
81
-
82
-
83
-
84
-
85
-
86
-
87
-
88
-
89
-
90
-
91
-
92
-
93
-
94
-
95
-
96
-
97
-
98
-
99
-
100
-
101
-
102
-
103
-
104
-
105
-
106
-
107
-
108
-
109
-
110
-
111
-
112
-
113
-
114
-
115
-
116
-
117
-
118
-
119
-
120
-
121
-
122
-
123
-
124
-
125
-
126
-
127
-
 128
128 -
 129
129 -
 130
130 -
 131
131 -
 132
132 -
 133
133 -
 134
134 -
 135
135 -
 136
136 -
 137
137 -
 138
138 -
139
-
140
-
141
-
142
-
143
-
144
-
145
-
146
-
147
-
148
-
149
-
150
-
151
-
152
-
153
-
154
-
155
-
156
-
157
-
158
-
159
-
160
-
161
-
162
-
163
-
164
-
165
-
166
-
167
-
168
-
169
-
170
-
171
-
172
-
173
-
174
-
175
-
176
-
177
-
178
-
179
-
180
-
181
-
182
-
183
-
184
-
185
-
186
-
187
-
188
-
189
-
190
-
191
-
192
-
193
-
194
-
195
-
196
-
197
-
198
-
199
-
200
-
201
-
202
-
203
-
204
-
205
-
206
-
207
-
208
-
209
-
210
-
211
-
212
-
213
-
214
-
215
-
216
-
217
-
218
-
219
-
220
-
221
-
222
-
223
-
224
-
225
-
226
-
227
-
228
-
229
-
230
-
231
-
232
-
233
-
234
-
235
-
236
-
237
-
238
-
239
-
240
-
241
-
242
-
243
-
244
-
245
-
246
-
247
-
248
-
249
-
250
-
251
-
252
 |
 |
