Kyocera KM-5530 KM/Ri 4530/5530 Operation Guide Rev 5F - Page 28
Adding toner
 |
View all Kyocera KM-5530 manuals
Add to My Manuals
Save this manual to your list of manuals |
Page 28 highlights
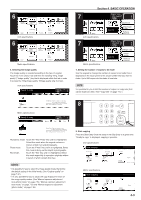
Section 3 PREPARATIONS 3. Adding toner Add toner when "Add toner" is displayed. Although a few copies can still be made once this message is displayed, you should add toner as soon as possible. * DO NOT add toner unless this message is displayed. * Touch the "Adding toner" key to have the procedure for adding toner displayed on the touch panel. Inch specifications Ready to copy. Add toner. 11x8 1/2" Plain 8 1/2x11" Color 11x8 1/2" Plain 11x8 1/2" Recycled APS Bypass Plain Basic User choice AMS Reduce /Enlarge Function Auto Exposure Exposure mode Program Paper Size Set 11x8 1/2" Sort:Off Sort:On Sort/ Finished Combine Orig.image quality Reduce /Enlarge Adding toner Metric specifications Ready to copy. Add toner. Plain Color Plain APS Bypass Plain Recycled Basic User choice AMS Reduce/ Enlarge Function Auto Exposure Exposure mode Program Paper Size Set Sort:Off Sort:On Sort/ Finished Merge copy Image quality Reduce/ Enlarge Adding toner 2 Turn the new toner bottle upside down and tap the bottom portion about 10 times or so. 3 Hold the bottle firmly and shake up the contents by turning it upside down and then right-side up 10 or more times in the manner shown in the illustration. CAUTION DO NOT attempt to incinerate the toner bottle or the waste toner box. Dangerous sparks may cause burns. CAUTION DO NOT attempt to force open or destroy the toner bottle or the waste toner box. 1 Open the cover on the right side of the operation panel. 4 Next, hold the bottle horizontally and shake it back and forth 10 or more times. 5 Fit the hole in the toner bottle (located below the ▼) over the metal pin (shown as 1 in the illustration) that is protruding out of the toner supply slot. 3-8
-
 1
1 -
2
-
3
-
4
-
5
-
6
-
7
-
8
-
9
-
10
-
11
-
12
-
13
-
14
-
15
-
16
-
17
-
18
-
19
-
20
-
21
-
22
-
 23
23 -
 24
24 -
 25
25 -
 26
26 -
 27
27 -
 28
28 -
 29
29 -
 30
30 -
 31
31 -
 32
32 -
 33
33 -
34
-
35
-
36
-
37
-
38
-
39
-
40
-
41
-
42
-
43
-
44
-
45
-
46
-
47
-
48
-
49
-
50
-
51
-
52
-
53
-
54
-
55
-
56
-
57
-
58
-
59
-
60
-
61
-
62
-
63
-
64
-
65
-
66
-
67
-
68
-
69
-
70
-
71
-
72
-
73
-
74
-
75
-
76
-
77
-
78
-
79
-
80
-
81
-
82
-
83
-
84
-
85
-
86
-
87
-
88
-
89
-
90
-
91
-
92
-
93
-
94
-
95
-
96
-
97
-
98
-
99
-
100
-
101
-
102
-
103
-
104
-
105
-
106
-
107
-
108
-
109
-
110
-
111
-
112
-
113
-
114
-
115
-
116
-
117
-
118
-
119
-
120
-
121
-
122
-
123
-
124
-
125
-
126
-
127
-
128
-
129
-
130
-
131
-
132
-
133
-
134
-
135
-
136
-
137
-
138
-
139
-
140
-
141
-
142
-
143
-
144
-
145
-
146
-
147
-
148
-
149
-
150
-
151
-
152
-
153
-
154
-
155
-
156
-
157
-
158
-
159
-
160
-
161
-
162
-
163
-
164
-
165
-
166
-
167
-
168
-
169
-
170
-
171
-
172
-
173
-
174
-
175
-
176
-
177
-
178
-
179
-
180
-
181
-
182
-
183
-
184
-
185
-
186
-
187
-
188
-
189
-
190
-
191
-
192
-
193
-
194
-
195
-
196
-
197
-
198
-
199
-
200
-
201
-
202
-
203
-
204
-
205
-
206
-
207
-
208
-
209
-
210
-
211
-
212
-
213
-
214
-
215
-
216
-
217
-
218
-
219
-
220
-
221
-
222
-
223
-
224
-
225
-
226
-
227
-
228
-
229
-
230
-
231
-
232
-
233
-
234
-
235
-
236
-
237
-
238
-
239
-
240
-
241
-
242
-
243
-
244
-
245
-
246
-
247
-
248
-
249
-
250
-
251
-
252
 |
 |
