Kyocera KM-5530 KM/Ri 4530/5530 Operation Guide Rev 5F - Page 31
Basic Operation
 |
View all Kyocera KM-5530 manuals
Add to My Manuals
Save this manual to your list of manuals |
Page 31 highlights
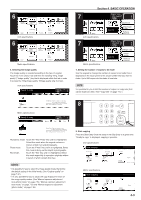
Section 4 BASIC OPERATION 1. Basic copying procedure 1 1. Warm-up Turn the main switch ON ( | ). At the end of warm-up, "Ready to copy." will be displayed. NOTE If you set the originals that you want to copy and press the [Start] key while the copier is still warming up, copying will begin as soon as warm-up is finished. 2 2. Setting the originals Set the original(s) that you want to copy in the Document Processor or on the platen. If you set an original on the platen, place it at the leftrear corner of the platen and align it with the appropriate original size indicator lines. NOTE Refer to "2. Setting originals" on page 3-6 for more detailed information on setting originals. 3 Ready to copy. 11x81/2" Plain 81/2x11" Color 11x81/2" Plain 11x81/2" Recycled APS Bypass Plain Basic User choice AMS Reduce /Enlarge Function Inch specifications 3 Ready to copy. Plain Color Plain APS Bypass Plain Recycled Basic User choice AMS Reduce/ Enlarge Function Metric specifications Auto Exposure Exposure mode Program Auto Exposure Exposure mode Program Paper Size Set 11x81/2" Co Ori qua Sort:Off Red Sort:On /En Sort/ Finished Paper Size Set Me Im qu Sort:Off Re Sort:On En Sort/ Finished 3. Selecting the desired functions Select from among the copier's various modes and functions. • Enlarging/reducing the copy image (Page 4-5.) • Interrupt copying (Page 4-9.) • Making 2-sided copies from various types of originals (Page 5-1.) • Copying each image of open-faced (books, magazines, etc.) or 2-sided originals onto separate sheets (Page 5-4.) • Creating a margin on the copies (Page 5-6.) • Centering the copy image (Page 5-8.) • Adding a space next to the copy images for making notes (Page 5-9.) • Making copies with clean edges (Page 5-11.) • Fitting the image of either two or four originals onto a single copy page (Page 5-13.) • Printing page numbers on the copies (Page 5-16.) • Overlaying one image over another (Page 5-20.) • Making booklets from sheet originals (Page 5-22.) • Making booklets from books (Page 5-25.) • Automatic sorting of copy sets without the Document Finisher (Page 5-28.) • Automatic rotation of the copy image (Page 5-29.) • Copying different sized originals at the same time (Page 5-30.) • Adding a front and/or back cover to your copy sets (Page 5-32.) • Feeding paper as a backing sheet for OHP transparencies (Page 5-37.) • Inverting black and white (Page 5-39.) • Making mirror image copies (Page 5-40.) • Making a test copy prior to large volume copying (Page 5-41.) • Making more of the same copies after a copy job is finished (Page 5-43.) • Copying a large volume of originals in one operation (Page 5-48.) • Easily add covers and insert sheets between various sets of originals in one operation (Page 5-58.) 4-1
-
 1
1 -
2
-
3
-
4
-
5
-
6
-
7
-
8
-
9
-
10
-
11
-
12
-
13
-
14
-
15
-
16
-
17
-
18
-
19
-
20
-
21
-
22
-
23
-
24
-
25
-
 26
26 -
 27
27 -
 28
28 -
 29
29 -
 30
30 -
 31
31 -
 32
32 -
 33
33 -
 34
34 -
 35
35 -
 36
36 -
37
-
38
-
39
-
40
-
41
-
42
-
43
-
44
-
45
-
46
-
47
-
48
-
49
-
50
-
51
-
52
-
53
-
54
-
55
-
56
-
57
-
58
-
59
-
60
-
61
-
62
-
63
-
64
-
65
-
66
-
67
-
68
-
69
-
70
-
71
-
72
-
73
-
74
-
75
-
76
-
77
-
78
-
79
-
80
-
81
-
82
-
83
-
84
-
85
-
86
-
87
-
88
-
89
-
90
-
91
-
92
-
93
-
94
-
95
-
96
-
97
-
98
-
99
-
100
-
101
-
102
-
103
-
104
-
105
-
106
-
107
-
108
-
109
-
110
-
111
-
112
-
113
-
114
-
115
-
116
-
117
-
118
-
119
-
120
-
121
-
122
-
123
-
124
-
125
-
126
-
127
-
128
-
129
-
130
-
131
-
132
-
133
-
134
-
135
-
136
-
137
-
138
-
139
-
140
-
141
-
142
-
143
-
144
-
145
-
146
-
147
-
148
-
149
-
150
-
151
-
152
-
153
-
154
-
155
-
156
-
157
-
158
-
159
-
160
-
161
-
162
-
163
-
164
-
165
-
166
-
167
-
168
-
169
-
170
-
171
-
172
-
173
-
174
-
175
-
176
-
177
-
178
-
179
-
180
-
181
-
182
-
183
-
184
-
185
-
186
-
187
-
188
-
189
-
190
-
191
-
192
-
193
-
194
-
195
-
196
-
197
-
198
-
199
-
200
-
201
-
202
-
203
-
204
-
205
-
206
-
207
-
208
-
209
-
210
-
211
-
212
-
213
-
214
-
215
-
216
-
217
-
218
-
219
-
220
-
221
-
222
-
223
-
224
-
225
-
226
-
227
-
228
-
229
-
230
-
231
-
232
-
233
-
234
-
235
-
236
-
237
-
238
-
239
-
240
-
241
-
242
-
243
-
244
-
245
-
246
-
247
-
248
-
249
-
250
-
251
-
252
 |
 |
