Kyocera KM-5530 KM/Ri 4530/5530 Operation Guide Rev 5F - Page 134
The Job history screen
 |
View all Kyocera KM-5530 manuals
Add to My Manuals
Save this manual to your list of manuals |
Page 134 highlights
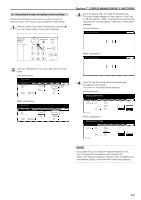
Section 6 DOCUMENT AND OUTPUT MANAGEMENT FUNCTIONS (4) The "Job history" screen This screen displays the jobs for which printing has been completed, as well as jobs that have been canceled after scanning. Inch specifications 1 4 3 Print management Job 117 119 120 121 Prt status User Original 4 User3 7 3 10 Job history Set Registration 5 10/10 22:32 Res. Finished 1 10/10 22:37 5 10/10 22:40 2 10/10 22:45 Stop Finished Finished Check details End 10/10 23:50 5 2 Metric specifications 1 4 3 Print management Job 117 119 120 121 Prnt status User Original 4 User3 7 3 10 Job history Set Registration 5 10/10 22:32 Res. Finished 1 10/10 22:37 5 10/10 22:40 2 10/10 22:45 Stop Finished Finished Check details End 10/10 23:50 5 2 1 Finished job list Displays information about each finished print job. The job at the bottom of the list is that job that was most recently finished printed. The rest of the jobs are displayed in order of the most recent to the oldest jobs from the bottom up. A " " icon under the "Job" heading indicates a copy job, while a " " icon indicates a print job. NOTE Jobs that were only scanned part way through are not displayed. 2 "Check details" key Touching this key displays the "Check details" screen, enabling you, for example, to check the contents of the currently selected (highlighted) job. Inch specifications Check details Close Item User name Job name Orig. page Set Print size Input source Registration date Output Job 1 Details 2 99 11x81/2" Copy 11/01 15:31 Finisher tray A Metric specifications Check details Close Item User name Job name Original Set Print size Input source Registration date Output Job 1 Details 2 99 A4 Copy 11/01 15:31 Finisher tray A 3 "M" and "N" cursor keys Use these keys to select a job from the finished job list. 4 "End" key Touching this key quits the output management function. In this case, the touch panel will return to the contents of the "Basic" tab. 5 "Print status" key Touching this key switches the display to the "Print state" screen. 6-22
-
 1
1 -
2
-
3
-
4
-
5
-
6
-
7
-
8
-
9
-
10
-
11
-
12
-
13
-
14
-
15
-
16
-
17
-
18
-
19
-
20
-
21
-
22
-
23
-
24
-
25
-
26
-
27
-
28
-
29
-
30
-
31
-
32
-
33
-
34
-
35
-
36
-
37
-
38
-
39
-
40
-
41
-
42
-
43
-
44
-
45
-
46
-
47
-
48
-
49
-
50
-
51
-
52
-
53
-
54
-
55
-
56
-
57
-
58
-
59
-
60
-
61
-
62
-
63
-
64
-
65
-
66
-
67
-
68
-
69
-
70
-
71
-
72
-
73
-
74
-
75
-
76
-
77
-
78
-
79
-
80
-
81
-
82
-
83
-
84
-
85
-
86
-
87
-
88
-
89
-
90
-
91
-
92
-
93
-
94
-
95
-
96
-
97
-
98
-
99
-
100
-
101
-
102
-
103
-
104
-
105
-
106
-
107
-
108
-
109
-
110
-
111
-
112
-
113
-
114
-
115
-
116
-
117
-
118
-
119
-
120
-
121
-
122
-
123
-
124
-
125
-
126
-
127
-
128
-
 129
129 -
 130
130 -
 131
131 -
 132
132 -
 133
133 -
 134
134 -
 135
135 -
 136
136 -
 137
137 -
 138
138 -
 139
139 -
140
-
141
-
142
-
143
-
144
-
145
-
146
-
147
-
148
-
149
-
150
-
151
-
152
-
153
-
154
-
155
-
156
-
157
-
158
-
159
-
160
-
161
-
162
-
163
-
164
-
165
-
166
-
167
-
168
-
169
-
170
-
171
-
172
-
173
-
174
-
175
-
176
-
177
-
178
-
179
-
180
-
181
-
182
-
183
-
184
-
185
-
186
-
187
-
188
-
189
-
190
-
191
-
192
-
193
-
194
-
195
-
196
-
197
-
198
-
199
-
200
-
201
-
202
-
203
-
204
-
205
-
206
-
207
-
208
-
209
-
210
-
211
-
212
-
213
-
214
-
215
-
216
-
217
-
218
-
219
-
220
-
221
-
222
-
223
-
224
-
225
-
226
-
227
-
228
-
229
-
230
-
231
-
232
-
233
-
234
-
235
-
236
-
237
-
238
-
239
-
240
-
241
-
242
-
243
-
244
-
245
-
246
-
247
-
248
-
249
-
250
-
251
-
252
 |
 |
