Kyocera KM-5530 KM/Ri 4530/5530 Operation Guide Rev 5F - Page 145
Turning copy management ON/OFF
 |
View all Kyocera KM-5530 manuals
Add to My Manuals
Save this manual to your list of manuals |
Page 145 highlights
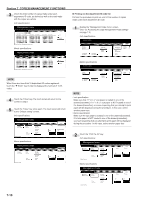
The "Printing report." screen will be displayed and printing of the department ID-code list will start. Inch specifications Printing report. Orig. page Count/Set 81/2x11" 1 sided Output Cancel Metric specifications Printing report Original Count/set 1-sided Sort Plain Output Cancel NOTE If you want to cancel print out of the department ID-code list, touch the "Cancel" key. Once print out is completed, the touch panel will return to the screen in step 2. Inch specifications Management menu Management code menu Counter by ID-code Print the list Default setting Print Err. PRT. ID-code Reg./Del. # of copy correct Counter clear copy Off On Close Printer Off On Metric specifications Management mode Management code menu Counter by ID-code Print the list Default setting Print Err. PRT. ID-code Reg./Del. # of copy correct counter clear Copy Off On Close Printer Off On 3 Touch the "Close" key. Section 7 COPIER MANAGEMENT FUNCTIONS ● Turning copy management ON/OFF Perform this procedure to turn copy management ON or OFF. 1 Make sure you have performed all of the appropriate settings on pages 7-3 through 7-11. 2 Touch the "On" key or the "Off" key in the "Management code menu" screen to turn copy management ON or OFF, as desired. Inch specifications Management menu Management code menu Counter by ID-code Print the list Default setting Print Err. PRT. ID-code Reg./Del. # of copy correct Counter clear copy Off On Close Printer Off On Metric specifications Management mode Management code menu Counter by ID-code Print the list Default setting Print Err. PRT. ID-code Reg./Del. # of copy correct counter clear Copy Off On Close Printer Off On If you turned copy management ON, the screen to enter your department ID-code will be displayed. 7-11
-
 1
1 -
2
-
3
-
4
-
5
-
6
-
7
-
8
-
9
-
10
-
11
-
12
-
13
-
14
-
15
-
16
-
17
-
18
-
19
-
20
-
21
-
22
-
23
-
24
-
25
-
26
-
27
-
28
-
29
-
30
-
31
-
32
-
33
-
34
-
35
-
36
-
37
-
38
-
39
-
40
-
41
-
42
-
43
-
44
-
45
-
46
-
47
-
48
-
49
-
50
-
51
-
52
-
53
-
54
-
55
-
56
-
57
-
58
-
59
-
60
-
61
-
62
-
63
-
64
-
65
-
66
-
67
-
68
-
69
-
70
-
71
-
72
-
73
-
74
-
75
-
76
-
77
-
78
-
79
-
80
-
81
-
82
-
83
-
84
-
85
-
86
-
87
-
88
-
89
-
90
-
91
-
92
-
93
-
94
-
95
-
96
-
97
-
98
-
99
-
100
-
101
-
102
-
103
-
104
-
105
-
106
-
107
-
108
-
109
-
110
-
111
-
112
-
113
-
114
-
115
-
116
-
117
-
118
-
119
-
120
-
121
-
122
-
123
-
124
-
125
-
126
-
127
-
128
-
129
-
130
-
131
-
132
-
133
-
134
-
135
-
136
-
137
-
138
-
139
-
 140
140 -
 141
141 -
 142
142 -
 143
143 -
 144
144 -
 145
145 -
 146
146 -
 147
147 -
 148
148 -
 149
149 -
 150
150 -
151
-
152
-
153
-
154
-
155
-
156
-
157
-
158
-
159
-
160
-
161
-
162
-
163
-
164
-
165
-
166
-
167
-
168
-
169
-
170
-
171
-
172
-
173
-
174
-
175
-
176
-
177
-
178
-
179
-
180
-
181
-
182
-
183
-
184
-
185
-
186
-
187
-
188
-
189
-
190
-
191
-
192
-
193
-
194
-
195
-
196
-
197
-
198
-
199
-
200
-
201
-
202
-
203
-
204
-
205
-
206
-
207
-
208
-
209
-
210
-
211
-
212
-
213
-
214
-
215
-
216
-
217
-
218
-
219
-
220
-
221
-
222
-
223
-
224
-
225
-
226
-
227
-
228
-
229
-
230
-
231
-
232
-
233
-
234
-
235
-
236
-
237
-
238
-
239
-
240
-
241
-
242
-
243
-
244
-
245
-
246
-
247
-
248
-
249
-
250
-
251
-
252
 |
 |
