Kyocera KM-5530 KM/Ri 4530/5530 Operation Guide Rev 5F - Page 24
Setting paper on the multi-bypass tray
 |
View all Kyocera KM-5530 manuals
Add to My Manuals
Save this manual to your list of manuals |
Page 24 highlights
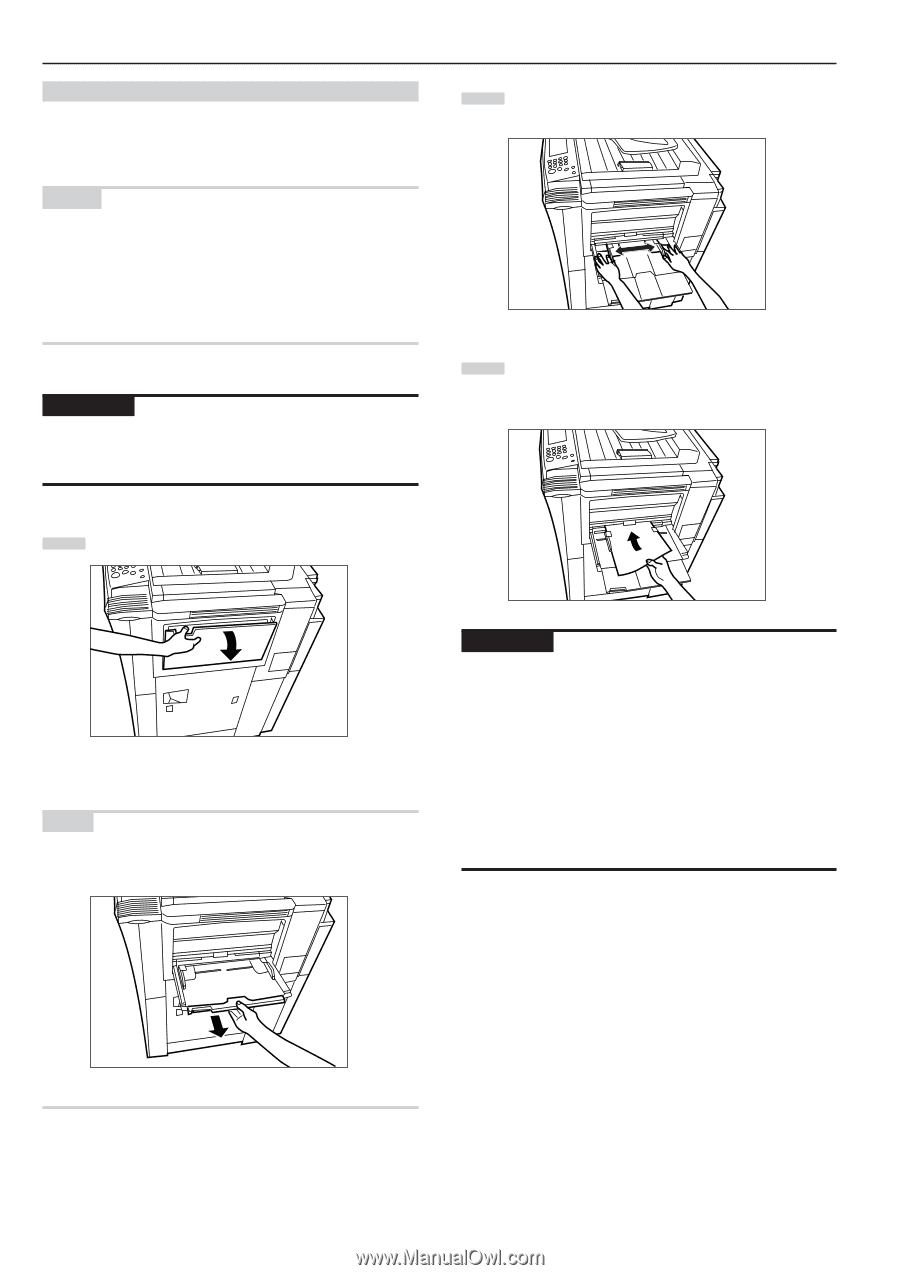
Section 3 PREPARATIONS (4) Setting paper on the multi-bypass tray Standard copy paper as well as special paper can be set on the multibypass tray. When copying onto special paper, be sure to use the multi-bypass tray. NOTES • Up to 100 sheets of standard copy paper or special paper can be set on the multi-bypass tray at one time. • The types of special paper and the number of sheets that can be set on the multi-bypass tray at one time are as follows: OHP transparencies: 25 sheets Thick paper (120 g/m2, 160 g/m2, 200 g/m2 and 110 lbs) : 25 sheets IMPORTANT! When setting special paper such as OHP transparencies and thick paper on the multi-bypass tray, the type of paper must be specified under "(1) Paper size and type" on page 7-63. 2 Adjust the insert guides to fit the width of the paper that is to be set on the multi-bypass tray. 3 Slide the paper all the way in, along the insert guides, as far as it will go. 1 Open the multi-bypass tray. NOTE When copying onto 8 1/2" x 14", 11" x 17", B4 or A3 size paper, be sure to pull out the multi-bypass extension. IMPORTANT! • Make sure there are no folds, etc., in the paper you set onto the multi-bypass tray. Folds, etc., can cause paper jams. • If the paper is curled at all, straighten it out before setting it on the multi-bypass tray. (The amount of paper curl should be under 10 mm for standard paper and 5 mm for postcards.) Depending upon the paper quality, paper might not be fed properly into the multibypass tray. • When you are loading paper onto the multi-bypass tray, make sure that the side to be copied onto is facing upward. (The copy side is the side facing upward when the package is opened.) Especially if the leading edge of the paper is curled at all, straighten it out before setting it on the multi-bypass tray. 3-4
-
 1
1 -
2
-
3
-
4
-
5
-
6
-
7
-
8
-
9
-
10
-
11
-
12
-
13
-
14
-
15
-
16
-
17
-
18
-
 19
19 -
 20
20 -
 21
21 -
 22
22 -
 23
23 -
 24
24 -
 25
25 -
 26
26 -
 27
27 -
 28
28 -
 29
29 -
30
-
31
-
32
-
33
-
34
-
35
-
36
-
37
-
38
-
39
-
40
-
41
-
42
-
43
-
44
-
45
-
46
-
47
-
48
-
49
-
50
-
51
-
52
-
53
-
54
-
55
-
56
-
57
-
58
-
59
-
60
-
61
-
62
-
63
-
64
-
65
-
66
-
67
-
68
-
69
-
70
-
71
-
72
-
73
-
74
-
75
-
76
-
77
-
78
-
79
-
80
-
81
-
82
-
83
-
84
-
85
-
86
-
87
-
88
-
89
-
90
-
91
-
92
-
93
-
94
-
95
-
96
-
97
-
98
-
99
-
100
-
101
-
102
-
103
-
104
-
105
-
106
-
107
-
108
-
109
-
110
-
111
-
112
-
113
-
114
-
115
-
116
-
117
-
118
-
119
-
120
-
121
-
122
-
123
-
124
-
125
-
126
-
127
-
128
-
129
-
130
-
131
-
132
-
133
-
134
-
135
-
136
-
137
-
138
-
139
-
140
-
141
-
142
-
143
-
144
-
145
-
146
-
147
-
148
-
149
-
150
-
151
-
152
-
153
-
154
-
155
-
156
-
157
-
158
-
159
-
160
-
161
-
162
-
163
-
164
-
165
-
166
-
167
-
168
-
169
-
170
-
171
-
172
-
173
-
174
-
175
-
176
-
177
-
178
-
179
-
180
-
181
-
182
-
183
-
184
-
185
-
186
-
187
-
188
-
189
-
190
-
191
-
192
-
193
-
194
-
195
-
196
-
197
-
198
-
199
-
200
-
201
-
202
-
203
-
204
-
205
-
206
-
207
-
208
-
209
-
210
-
211
-
212
-
213
-
214
-
215
-
216
-
217
-
218
-
219
-
220
-
221
-
222
-
223
-
224
-
225
-
226
-
227
-
228
-
229
-
230
-
231
-
232
-
233
-
234
-
235
-
236
-
237
-
238
-
239
-
240
-
241
-
242
-
243
-
244
-
245
-
246
-
247
-
248
-
249
-
250
-
251
-
252
 |
 |