Kyocera KM-5530 KM/Ri 4530/5530 Operation Guide Rev 5F - Page 33
Selecting the image quality, NOTES, Setting the number of copies to be made, Start copying
 |
View all Kyocera KM-5530 manuals
Add to My Manuals
Save this manual to your list of manuals |
Page 33 highlights
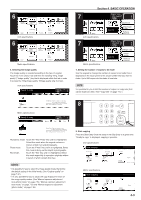
6 2-sided / Separation Orig. image quality Select orig. size Border Erase Cover Basic Proof Copy User choice Inch specifications Function 6 2-sided / Split Image quality Select size orig. Form Overlay Program Erase Mode Cover Mode Basic Test copy User choice Metric specifications Function Form overlay Program 6. Selecting the image quality The image quality is selected according to the type of original. Touch the "User choice" tab and then the resulting "Orig. image quality" ["Image quality"] key that is displayed within that tab in order to access the "Orig.image quality" ["Image quality orig."] screen. Inch specifications Ready to copy. Orig.image quality Register Paper Size Set 11x81/2" Back Close Text Photo Photo Text Metric specifications Ready to copy. Image quality orig. Tex t P h o t o : S e t t h i s m o d e t o c o py o r i g . with mixed text and photo Photo:Add a dimensional effect of photo Tex t : C o py a p e n c i l o r f i n e l i n e. Register Paper size Set Back Close Text+Photo Photo Text Tex t + P h o t o : S e t t h i s m o d e t o c o py original mixed (text & photo). Photo:Add a dimensional effect of photo. Tex t : C o py p e n c i l & f i n e l i n e c l e a r l y. Text+photo mode: Touch the "Text+Photo" key until it is highlighted. Select this mode when the original contains a mixture of both text and photographs. Photo mode: Touch the "Photo" key until it is highlighted. Select this mode to bring out the depth in photographs. Text mode: Touch the "Text" key until it is highlighted. Select this mode especially to reproduce originals written in pencil of which contain thin lines. NOTES • It is possible for you to select the image quality mode that will be the default setting in the initial mode. (See "Original quality" on page 7-41.) • It is also possible for you to adjust the copy exposure in each of the image quality modes. (See "Manual exposure adjustment (text+photo mode)" on page 7-52, "Manual exposure adjustment (text mode)" on page 7-53 and "Manual exposure adjustment (photo mode)" on page 7-54.) Section 4 BASIC OPERATION 7 Paper Size Set 11x81/2" AMS Auto Inch specifications 7 Sort:Off S tO Combine Orig.image quality Reduce /Enlarge Paper Size Set AMS Auto Metric specifications Sort:Off S tO Merge copy Image quality Reduce/ Enlarge 7. Setting the number of copies to be made Use the keypad to change the number of copies to be made that is displayed on the touch panel to the actual number that you want to make. Up to 999 copies can be made at one time. NOTE It is possible for you to limit the number of copies (or copy sets) that can be made at a time. (See "Copy limit" on page 7-57.) 8 8. Start copying Press the [Start] key. Once the lamp in the [Start] key is lit green and "Ready to copy." is displayed, copying is possible. Inch specifications Now copying. Orig. page 11x81/2" 1-sided R top / Rear Count/Set 11x81/2" 1-sided Sort Plain Output Change Exposure Cancel Metric specifications Now copying. Original Count/set 1-sided R top / Rear 1-sided Sort Plain Output Change Exposure Cancel 4-3
-
 1
1 -
2
-
3
-
4
-
5
-
6
-
7
-
8
-
9
-
10
-
11
-
12
-
13
-
14
-
15
-
16
-
17
-
18
-
19
-
20
-
21
-
22
-
23
-
24
-
25
-
26
-
27
-
 28
28 -
 29
29 -
 30
30 -
 31
31 -
 32
32 -
 33
33 -
 34
34 -
 35
35 -
 36
36 -
 37
37 -
 38
38 -
39
-
40
-
41
-
42
-
43
-
44
-
45
-
46
-
47
-
48
-
49
-
50
-
51
-
52
-
53
-
54
-
55
-
56
-
57
-
58
-
59
-
60
-
61
-
62
-
63
-
64
-
65
-
66
-
67
-
68
-
69
-
70
-
71
-
72
-
73
-
74
-
75
-
76
-
77
-
78
-
79
-
80
-
81
-
82
-
83
-
84
-
85
-
86
-
87
-
88
-
89
-
90
-
91
-
92
-
93
-
94
-
95
-
96
-
97
-
98
-
99
-
100
-
101
-
102
-
103
-
104
-
105
-
106
-
107
-
108
-
109
-
110
-
111
-
112
-
113
-
114
-
115
-
116
-
117
-
118
-
119
-
120
-
121
-
122
-
123
-
124
-
125
-
126
-
127
-
128
-
129
-
130
-
131
-
132
-
133
-
134
-
135
-
136
-
137
-
138
-
139
-
140
-
141
-
142
-
143
-
144
-
145
-
146
-
147
-
148
-
149
-
150
-
151
-
152
-
153
-
154
-
155
-
156
-
157
-
158
-
159
-
160
-
161
-
162
-
163
-
164
-
165
-
166
-
167
-
168
-
169
-
170
-
171
-
172
-
173
-
174
-
175
-
176
-
177
-
178
-
179
-
180
-
181
-
182
-
183
-
184
-
185
-
186
-
187
-
188
-
189
-
190
-
191
-
192
-
193
-
194
-
195
-
196
-
197
-
198
-
199
-
200
-
201
-
202
-
203
-
204
-
205
-
206
-
207
-
208
-
209
-
210
-
211
-
212
-
213
-
214
-
215
-
216
-
217
-
218
-
219
-
220
-
221
-
222
-
223
-
224
-
225
-
226
-
227
-
228
-
229
-
230
-
231
-
232
-
233
-
234
-
235
-
236
-
237
-
238
-
239
-
240
-
241
-
242
-
243
-
244
-
245
-
246
-
247
-
248
-
249
-
250
-
251
-
252
 |
 |
