Samsung SCH-I910 User Manual (user Manual) (ver.f4) (English) - Page 128
Calendar, Appointments and Events, Scheduling an Appointment
 |
UPC - 635753474688
View all Samsung SCH-I910 manuals
Add to My Manuals
Save this manual to your list of manuals |
Page 128 highlights
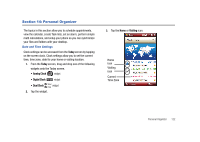
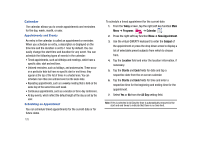
Calendar The calendar allows you to create appointments and reminders for the day, week, month, or year. Appointments and Events An entry in the calendar is called an appointment or reminder. When you schedule an entry, a description is displayed on the time line and the duration is set to 1 hour by default. You can easily change the start time and duration for any event. You can schedule the following types of events in the calendar: • Timed appointments, such as birthdays and meetings, which have a specific date, start and end time. • Untimed reminders, such as holidays, and anniversaries. These occur on a particular date but have no specific start or end times; they appear at the top of the list of times in a shaded area. You can schedule more than one untimed event on the same date. • Repeating appointments, such as a weekly meeting that is held on the same day at the same time each week. • Continuous appointments, such as a vacation or three-day conference. • All day events, which reflect the default length of the day as set by the user. Scheduling an Appointment You can schedule timed appointments for the current date or for future dates. 125 To schedule a timed appointment for the current date: 1. From the Today screen, tap the right soft key function Main Menu ➔ Programs ➔ Calendar . 2. Press the right soft key function Menu ➔ New Appointment. 3. Use the virtual QWERTY keyboard to enter the Subject of the appointment or press the drop down arrow to display a list of selectable preset subjects from which to choose from. 4. Tap the Location field and enter the location information, if necessary. 5. Tap the Starts and Ends fields for date and tap a respective date from the on screen calendar. 6. Tap the Starts and Ends fields for time and enter a respective time for the beginning and ending time for the appointment. 7. Select Yes or No from the All Day setting field. Note: If Yes is selected in All Day the time is automatically removed in the start and end times to indicate that there is no time limit.
-
 1
1 -
2
-
3
-
4
-
5
-
6
-
7
-
8
-
9
-
10
-
11
-
12
-
13
-
14
-
15
-
16
-
17
-
18
-
19
-
20
-
21
-
22
-
23
-
24
-
25
-
26
-
27
-
28
-
29
-
30
-
31
-
32
-
33
-
34
-
35
-
36
-
37
-
38
-
39
-
40
-
41
-
42
-
43
-
44
-
45
-
46
-
47
-
48
-
49
-
50
-
51
-
52
-
53
-
54
-
55
-
56
-
57
-
58
-
59
-
60
-
61
-
62
-
63
-
64
-
65
-
66
-
67
-
68
-
69
-
70
-
71
-
72
-
73
-
74
-
75
-
76
-
77
-
78
-
79
-
80
-
81
-
82
-
83
-
84
-
85
-
86
-
87
-
88
-
89
-
90
-
91
-
92
-
93
-
94
-
95
-
96
-
97
-
98
-
99
-
100
-
101
-
102
-
103
-
104
-
105
-
106
-
107
-
108
-
109
-
110
-
111
-
112
-
113
-
114
-
115
-
116
-
117
-
118
-
119
-
120
-
121
-
122
-
 123
123 -
 124
124 -
 125
125 -
 126
126 -
 127
127 -
 128
128 -
 129
129 -
 130
130 -
 131
131 -
 132
132 -
 133
133 -
134
-
135
-
136
-
137
-
138
-
139
-
140
-
141
-
142
-
143
-
144
-
145
-
146
-
147
-
148
-
149
-
150
-
151
-
152
-
153
-
154
-
155
-
156
-
157
-
158
-
159
-
160
-
161
-
162
-
163
-
164
-
165
-
166
-
167
-
168
-
169
-
170
-
171
-
172
-
173
-
174
-
175
-
176
-
177
-
178
-
179
-
180
-
181
-
182
-
183
-
184
-
185
-
186
-
187
-
188
-
189
-
190
-
191
-
192
-
193
-
194
-
195
-
196
-
197
-
198
-
199
-
200
-
201
-
202
-
203
-
204
-
205
-
206
-
207
-
208
-
209
 |
 |