Samsung SCH-I910 User Manual (user Manual) (ver.f4) (English) - Page 129
Out of Office, Sensitivity
 |
UPC - 635753474688
View all Samsung SCH-I910 manuals
Add to My Manuals
Save this manual to your list of manuals |
Page 129 highlights
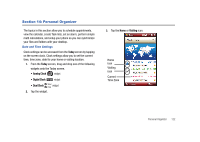
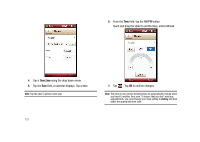
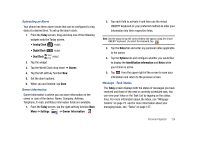
8. Tap the Occurs box to select the frequency of this event's occurrence. 9. Tap the Reminder box and select either None or Remind Me. If the Remind Me option was selected, enter the amount of time before your event which your Omnia should begin reminding you. 10. Tap Categories and select either Business, Holiday, Personal or Seasonal. • You can also add a new category, by tapping the New soft key. Use the keyboard to enter the name and tap the Done soft key when finished. 11. Tap the Attendees field to invite others to the appointment from your contacts. Contacts must have an E-mail address to be added as an attendee. 12. Tap the Status field and select either Free, Tentative, Busy, or Out of Office as your displayed status during the event. 13. Tap the Sensitivity field and select either Normal, Personal, Private, or Confidential to denote the status of this appointment/event. 14. Tap ok to save your new appointment and return to the previous screen. Change the Calendar View 1. From the Today screen, tap the right soft key function Main Menu ➔ Programs ➔ Calendar .The Calendar defaults to the Day view. Press the left soft key function Day to toggle and show other views such as: • Day - Displays the current day with the times of any appointments blocked out. • Week - Displays an entire work week's appointment schedule (Monday thru Friday). • Month - Displays entire month's appointment schedule. • Year - Displays entire year's appointment schedule. Appointment dates are highlighted to indicate events on that day. • Agenda - Displays a list of the current day's appointments. 2. Tap to exit and return to the previous screen. Personal Organizer 126
-
 1
1 -
2
-
3
-
4
-
5
-
6
-
7
-
8
-
9
-
10
-
11
-
12
-
13
-
14
-
15
-
16
-
17
-
18
-
19
-
20
-
21
-
22
-
23
-
24
-
25
-
26
-
27
-
28
-
29
-
30
-
31
-
32
-
33
-
34
-
35
-
36
-
37
-
38
-
39
-
40
-
41
-
42
-
43
-
44
-
45
-
46
-
47
-
48
-
49
-
50
-
51
-
52
-
53
-
54
-
55
-
56
-
57
-
58
-
59
-
60
-
61
-
62
-
63
-
64
-
65
-
66
-
67
-
68
-
69
-
70
-
71
-
72
-
73
-
74
-
75
-
76
-
77
-
78
-
79
-
80
-
81
-
82
-
83
-
84
-
85
-
86
-
87
-
88
-
89
-
90
-
91
-
92
-
93
-
94
-
95
-
96
-
97
-
98
-
99
-
100
-
101
-
102
-
103
-
104
-
105
-
106
-
107
-
108
-
109
-
110
-
111
-
112
-
113
-
114
-
115
-
116
-
117
-
118
-
119
-
120
-
121
-
122
-
123
-
 124
124 -
 125
125 -
 126
126 -
 127
127 -
 128
128 -
 129
129 -
 130
130 -
 131
131 -
 132
132 -
 133
133 -
 134
134 -
135
-
136
-
137
-
138
-
139
-
140
-
141
-
142
-
143
-
144
-
145
-
146
-
147
-
148
-
149
-
150
-
151
-
152
-
153
-
154
-
155
-
156
-
157
-
158
-
159
-
160
-
161
-
162
-
163
-
164
-
165
-
166
-
167
-
168
-
169
-
170
-
171
-
172
-
173
-
174
-
175
-
176
-
177
-
178
-
179
-
180
-
181
-
182
-
183
-
184
-
185
-
186
-
187
-
188
-
189
-
190
-
191
-
192
-
193
-
194
-
195
-
196
-
197
-
198
-
199
-
200
-
201
-
202
-
203
-
204
-
205
-
206
-
207
-
208
-
209
 |
 |