Canon XF605 Instruction Manual - Page 111
Using the RC-V100 Remote Controller, REMOTE B].
 |
View all Canon XF605 manuals
Add to My Manuals
Save this manual to your list of manuals |
Page 111 highlights
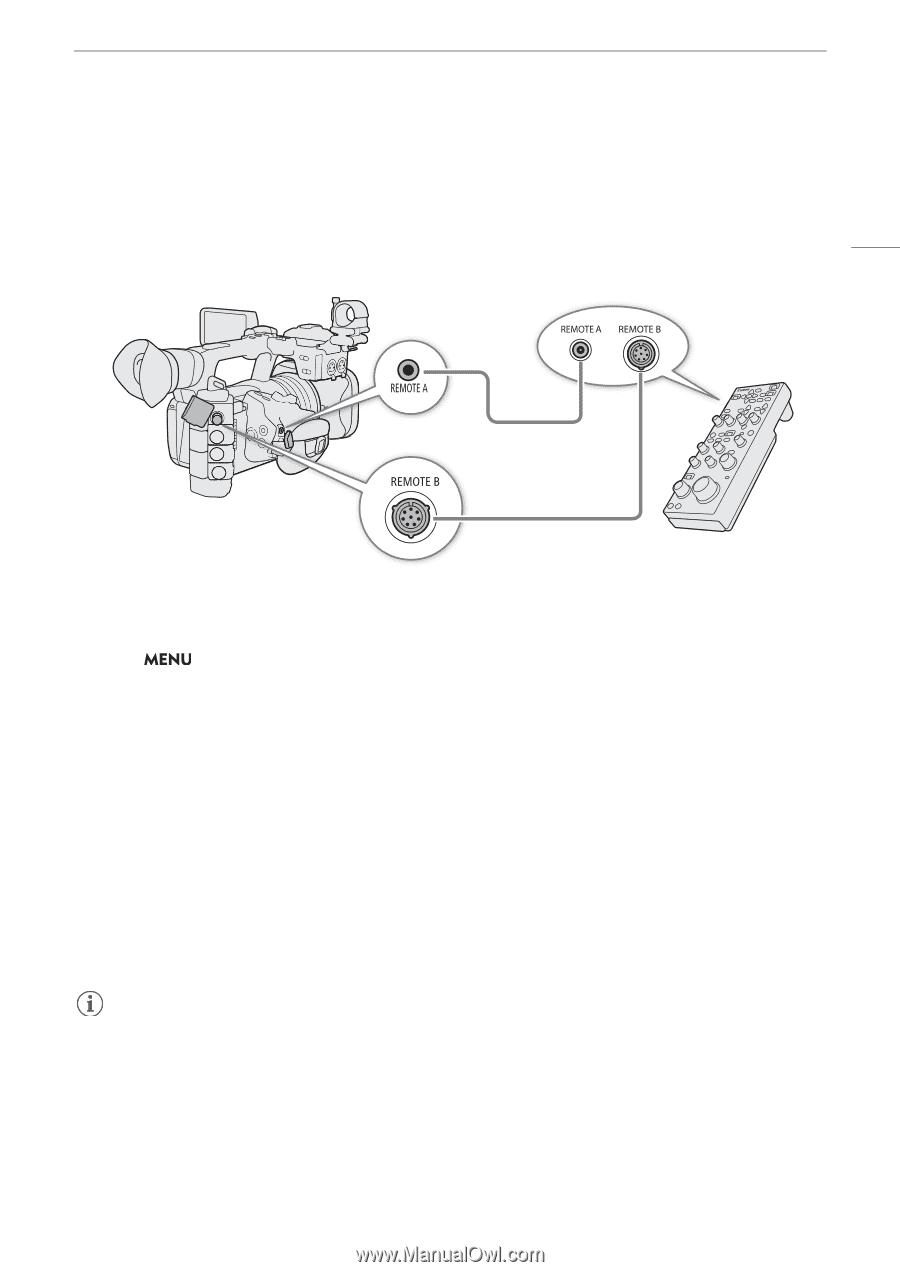
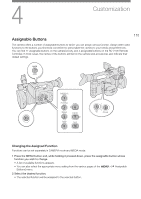
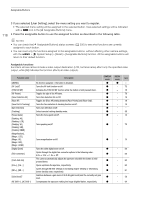
Using the RC-V100 Remote Controller Using the RC-V100 Remote Controller You can connect the RC-V100 Remote Controller to the camera in order to control the camera (including advanced recording functions) from a distance. The remote controller lets you turn the camera on, navigate the menus and remotely control the aperture and shutter speed, change picture-related settings like the knee and sharpness, and more. For details on how to connect and use the remote controller, refer to its instruction manual. 111 Remote cable (supplied with the RC-V100) RR-10 or RR-100 8-pin Remote Cable (optional) 1 Turn off the camera and connect the RC-V100 Remote Controller to the camera. 2 Turn on the camera in CAMERA mode. 3 Select > [B System Setup] > [REMOTE Term.] > [RC-V100 (REMOTE A)] or [RC-V100 (REMOTE B)]. Options [RC-V100 (REMOTE A)]: Select this option to use the optional RC-V100 connected to the camera with the RC-V100's remote cable. [RC-V100 (REMOTE B)]: Select this option to use the RC-V100 connected to an expansion unit with an 8-pin remote cable (all optionals). [Standard]: Select this option to use commercially available remote controls. [Standard + RC-V100]: Select this option to use a commercially available remote control (connected to the REMOTE A terminal) simultaneously with an optional RC-V100 (connected to the REMOTE B terminal). Note that with this connection, you will not be able to turn the camera on/off using the CAMERA POWER button on the RC-V100. NOTES • When the camera is set to full auto mode (A 42), settings related to the aperture, gain, shutter speed and white balance (except for [R Gain] and [B Gain] in the custom picture's [White Balance] settings*) cannot be changed using the remote controller. * When infrared recording is activated, even the WHITE BALANCE R and B dials will have no effect on the camera.
-
 1
1 -
2
-
3
-
4
-
5
-
6
-
7
-
8
-
9
-
10
-
11
-
12
-
13
-
14
-
15
-
16
-
17
-
18
-
19
-
20
-
21
-
22
-
23
-
24
-
25
-
26
-
27
-
28
-
29
-
30
-
31
-
32
-
33
-
34
-
35
-
36
-
37
-
38
-
39
-
40
-
41
-
42
-
43
-
44
-
45
-
46
-
47
-
48
-
49
-
50
-
51
-
52
-
53
-
54
-
55
-
56
-
57
-
58
-
59
-
60
-
61
-
62
-
63
-
64
-
65
-
66
-
67
-
68
-
69
-
70
-
71
-
72
-
73
-
74
-
75
-
76
-
77
-
78
-
79
-
80
-
81
-
82
-
83
-
84
-
85
-
86
-
87
-
88
-
89
-
90
-
91
-
92
-
93
-
94
-
95
-
96
-
97
-
98
-
99
-
100
-
101
-
102
-
103
-
104
-
105
-
 106
106 -
 107
107 -
 108
108 -
 109
109 -
 110
110 -
 111
111 -
 112
112 -
 113
113 -
 114
114 -
 115
115 -
 116
116 -
117
-
118
-
119
-
120
-
121
-
122
-
123
-
124
-
125
-
126
-
127
-
128
-
129
-
130
-
131
-
132
-
133
-
134
-
135
-
136
-
137
-
138
-
139
-
140
-
141
-
142
-
143
-
144
-
145
-
146
-
147
-
148
-
149
-
150
-
151
-
152
-
153
-
154
-
155
-
156
-
157
-
158
-
159
-
160
-
161
-
162
-
163
-
164
-
165
-
166
-
167
-
168
-
169
-
170
-
171
-
172
-
173
-
174
-
175
-
176
-
177
-
178
-
179
-
180
-
181
-
182
-
183
-
184
-
185
-
186
-
187
-
188
-
189
-
190
-
191
-
192
-
193
-
194
-
195
-
196
-
197
-
198
-
199
-
200
-
201
-
202
-
203
-
204
-
205
-
206
-
207
-
208
-
209
-
210
-
211
-
212
-
213
-
214
-
215
-
216
-
217
-
218
-
219
-
220
-
221
-
222
-
223
-
224
-
225
-
226
-
227
-
228
-
229
-
230
-
231
-
232
-
233
-
234
-
235
-
236
-
237
-
238
 |
 |